[Easy & Quick] Handmade Halloween Decorations — Part 2

In October, there’s the Halloween event that kids look forward to.
Many families, as well as preschools and schools, hold parties, don’t they?
Costumes, treats, and games are the main attractions at these parties, but decorations are another must-have!
With decorations versus without, the atmosphere of the venue is totally different, right?
In this article, we’ll introduce useful Halloween decoration ideas and DIY decor items you can make yourself.
They’re all easy to make, so be sure to try them and use them to decorate your venue!
- Halloween in childcare gets exciting! Dance ideas for moving and having fun
- Recommended for daycare activities! A Halloween song you can sing and play with
- [Easy Halloween Vibes] Perfect BGM and Theme Songs for a Halloween Party
- A Halloween song for children. A fun Halloween song.
- Cute Halloween Song Collection! A carefully selected lineup of adorable tracks that both kids and adults can enjoy
- Songs that amp up Halloween: a roundup of perfect tracks for party BGM!
- Halloween songs for seniors to enjoy at events: from nostalgic classics to exciting new favorites
- Recommended children's songs and hand play songs for October! Music time in childcare that feels like autumn.
- [From Kids to Adults] Dance Songs You’ll Want to Groove to at a Halloween Party
- Heisei-Era Halloween Songs | A roundup of classic tracks to elevate the party mood!
- Music you’ll want to play at a Halloween party: perfect for BGM or dancing!
- Halloween songs released in the Reiwa era | Perfect as party BGM too!
- [For Seniors] Have Fun Moving with Halloween Exercises! Introducing Songs You Can Dance To
[Simple & Easy] Handmade Halloween Decorations [Part 2] (1–10)
Halloween mascot
Let’s make some Halloween mascots to brighten up your room! They’re super economical because you can use a toilet paper roll that everyone has at home.
First, cut the toilet paper roll in half and wrap it with origami or construction paper.
Next, pinch the top closed and add a face—like a bat, ghost, or black cat—and you’re done! They stand on their own, so even just one in your room or entryway will boost the Halloween mood.
It’s also a lovely craft to make together with kids.
Fluffy Pumpkin Objet

This is a pumpkin-shaped ornament made by gently shaping yarn.
First, use a bundle of twine layered over wooden chopsticks as the core, then wrap yarn around it.
Once you’ve wrapped it thickly, use the layered twine to secure the yarn and refine the overall shape.
Finally, remove the chopsticks and shape it firmly into a pumpkin to finish.
Since the entire piece is made from yarn, it ends up looking softer than versions that keep a rigid core, which is a key point.
Try creating your own unique ornament by choosing different colors and adding parts as you like.
Natural wreath

Let’s make a wreath with a vibrant, soft look using green yarn.
Using a vine-woven wreath as the base makes it easy to craft, which is another key point.
Wrap the green yarn around the base, and the more thoroughly you cover the base so it doesn’t show, the more beautiful the result will be.
Once you finish wrapping, attach Halloween-themed decorations to complete it—this is where you can add your own originality.
It’s also recommended to incorporate different yarns as you wrap to create a colorful, customized base.
[Simple & Easy] Handmade Halloween Decorations — Part 2 (11–20)
Halloween ornament

These are small ornaments characterized by their softness, made using yarn and dish sponges.
Roll a dish sponge into a ball with rubber bands, then wrap yarn around it to form a sphere.
Try to wrap the yarn so the sponge doesn’t show; if it does peek through, using a similar color is recommended so it doesn’t look out of place.
Once you’ve finished wrapping, attach facial features and other parts to complete it.
Add originality by getting creative with your choice of motifs and the shapes of the parts.
Giant Spiderweb

It’s about crossing tightly stretched white yarn to create a large spider web.
It’s recommended to make it on large flat surfaces like doors or walls.
A spider web alone can create a spooky Halloween vibe, and it also works well as a base for other decorations.
While spider webs are often associated with white, it might be fun to change the yarn color to match the decorations you attach.
This craft should be useful for creating a cohesive atmosphere when decorating an entire room.
Simple Halloween Art

Here’s a Halloween craft idea that uses a clear jar and yarn.
Fill the jar to about three-fifths with water, then place a tree branch inside.
Choose something with lots of offshoots, like burning bush (Euonymus alatus).
Next, attach yarn to the stem end of an apple and hang it from the branch.
Arrange fallen leaves and apples beneath the branch to finish.
You can also swap the apples for pumpkins or change the yarn color for variety.
There are no complicated steps—give this easy Halloween craft with yarn a try!
Halloween decorations made with paper chains
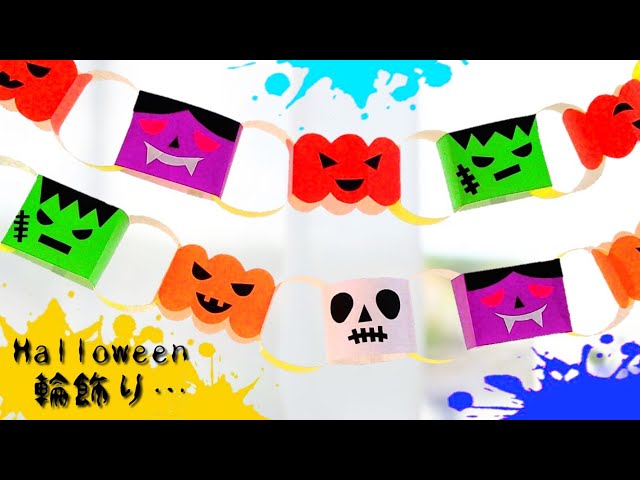
Here’s how to make a Halloween paper chain.
Prepare origami paper sized 3.8 cm x 15 cm and 2 cm x 15 cm, felt-tip pens, tape, and scissors.
First, use the 3.8 cm x 15 cm paper to make a pumpkin, Frankenstein, Dracula, and a skull.
For the pumpkin: accordion-fold the paper, round off the corners with scissors, draw the face, and it’s done.
Next, for Frankenstein: first draw the face in the center of the paper, make a loop and secure it with tape, then fold both sides of the face to form a rectangle—done.
Make Dracula the same way.
For the skull: draw the face on the paper, don’t fold it; just roll it into a loop and secure with tape—done.
Finally, connect them using the 2 cm x 15 cm strips to complete your Halloween paper chain!
In conclusion
We introduced some ideas for Halloween decorations. Did you find any ideas to brighten up your venue? There are all sorts of options—from items you can place on surfaces to wall decor and hanging decorations—so find the ones that match the party you have in mind, make them, and have fun decorating!