Autumn craft ideas that will captivate 2-year-olds! Have fun making them and enjoy the fall to the fullest


Autumn has arrived, and it’s a season that even two-year-olds can get excited about.There are plenty of creative projects waiting that let you enjoy the unique nature and traditions of autumn—like fallen leaves, acorns, and moon-viewing!Here are some autumn craft ideas you can enjoy together with two-year-olds.Each project uses simple steps and seasonal materials to nurture children’s imagination.Why not enjoy autumn crafting with children using fallen leaves found on a walk or warm, cozy yarn?Because we treat what children make as works of art, we refer to them as “seisaku” (productions/works) in the text.
- [Childcare] For 2-year-olds! November craft activity ideas
- September crafts for 2-year-olds! A collection of make-and-play ideas to enjoy autumn
- Craft ideas for 2-year-olds! A cute collection of creations to enjoy October events
- [Childcare] Autumn craft ideas
- [Age 2] Have fun with Halloween crafts! A collection of ideas perfect for October
- Even 1-year-olds will be captivated! A collection of craft ideas to enjoy the art-filled autumn
- [October] Craft ideas for fall you can use in childcare
- [For 2-year-olds] A collection of craft ideas useful for winter childcare
- A collection of fall origami ideas recommended for 2-year-olds! Make them easily and enjoy autumn!
- Toddler-Approved Halloween Crafts: Ideas That Captivate 2-Year-Olds
- Preschool: Autumn-Themed Craft Ideas Recommended for November
- Grape craft ideas to enjoy in childcare! Have fun making autumn fruits
- [Crafts for 3-Year-Olds] A Collection of Fun Ideas for Autumn! Let's Incorporate Seasonal Motifs
Fall craft ideas that fascinate 2-year-olds! Have fun making and enjoy autumn to the fullest (21–30)
Make it with handprints! Wobbly bagworm
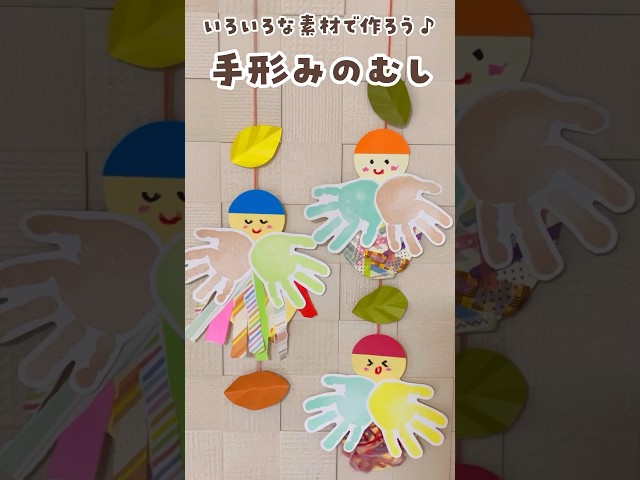
Here’s a craft idea for making bagworms using children’s handprints and footprints! First, create the bagworm’s body out of colored construction paper.
Next, take origami paper in your favorite colors and tear it into long, thin strips.
Paste the strips onto the body with glue, and use the child’s handprints to make a cute outfit.
Draw the face, attach a piece of yarn to hang it, and you’re done! You can also decorate with yarn instead of or in addition to origami paper.
Making lots in different colors and displaying them looks super cute, so it’s highly recommended.
Be sure to have fun tearing and pasting together with the kids!
Super easy! Fox face

This is a way to fold a fox face in just five folds.
First, fold the paper in half along the diagonal to make a triangle.
Next, fold so that the two 45-degree corners meet, creating a crease.
Then, fold so that the 90-degree corner aligns with the point where the crease intersects the base.
Finally, fold each of the 45-degree corners upward, and you’re done.
Turn it face up and draw the fox’s face.
With no complicated steps and only a few folds, this is an easy origami project to try.
Grape craft for ages 1 and up
@hoikushisatomi From around age 1: Just roll and pop it in! Simple fine-motor play craftNursery teacher / Childcare workerKids will love it#NurseryTeacherDailyLifework#OuchiMonteTranslation#grapes
♬ Whistling you want to go for a walk – Ken Nakagawa
A cute bunch of grapes that’s finished by crumpling tissue paper, putting it into a bag, and shaping it.
Change the color and you’ve got muscat grapes, too.
Cut grape leaves out of construction paper and stick them on.
Using tissue paper in the same color family with different shades will make it look even more vibrant.
Once it’s done, you can display it as is to enjoy an autumn mood, or stick it on the wall and have a grape-picking game.
Since the tissue paper gets packed into the bag, it doesn’t need to be perfectly crumpled.
Let the kids enjoy the feel of the tissue paper while they work on it.
Easy grapes—just put them in a plastic bag

Let’s make grapes by crumpling tissue paper—an activity kids can enjoy from around age one.
Prepare a clear plastic bag, tissue paper, and a pipe cleaner.
Shape the clear plastic bag into a triangle, then crumple the tissue paper into small balls to make grape berries.
Put the berries into the bag and twist the opening closed with the pipe cleaner.
Once your 3D grape cluster is done, add a leaf made from a handprint and create a wrinkled pattern on it to finish.
This is a craft that children around one year old, who love squeezing and crumpling, can enjoy.
Give it a try!
Grapes made with tissue paper
Autumn is full of delicious foods, and it’s especially the season when many fruits are harvested.
How about making grapes, a seasonal fruit you can enjoy in autumn? Roll purple tissue paper into balls to create the many round grape berries in a cluster, and have the children stamp their handprints in green on construction paper, cut them out, and use them as grape leaves.
Glue the grape berries onto a backing sheet of the same color.
The number of berries and how they are arranged will change the size and appearance, giving each piece its own personality.
Tissue paper mushroom
Let’s make colorful and cute mushrooms using tissue paper! First, cut out a large mushroom stem (stipe) from construction paper.
Depending on the children’s ages, the teacher can prepare these in advance.
Next, have the children choose their favorite colors of tissue paper and crumple them into small balls.
Once they’ve made enough, place the balls on a sheet of plastic wrap and wrap them up while shaping them into a mushroom cap.
When it’s done, attach it to the construction paper stem to finish! If you like, draw a face on the stem for extra fun.
Torn-paper collage mushroom
How about adding patterns to a mushroom cap using torn-paper collage? First, cut out the mushroom cap and stem from construction paper.
If the children are old enough to use scissors, let them do it themselves; if not, the teacher should prepare the pieces in advance.
Next, tear colored origami paper into small pieces.
Then randomly glue the pieces onto the mushroom cap to decorate it.
Once you’ve covered it enough, attach the cap and stem to complete the mushroom.
If you like, draw a cute face on the stem with crayons or pens.