For Seniors: Simple and Lovely Crafts – A Collection of Take-Home Project Ideas for Day Service


If you can take home the pieces made at day service centers and other senior facilities, you can display or use them at home, adding a little extra enjoyment to everyday life.
Many older adults also enjoy focusing on the act of making things.
So this time, we’ve gathered ideas for projects you can take home.
We’ve included practical items you can use at home, like small organizers and photo frames, as well as pieces you can simply display and enjoy!
The materials are easy to prepare, and we also make use of recyclables like empty jars.
Crafting involves using your fingertips, which can stimulate the brain and help prevent cognitive decline, while also providing a sense of accomplishment and fulfillment from creating something.
Please have fun making these projects!
- [For Seniors] Simple Handicrafts Recommended for Finger Exercise
- [For Seniors] Introducing Fun Crafts Made with Plastic Bottle Caps
- [For Seniors] Practical Crafts to Make in Day-Service Recreation: Idea Roundup
- [For Seniors] Recommended for day services! Simple and cute small craft ideas
- [For Seniors] Crafts to Enjoy with Yakult Containers: Ideas for Ornaments and Toys
- [For Seniors] Perfect for winter events! Easy craft ideas
- [For Seniors] Small craft ideas: for yourself and as gifts!
- [For Senior Daycare Centers] Ideas for Summer Take-Home Crafts
- [Day Service] Handmade Autumn Crafts: Take-Home Project Ideas
- [For Seniors] Easy and Fun! Tsumami Zaiku Craft Ideas
- Simple, Recommended Autumn Crafts for Seniors
- [Day Service] Spring Take-Home Crafts: Ideas to Warmly Brighten Your Room
- [For Seniors] Have Fun Making Things Based on Today’s Mood! Today’s Recommended Craft
[For Seniors] Simple and Lovely Crafts: Day Service Take-Home Project Ideas (71–80)
Flower leaning ornament
@aikoukai Creating a piece together with a 92-year-old client 🎵 It’s a cute flower stand display♪Caregiving#WelfarefacilityCreating WorksOccupational therapy
♬ Cute heartwarming BGM(1490583) – sanusagi
This is a vibrant, propped-up decoration with flowers arranged to pop out of the frame.
Cut cardboard to create two frames and use them with a sheet of origami paper sandwiched in between as the base.
For the flowers placed there, cut origami paper into long strips, shape them into petals, and combine them.
Make them in various sizes and colors to brighten up the whole piece.
It’s recommended to finish the frame in a color that complements the flowers, and the key is to emphasize the three-dimensional look of the blossoms.
kimono charm
@kipara_craft Kimono amulets you can make without sewing ✨ The method is almost the same as the “Kimono Pochi-bukuro” I posted before 👘💓 Unlike the amulets you buy at a shrine, these might not carry blessings from the deities 😂, but the feeling of “Mom made this while thinking of me” will surely come through… 👦🏻👧🏻 ✔ Starting preschool/advancing a grade ✔ Recitals ✔ Moving house Perfect for the start of something new or little milestones ✨ Materials ▶ Precut fabric: made with 10 cm × 10 cm in the video ▶ Chiffon ribbon / Seria JAN: 4542804132472 ▶ Ribbon embellishment / Seria JAN: 4900662746253 ▶ Adhesive felt stickers ▶ Clear file folder ▶ Ball chain or strap ▶ Double-sided tape (fabric tape if possible👌) ▶ Glue or hot glue gun (for attaching parts) How to make 1) Fold two edges by 2 cm. 2) On the edges folded in step 1, stick 1 cm-wide white felt on the outside. 3) Fold back so the white felt shows. 4) Turn over and place a backing made from the corner of a clear file in the center. 5) Overlap and fold the top and bottom, slightly offset from the center. 6) Fold both sides left → right. 7) Wrap a ribbon as an obi and decorate 🎀 8) Punch a hole, thread the ball chain, and you’re done 👏 Save this and give it a try 🥰💕︎#StayHomeTime#100-yen shop DIY#AffordableSeriaHandmade
♬ Flowers – SoundAudio
Prepare a square piece of fabric and fold up two adjacent edges by 2 cm.
Then attach a collar-like self-adhesive felt to the lower 1 cm and double-sided tape to the upper 1 cm, and fold it back so that the self-adhesive felt is slightly visible.
This part will be the overlap of the kimono.
Turn the fabric over so that the overlapped section is on top, and place a clear file with your wish paper inserted in the center.
First fold the top and bottom corners, then fold the left and right corners starting from the left.
Once everything is securely adhered, attach a ribbon obi at the center and on the back.
Finally, decorate with your favorite parts and add a ball chain to finish!
Easter decorations

An Easter decoration featuring a basket you can make without weaving, filled with motifs made from tissue paper, origami, and yarn.
The soft texture of the tissue paper brings out a springlike feel and gives it a gentle look.
The steps are simple, making it easy to incorporate into activities for seniors or crafts for children.
The overall impression changes greatly depending on the color choices and combination of decorations, which is part of the charm as each person’s individuality shines through.
Once finished, it can be displayed as is, letting you enjoy the season with ease.
It felt like the perfect spring idea that’s enjoyable both to make and to display.
Cup Ohina (Cup Hina Dolls)

Let’s make Hina dolls perfect for spring, a season that brightens up any room.
Wrap cotton with tissue paper, shape it as if wrapping with fabric, place it inside a cupcake liner, and create the doll’s body.
Then use glue to attach the layered collar, a round sticker for the face, black hair, eyes, and a hair ornament.
For the Emperor doll’s kimono, using a different fabric color from the Empress doll adds extra splendor.
Placing the finished piece under a clear container lid helps you store it safely and bring it home without getting it dirty—highly recommended.
It’s also great for fine motor practice, so give it a try!
Clover and a Vase

These cute creations are perfect for the colorful spring season.
Prepare origami in your favorite colors and make a four-leaf clover and a vase.
The four-leaf clover is made from a single sheet of origami paper.
If you make several in different sizes and colors, they’ll give a bright, festive impression.
The leaves have a three-dimensional finish, so they look striking.
For the clover’s stem, roll a strip of origami paper thinly, flatten it, and attach it.
Place the clovers in an origami vase shaped with a bit of volume, and display them at home.
If you like, using puffy stickers to create little insects and sticking them on is also recommended.
pencil case
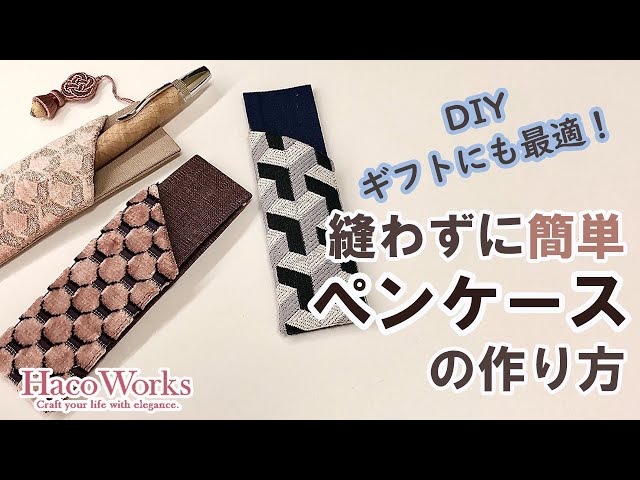
Introducing a pen case you can make just by gluing! Attach cardboard to the base fabric, then layer and adhere the pocket fabric on top.
The pocket has a slanted opening for a striking look.
Add a small decoration for a nice accent—perfect for gifts.
Basically, you just cut the fabric with scissors and glue it together, so you can complete a fabric accessory with a fun, craft-like feel.
Use solid fabric for the base and patterned fabric for the pocket to create a simple yet stylish piece.
Paper Bag Remake Pouch

An idea for transforming your favorite paper shopping bag you had tucked away into a practical pouch.
By arranging it into a vanity-style shape, it achieves both storage capacity and stability.
It’s impressively sturdy—hard to believe it can be made without sewing.
You can enjoy the design inside and out, so it’s a delight right up to the moment you open it.
It’s also great for organizing cosmetics, stationery, and small odds and ends.
Since it makes use of paper bags you already have on hand, it’s an easy remake project that we highly recommend trying.