[For Seniors] Lovely Crafts Made with Tissue Paper: Ideas Collection


Tissue paper, widely known as a craft material for making paper flowers.
Its wide range of colors and ease of handling make it especially appealing.
These days, you can even find it at 100-yen shops, making it more accessible and widely used for crafts, wall decorations, and more.
In this article, we’ll introduce craft ideas using tissue paper.
Enjoy its soft, fluffy texture as you crumple it, cut it with scissors, and—beyond making flowers—try creating items like translucent lampshades.
Let’s make all kinds of things with tissue paper and incorporate them as seasonal craft ideas!
- [For Seniors] Add Color to Your Room: A Collection of Flower Craft Ideas
- [For Seniors] Perfect Finger Exercises! Seasonal Flower Origami
- [For Seniors] Fun to Make! Paper Quilling Ideas
- [For Seniors] Easy and Fun! Tsumami Zaiku Craft Ideas
- For seniors: Year-round ideas for wall decorations
- [For Seniors] Easy Construction Paper Crafts Activity
- [Easy!] Flower paper-cut art you can make using just scissors
- For Seniors: Simple and Lovely Crafts – A Collection of Take-Home Project Ideas for Day Service
- Simple, Recommended Autumn Crafts for Seniors
- [For Seniors] Recycle Everyday Materials: A Collection of Flyer Craft Ideas
- [For Seniors] Easy Origami Recommended for Winter
- [For Seniors] Craft Ideas Using Paper Plates
- [Day Service] Spring Take-Home Crafts: Ideas to Warmly Brighten Your Room
[For Seniors] Lovely Crafts Made with Tissue Paper: Ideas 21–30
Tower of Light Mini Lampshade
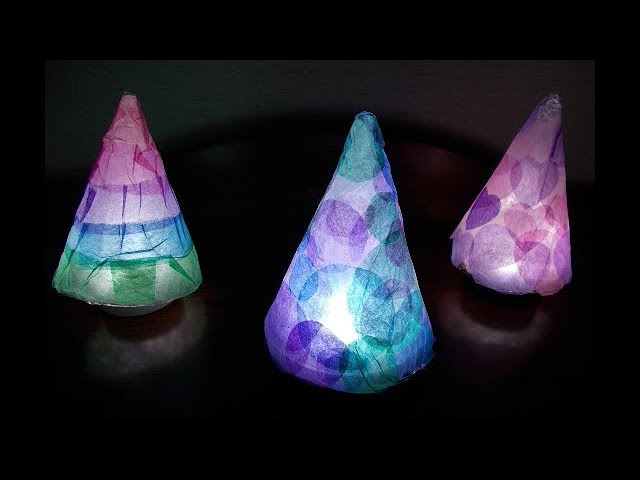
If you want to handcraft a romantic item that soothes the heart, this is a must-see.
Here’s how to make a mini lampshade using tissue paper.
First, stack several sheets of tissue paper and cut them into your desired shapes.
Next, assemble a party cone hat with the white side facing outward, then wrap it in plastic wrap.
After that, use diluted liquid glue to attach the cut tissue paper pieces.
Once the glue has dried, remove the plastic wrap from the cone hat.
Finally, place an LED light in the center, and the patterns will be projected—your lovely lampshade is complete.
It’s very easy to make, so give it a try!
Christmas tree

How about making a fluffy, stylish Christmas tree using tissue paper? First, cut tissue paper in your favorite color into a rectangular piece about one-quarter the original size, then fold it in half lengthwise to make it long and narrow.
Make lots of slits along the folded edge.
After cutting the slits, open it up once, fold it back in the opposite direction of the original crease, and glue it in place.
Make several of these, then take a cone-shaped tree base made from construction paper and wrap and glue the tissue paper around it in tiers.
Finally, decorate with beads and stickers, and you’re done.
You’ll end up with a very whimsical, cute tree, so give it a try!
Blue poinsettia

Let’s make a blue poinsettia with tissue paper that has a charming, fluffy petal look.
First, stack two sheets of blue tissue paper, accordion-fold them, and then fold the strip in half.
Next, cut off all the corners on the sides that are mountain folds at a diagonal, open it up, and staple along the center crease.
Make another one the same way using light blue tissue paper.
Once you have two pieces, gently fluff the tissue to give it volume, layer the blue tissue paper on top of the light blue one, and glue them together.
Finally, glue a few white polystyrene beads in the center of the flower to finish.
daffodil

Let’s make a daffodil using soft tissue paper.
Fold a white tissue paper sheet in half, then place an orange tissue paper sheet half its size on top.
Next, accordion-fold the stack into six sections, fold it in half, then cut the ends at a slant and staple the center.
After stapling, gently spread out the petals.
Once spread, separate the white and orange layers.
The orange section will be the flower’s center, so trim its edge straight.
For the leaves, cut colored construction paper into thin strips, wrap them around a pencil, and round off the tips.
Hydrangea wreath

Let’s express the beautifully blended colors of hydrangeas using tissue paper! Here’s a hydrangea wreath idea.
When you think of hydrangeas, you picture that distinctive round shape made up of many small blossoms, right? This time, we’ll make tiny flowers with tissue paper and arrange them into a wreath.
You’ll need a foam wreath form, tissue paper, cardstock, scissors, glue, toothpicks, and rhinestone stickers.
Use the toothpicks to help insert the tissue paper hydrangea flowers into the foam.
For the finishing touch, stick rhinestone stickers in the center of each flower to create an elegant look!
Pine, bamboo, and plum made from tissue paper

These are decorations of pine, bamboo, and plum made with tissue paper.
Each piece is simple, but arranged together like this, they make the wall look very festive.
The parts aren’t too difficult to make, either.
For the pine, fold the tissue paper in an accordion, fold it in half, cut off two corners, tie the crease with a pipe cleaner to form the branch, then make slits and fan it open to finish.
For the bamboo, fold the tissue paper into a rectangle, fold the left edge up to meet the top edge twice, unfold one layer back, twist the remaining right section, attach it to the folded part, and shape it.
This makes one bamboo leaf; make three and attach them together.
For the plum blossoms, accordion-fold the tissue paper, round both ends, and cut the center (along the folded side) into a triangle.
Then bundle it together with a wire along with the stamen piece made by cutting slits with shredding scissors, and peel apart the tissue layers one by one to shape the plum blossom.
collage (paper collage; cut-and-paste picture)

Mount Fuji is so majestic that just looking at it can move you.
This time, let’s make a wall mural of Mount Fuji using tissue paper.
By using two colors—blue and light blue—you can beautifully express the contrast of Mount Fuji.
When sticking the pieces onto colored paper, the key is to dilute the liquid glue.
That way, you can achieve a translucent look for Mount Fuji.
It will look great as interior decor not only in a room but also displayed in your home’s entryway.
Since Mount Fuji is considered lucky, it’s sure to be well received.