Feelings That Reach the Heart! Handmade Gift Ideas to Give at Graduation


On the special day of graduation, you may want to express your gratitude to someone important to you.
Many people probably feel the same way.
Store-bought gifts are wonderful, but handmade gifts have a warmth and a one-of-a-kind specialness that you can’t get from something off the shelf.
Plus, depending on how you make them, the ideas are endless.
In this article, we’ll introduce handmade gift ideas that are perfect for graduation.
We’ve included a wide range—from easy projects you can try casually to those that take time and care—so please use them as inspiration!
- Handmade Gifts for Graduates: A Collection of Heartfelt Ideas
- A gift to give your teacher at graduation that conveys your gratitude
- A heartwarming surprise idea that will excite everyone at an elementary school
- [Graduation Commemorative Gifts] Handmade Presents That Kids Will Love! A Collection of Easy-to-Make Ideas
- Thank you, Teacher: A Song of Gratitude for Teachers and Mentors — An Emotional Farewell Song for the Journey Ahead
- At the End of Preschool Practicum: Simple and Cute Handmade Gifts
- [For Elementary School Students] Recommended Recreational Activities to Enjoy at a Farewell Party
- [Gratitude, Encouragement, Memories] Tear-Jerking Graduation Songs You Can’t Listen to Without Crying [2026]
- Heartwarming surprise ideas that will excite everyone at school
- [For Middle School Students] A Collection of Recreation Ideas to Liven Up Farewell Parties
- [For Graduates] Graduation Songs and Cheer Anthems to Convey Gratitude and Support
- Let's make a handmade graduation certificate! A collection of memorable design and crafting ideas
- Songs to use in the memory movie. Let’s look back on our memories before graduation!
Feelings that reach the heart! Handmade gift ideas to give at graduation (21–30)
Graduation Certificate Made with Resin
@arthega.resin ✨ Un pedacito de este gran logro hecho eterno en resina 💜 #graduacion2025#regalosgraduacion#resinapersonalizada#hechoamanoconamor#recuerdoespecial#resinaespaña#hechoencasa#memoryinresin#arthegaresin
♬ sonido original – ARTHEGA || Diseño en resina
A resin graduation certificate also makes a great interior decoration.
Pour resin into a mold and use letter stickers or graduation-themed illustrations to create the certificate.
Once the design is finished, cure it with a UV or LED light to complete it.
Since resin is basically transparent, add glitter or gold leaf if you want a more festive certificate.
Decorating the edges with bijou parts is also recommended.
Since it’s a special piece, try creating original wording, too.
desk calendar

A calendar that can be used throughout the year makes a great gift as a keepsake.
In this idea, you cut thick paper into tag shapes and decorate them by attaching origami paper and date sheets.
You can choose seasonal patterns for the design, but using memorable photos would also be lovely.
Create a front and back cover, gather everything with a binder ring, and finish it as a calendar.
Punch a hole at the bottom of the back cover and attach a string with a paper clip.
By flipping the front cover to the back and securing it with the paper clip, the calendar can stand on its own.
Perfume gift

A perfume gift that’s done in no time—just place your favorite items inside and decorate with ribbons or stickers! It’s a great idea when you’re short on time but need to prepare lots of graduation presents.
Look for perfume-shaped gift boxes at 100-yen shops or online.
You can put anything inside—sweets, small accessories, artificial flowers, you name it! Just note that the box is transparent, so choose items with bright, festive colors.
It’s also fun to vary the ribbon colors and the contents a little for each one.
hair accessory

At graduation ceremonies, some people wear hakama, and at high schools with more relaxed dress codes, they might do a bit of hair styling or dress up.
To make such a special ceremony even more special, why not try making a hair accessory? You can make one using materials available at craft stores or 100-yen shops.
It doesn’t take much preparation, so it’s easy to try.
It’s also recommended to make hair accessories for each other with close friends.
Spend your special day with a one-of-a-kind accessory found nowhere else in the world.
snow globe

It’s an ornament that feels like it traps a beautiful scene of snow gently drifting down inside the narrow space of a jar.
You can easily make a snow globe by filling the jar with a mixture of water and liquid starch (or laundry glue) and adding glitter.
Before pouring in the liquid, you attach whatever you want to showcase to the bottom of the jar, and choosing and decorating that focal point is important.
You could place a character everyone recognizes and arrange the scene around it, or it might be fun to use a memorable photo related to graduation.
Stamping
A simple, easy-to-understand, and easy-to-try technique! Stamping refers to a method where you apply ink such as paint to a stamp (a mold) and press it onto paper, fabric, and so on to transfer the pattern.
You can also use familiar materials for the molds, so it seems you can create interesting works by using recycled items like plastic bottle caps or cardboard, cross-sections of vegetables, or uniquely shaped objects.
Also, the amount of water appears to be a key point, so it’s best to adjust it as you work.
string
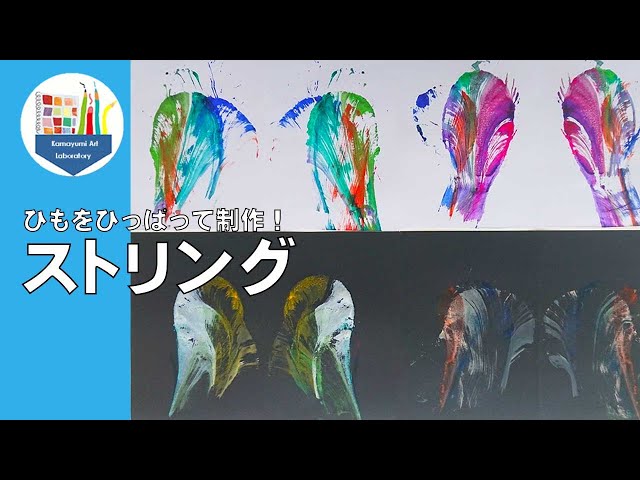
A piece made with the string-pulling technique—fun to make as well—would make a great graduation project keepsake.
Apply several colors of your favorite paint directly onto a hemp cord.
Use a water-dampened brush to spread the paint.
Place the cord between a sheet of drawing paper that has been folded to make a crease, and hold it firmly with one hand.
With your other hand, pull the cord out from between the paper to create a pattern.
The design changes depending on the colors you use and how you pull the cord.
The fact that no two pieces are the same is one of this project’s charms.
Once it’s finished, you can paste in memorable photos or write a message.
Besides a graduation project, it also works great as a card.