Handmade Gifts for Graduates: A Collection of Heartfelt Ideas


Are you thinking of giving a heartfelt, handmade gift for the special milestone of graduation? In this article, we’ll share handmade gift ideas perfect for someone important who’s about to graduate! The beauty of handmade gifts is that they can express gratitude in ways store-bought items can’t—whether it’s for a friend or a mentor who has supported you.
We’ve picked a wide range of ideas, from easy projects for beginners to creations you can take your time crafting.
Make the graduation unforgettable with a one-of-a-kind gift found nowhere else in the world!
- Feelings That Reach the Heart! Handmade Gift Ideas to Give at Graduation
- A graduation surprise that delivers heartfelt emotion: a collection of memorable ideas
- [For Graduates] Graduation Songs and Cheer Anthems to Convey Gratitude and Support
- A heartwarming surprise idea that will excite everyone at an elementary school
- Let's make a handmade graduation certificate! A collection of memorable design and crafting ideas
- Ideas for handmade gifts for teachers to give at the preschool graduation ceremony
- Thank you, Teacher: A Song of Gratitude for Teachers and Mentors — An Emotional Farewell Song for the Journey Ahead
- From current students to graduates! A collection of handmade graduation gift and keepsake ideas
- [For Middle School Students] A Collection of Recreation Ideas to Liven Up Farewell Parties
- A farewell song for a dear friend—an uplifting graduation song that conveys heartfelt gratitude.
- [Gratitude, Encouragement, Memories] Tear-Jerking Graduation Songs You Can’t Listen to Without Crying [2026]
- Heartwarming surprise ideas that will excite everyone at school
- Handmade ideas for a welcome board
Handmade Gifts for Graduates! A Collection of Heartfelt Ideas (21–30)
string
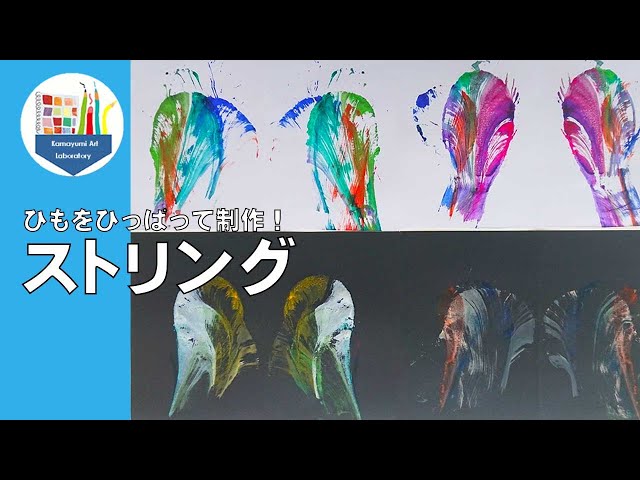
A piece made with the string-pulling technique—fun to make as well—would make a great graduation project keepsake.
Apply several colors of your favorite paint directly onto a hemp cord.
Use a water-dampened brush to spread the paint.
Place the cord between a sheet of drawing paper that has been folded to make a crease, and hold it firmly with one hand.
With your other hand, pull the cord out from between the paper to create a pattern.
The design changes depending on the colors you use and how you pull the cord.
The fact that no two pieces are the same is one of this project’s charms.
Once it’s finished, you can paste in memorable photos or write a message.
Besides a graduation project, it also works great as a card.
Modeling

Among CG designers, there are 3D modelers who create forms that make characters appear three-dimensional.
Their work spans many fields, including creating characters and backgrounds for games and anime, prototyping figures, and modeling industrial products.
Some of you may aim for this path after graduation.
If you have access to a modeling environment, why not try creating a graduation project? On a computer, you combine points, lines, and surfaces to build three-dimensional shapes.
You might end up with something interesting or a wonderful piece of work.
Handmade Gifts for Graduates! A Collection of Heartfelt Ideas (31–40)
Album box

Many people are probably thinking of closing photos into an album and giving it as a graduation gift.
However, a regular album can feel a bit ordinary.
That’s why we’d like to introduce the album box.
An album box is a box-shaped, three-dimensional album that, when unfolded, lets you attach photos to many surfaces.
Depending on how you arrange it, you can finish it in various styles.
You can easily make one using just construction paper, so give it a try!
Cherry-blossom-themed display

Perfect for graduation season! How about gifting a cherry blossom–themed display that’s fun to look at? Just put pink sequins and liquid laundry starch (or glue) into a clear, sealable bag and clamp it in a display stand—that’s it.
Tape any excess bag to the edge of the stand to keep it in place.
It looks beautiful as a decoration, and the squishy texture makes it a simple, soothing stress reliever, too.
Try decorating the stand itself for an even more festive finish.
silk screen

Let’s try one of the printmaking techniques! As the name suggests, silk screen printing is a method where ink is pushed through the open areas of a mesh—such as silk or nylon—to print.
Its appeal lies in the fact that you can print without reversing the image, achieve vivid colors and uniform color fields, and print on various materials and even curved surfaces, including paper, fabric, and boards.
In the video, they gather tools from a 100-yen shop and introduce the basics of how to print with silk screen.
Be sure to check it out for reference!
Graduation Certificate Made with Resin
@arthega.resin ✨ Un pedacito de este gran logro hecho eterno en resina 💜 #graduacion2025#regalosgraduacion#resinapersonalizada#hechoamanoconamor#recuerdoespecial#resinaespaña#hechoencasa#memoryinresin#arthegaresin
♬ sonido original – ARTHEGA || Diseño en resina
A resin graduation certificate also makes a great interior decoration.
Pour resin into a mold and use letter stickers or graduation-themed illustrations to create the certificate.
Once the design is finished, cure it with a UV or LED light to complete it.
Since resin is basically transparent, add glitter or gold leaf if you want a more festive certificate.
Decorating the edges with bijou parts is also recommended.
Since it’s a special piece, try creating original wording, too.
desk calendar

A calendar that can be used throughout the year makes a great gift as a keepsake.
In this idea, you cut thick paper into tag shapes and decorate them by attaching origami paper and date sheets.
You can choose seasonal patterns for the design, but using memorable photos would also be lovely.
Create a front and back cover, gather everything with a binder ring, and finish it as a calendar.
Punch a hole at the bottom of the back cover and attach a string with a paper clip.
By flipping the front cover to the back and securing it with the paper clip, the calendar can stand on its own.