

Here are some handmade wreath ideas we recommend for anyone wondering how to decorate for Halloween!
While wreaths are often associated with Christmas, more and more people are making Halloween-themed wreaths using Halloween and autumn colors.
Making one yourself might seem difficult at first, but there’s no need to worry—materials are easy to find at 100-yen shops, and there are plenty of simple tutorials available!
Whether you prefer a colorful wreath or a slightly darker one, create a wreath you love and get into the Halloween spirit.
- Halloween in childcare gets exciting! Dance ideas for moving and having fun
- [Easy Halloween Vibes] Perfect BGM and Theme Songs for a Halloween Party
- Handmade ideas for a welcome board
- Halloween songs released in the Reiwa era | Perfect as party BGM too!
- Recommended for daycare activities! A Halloween song you can sing and play with
- Cute Halloween Song Collection! A carefully selected lineup of adorable tracks that both kids and adults can enjoy
- When it comes to Halloween songs, this is the one! A special feature on Japanese tracks that hype up the karaoke crowd
- Songs that amp up Halloween: a roundup of perfect tracks for party BGM!
- Halloween songs for seniors to enjoy at events: from nostalgic classics to exciting new favorites
- Halloween songs you can use for Instagram Reels. Tracks that set the mood.
- Songs to Listen to and Play on Halloween! A Selection of Recommended Piano Pieces
- Heisei-Era Halloween Songs | A roundup of classic tracks to elevate the party mood!
- A Halloween song for children. A fun Halloween song.
Handmade Halloween wreath ideas! Popular crafts you can make with everyday materials (1–10)
[100-yen shop] Halloween wreath made with paper plates and paper napkins
https://www.tiktok.com/@sana_tanosi/video/7548615236337569032A Halloween wreath made with paper plates and paper napkins full of Halloween vibes.
Get your paper plates, ribbon, construction paper, paper napkins, scissors, and glue ready.
Cut a hole in the center of the paper plate to make the wreath base.
Cut the paper napkins for decoration into pieces about 1/16 of their original size and twist them.
Using glue, attach the twisted napkins to the paper plate.
The key is to place them so there are no gaps.
Wrap a ribbon around it for an accent, and finish by attaching decorations made from construction paper—witch’s legs, a hat, and bats.
Give this parent-and-child Halloween wreath a try!
Halloween wreath made with paper cutouts
https://www.tiktok.com/@kocchann_hoiku_seisaku/video/7544404600019799304A Halloween wreath you can enjoy making with your kids using papercutting.
Get some construction paper, scissors, and colored pens ready, and let’s get started.
Fold the paper three times, then cut along the sketch lines.
When you unfold it, you’ll have a cute wreath shape.
Making ghost shapes adds to the Halloween vibe, too.
Use colored pens to draw the faces, one little square at a time.
Adding small ribbons or stickers can make it even cuter.
It also makes a nice little Halloween gift.
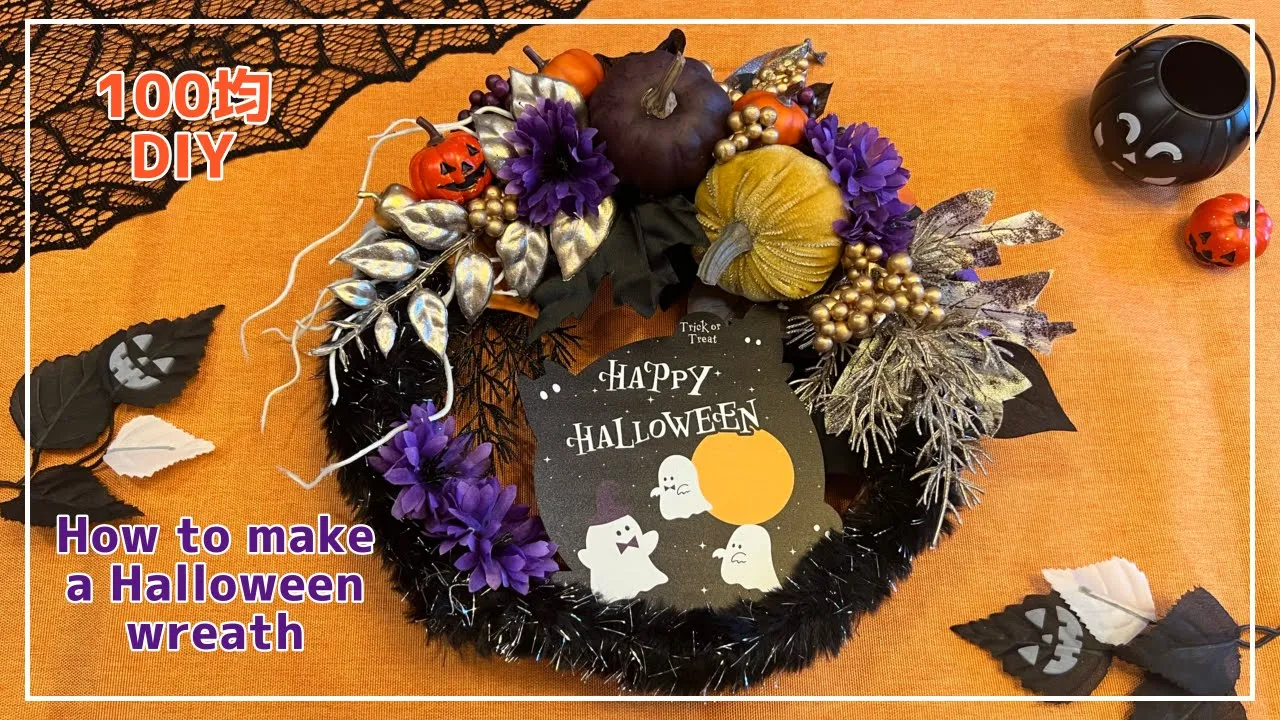
[100-yen shop] Just stick on the parts! Halloween wreath
![[100-yen shop] Just stick on the parts! Halloween wreath](https://i.ytimg.com/vi/fcss4eulnjA/sddefault.jpg)
A cute Halloween wreath you can make just by attaching parts.
Get your ribbon, faux fur, pumpkin bouquet, artificial flowers, nuts, wreath base, adhesive, and nippers ready, and let’s get started.
Glue the fur material onto the wreath base.
Use nippers to cut flowers and greenery from the pumpkin bouquet, then glue them on.
Using velour flowers adds a warm, autumn feel and looks adorable.
Keep balance and volume in mind, and glue everything securely so it won’t come off.
Adding colored leaves and pumpkins is also a key point.
You can enjoy making a simple yet luxurious original wreath.
[Origami] Totoro Halloween Wreath
![[Origami] Totoro Halloween Wreath](https://i.ytimg.com/vi/eK8qusyvMWw/sddefault.jpg)
The Totoro-themed wreath, inspired by the Ghibli character, is a craft you can make using only origami.
The base is made by assembling eight identical parts.
Totoro is created by combining gray and white origami paper, and you draw the facial features and body patterns with a pen.
After putting a witch’s hat on Totoro and giving him a broom, make bat, ghost, and pumpkin pieces, then attach them to the base along with Totoro, adjusting the balance as you go.
Punch a hole at the top, thread a ribbon or string for hanging, and it’s complete.
[Origami] 3D Halloween Wreath
![[Origami] 3D Halloween Wreath](https://i.ytimg.com/vi/aYVhyx9zI0g/sddefault.jpg)
This wreath is made by gluing circular pieces onto a 12 cm diameter base.
Use origami paper for the pieces.
The first piece is a circular part cut to a 3 cm diameter.
The second is made by folding a circular piece in half and gluing three of them together to create a three-dimensional element.
The third is a slightly larger pumpkin piece made the same way as the second.
After alternately attaching pieces 1 and 2 to the base, glue Halloween-themed craft decorations onto piece 1.
Then attach the pumpkin piece to the end of a strip of origami paper cut lengthwise, and stick it onto the base so it looks like it’s hanging from above.
That’s it!
Yarn Ball Halloween Wreath
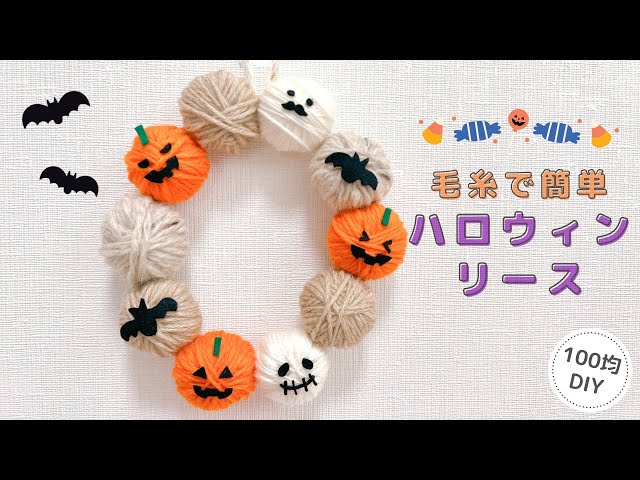
A handmade, cozy yarn Halloween wreath.
Prepare tissues, yarn, felt, scissors, and glue, and let’s get started.
Crumple three tissues into a ball to make the base for a pumpkin.
Wrap yarn tightly around it to add thickness, and secure the end with glue so it doesn’t unravel.
Make more in the same way, changing the yarn colors as you like.
After you’ve made about 10, glue them together in a circle.
Create original facial features with felt, attach them, and you’re done.
The steps are simple, so it’s an activity you can enjoy together with children around kindergarten senior age.
[Tissue Paper] A Halloween wreath that even infants can enjoy
https://www.tiktok.com/@rin_hoiku_idea/video/7428881690283511058Cut out the center of a paper plate to make the base.
Crumple tissue paper tightly into balls and attach them to the base with double-sided tape.
Cut the previously removed center into a ghost shape, then add a child’s face photo and a hat.
Hang the ghost in the center of the base with thread, and finish by attaching pumpkin, star, and candy pieces! You can make the pieces from origami or cut construction paper, but if you’re short on time, using ready-made craft parts might be a good idea.