
A 100th birthday celebration is called kiju or hyakuju in Japan.
Even though more people in Japan are living longer these days, reaching 100 is not something just anyone can do.
If someone in your family is turning 100, you’ll want to celebrate in a big way!
In this article, we’ll share handmade shikishi (decorative message board) ideas that are perfect for a 100th birthday celebration.
We’ve gathered recommended designs and ideas, including auspicious motifs like cranes and turtles.
If you’re wondering what kind of shikishi to make, use these ideas as inspiration!
- Kiju and Hyakuju: Celebrate a 100th Birthday! Handmade Shikishi Ideas That Will Delight
- [Handmade] Message board ideas that convey your honest feelings
- From Grandchildren with Love! Heartwarming Handmade Gift Ideas for Respect-for-the-Aged Day
- [Respect for the Aged Day] Handmade gifts that will be appreciated: A curated selection of simple ideas
- Handmade celebration card ideas. How to make a message card.
- Handmade Birthday Present Ideas
- [Respect for the Aged Day] Heartfelt! Handmade Message Card Ideas to Share Your Feelings
- [Birthday] Handmade decoration ideas using construction paper
- Handmade birthday plate ideas: make birthdays extra special!
- New Year’s card ideas to make with children: simple designs using stickers and stamps
- You can make it with construction paper! Handmade birthday card ideas
- Gifts with your grandchild’s photos! Easy DIY ideas
- Let's make New Year’s decorations by hand! A collection of ideas you can create with everyday materials.
Kiju/Hyakujyu: Celebrating 100 Years! Handmade Message Board Ideas That Will Delight (1–10)
Three-dimensional decorative shikishi (colored paper)
This design is charming for its lively three-dimensional look, with the entire shikishi board decorated by layering felt and other embellishments.
The photo is first mounted on a base and then placed in the center, and the congratulatory message is also layered onto a flower-shaped piece of felt before being set—every part is arranged after adding volume.
The key is how many layers of felt pieces you use; by varying the layering, you can skillfully adjust which elements stand out.
The message area also includes decorative elements, and adding items like mizuhiki cords there will give it an even more luxurious feel, which is highly recommended.
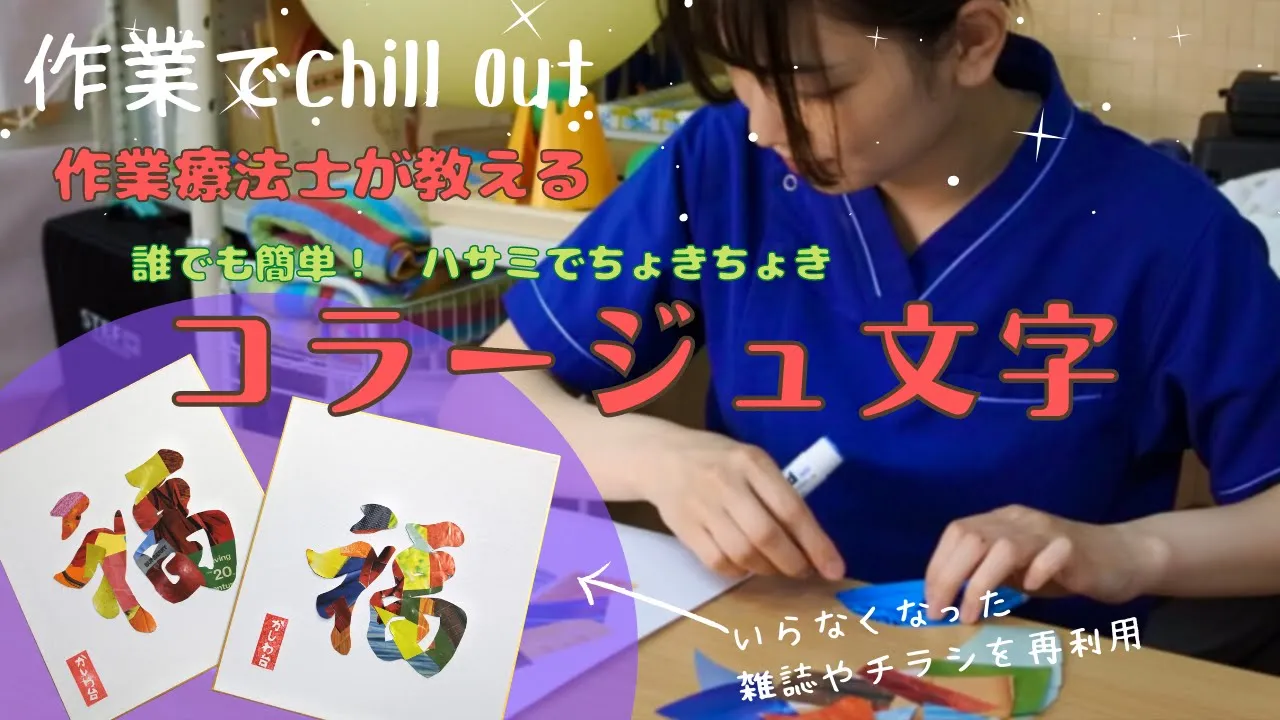
Colored paper using collage letters

It’s a design that vividly arranges letters with collage to emphasize the main message.
First, print the main text such as “Congratulations on 100 Years,” and trace the outlines of the letters visible from the back.
Then, on the front, randomly paste magazine clippings, flyers, or origami paper, and cut along the outlines you drew on the back to complete the collage letters.
Next, attach these letters to a colored board, add your message and decorations, and the whole piece is finished.
As you work, be mindful of which colors to use in the collage, the balance of the layout after cutting, and decorations that help the letters stand out.
message board with group signatures and messages
When it comes to shikishi message boards, the classic style is a group message layout where individual messages surround a main message in the center.
This design is a creative take on that format: it conveys each message while giving the whole piece a festive, decorative look.
The entire shikishi is colored, with a soft, brush-lettered congratulatory phrase placed in the center.
Each person’s note is written on a small message card and affixed to the board, so the contrast with the background color makes the messages stand out.
Adding three-dimensional decorations—like attaching a ribbon at the corner—is also a recommended option.
Brush lettering art

A design that makes use of the unique texture of characters written with a brush pen.
You can feel the softness and warmth coming through the letters.
By intentionally giving the characters a slightly broken look and skillfully adjusting thickness and angle, the lettering gains a sense of dynamism.
Also, by incorporating not only black but colors like red and green, the letters become more festive and lively.
Decide on the message you want to use for the celebration first, then think about arrangements that will make the lettering feel even more vibrant.
Paper quilling shikishi (decorative square paper board)
This is a cheerful design that decorates the message with three-dimensional flowers made using paper quilling.
Because the motifs are quite prominent and dimensional, decide where you want to place them first, leave those areas open, and write the message beforehand.
A key feature of paper quilling is that you can create many types of flowers by varying how you roll and shape the paper, so it’s important to tailor the flowers to the recipient.
You can highlight the brilliance not only through the flower colors, but also through how you arrange and layer the pieces you make.
Caricature shikishi (portrait drawing on a square art board)
https://www.tiktok.com/@sachi0312.k/video/7277915582974938370When a portrait is included, it really heightens that warm feeling that it was made just for you, doesn’t it? This design features a portrait of the person you’re gifting it to, decorated with celebratory messages and happy motifs like flowers.
Be sure the portrait is smiling, and aim for an overall cheerful vibe that clearly conveys your congratulations.
Flowers are a classic choice for decorating around the portrait, but it’s also a great idea to incorporate items they cherish or their personal treasures into the design so it reflects who they are.
Colored paper with a cat design
This design incorporates animal motifs and is especially recommended as a gift for people who have pets.
By arranging a photo of the recipient alongside motifs of animals—such as cats—it conveys a sense of the bond with their beloved family members.
How you depict the animals is also key: combining decorative elements to create a three-dimensional look will make the animals stand out even more.
To fully bring out the charm of the motifs, it’s best to keep the colors of the decorations consistent.