

How about handcrafting a special hair accessory for a Christmas party or date? Store-bought items are lovely, but when you make your own, you can choose your favorite colors and shapes and create a one-of-a-kind original design.
In this article, we’ll introduce ideas for Christmas-perfect hair accessories using resin, ribbons, and more.
All of them use familiar materials and are easy to try, so they’re great for matching sets with family or friends, or for gifts!
- Christmas crafts for adults: stylish project ideas you'll want to display
- Handmade winter garlands: cute ideas that are easy to make
- Cute and Easy with 100-Yen-Shop Items! DIY Christmas Costume Ideas for Kids
- Christmas crafts with pinecones! A collection of ideas you can make with your kids
- Easy handmade Christmas crafts: ideas you'll want to display
- Let's make it with acorns! Cute Christmas craft ideas.
- [Handmade] Christmas trees you can make with everyday materials: a collection of eye-catching ideas
- Handmade Christmas cards: A collection of ideas to make the recipient smile
- [Easy & Cute] Handmade Christmas Decoration Ideas
- Let's make handmade hair accessories for Coming-of-Age Day! Heartfelt DIY ideas
- Stylish handmade Christmas decorations
- Easy way to make Christmas stockings
- Let’s play Christmas songs with handmade instruments! Craft ideas for sound-making instruments
Handmade Christmas Hair Accessories! A Collection of Ideas Using Ribbons and Resin (1–10)
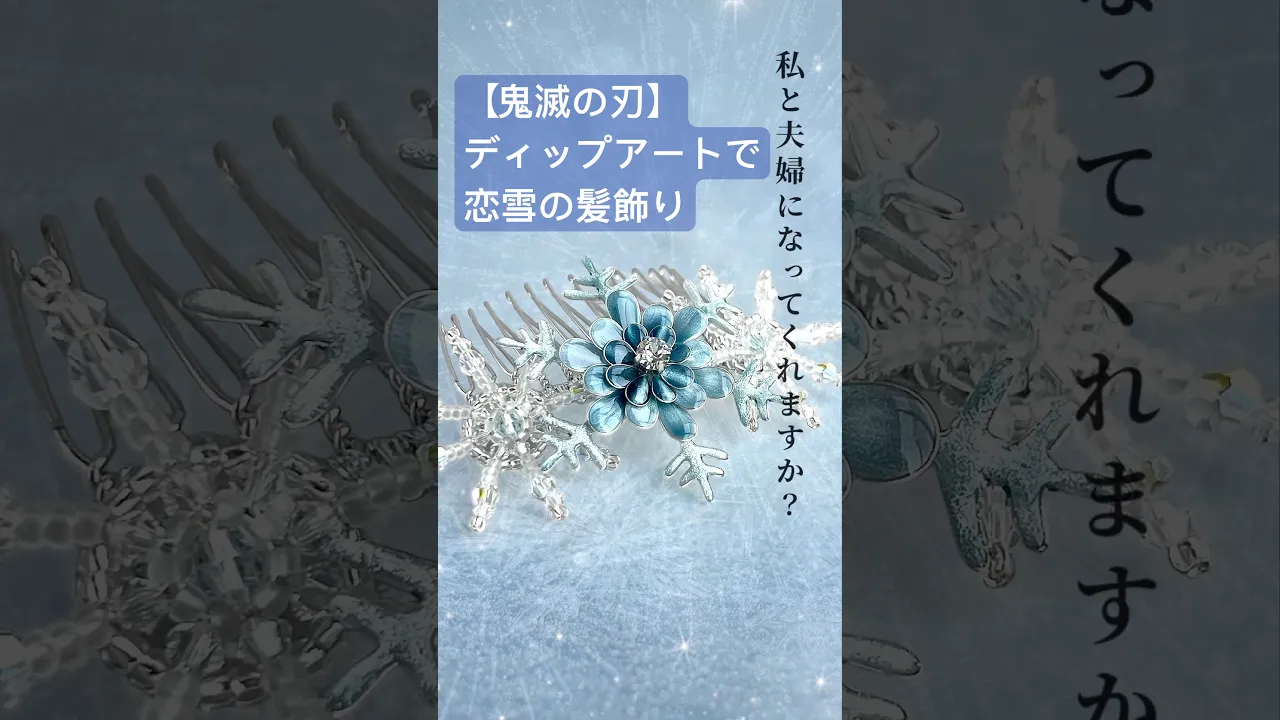
Koyuki’s Hair Ornament

Speaking of Koyuki’s hair ornament from Demon Slayer, it’s famously modeled after a snowflake.
In this idea, wire and beads are used to recreate the accessory.
The central crystal is formed by creating a wire base and then dipping it into a hardening solution.
Once it sets, it’s colored and combined with rhinestones and other parts to represent the crystal.
The side crystals are made by weaving beads.
It looks lovely as is, but if you want a more glamorous finish, why not incorporate Christmas colors into the rhinestones and beads?
Ribbon made with crochet
https://www.tiktok.com/@amimono_hiyokko/video/7440089536119573778Here’s an idea for crocheting a ribbon using Christmas-colored yarn.
You can make it with basic stitches like chain stitch and single crochet, so it’s great for beginners.
Basically, you’ll crochet straight to create a long strip.
Once it becomes a ribbon, tie it around a ponytail or bun.
Green and red yarn are recommended, but white gives a cute, wintry look too.
You could also crochet in some beads to make it more festive.
If you add ties, it could even work as a headband.
Christmas scrunchie made with yarn
@irona_crochet Another happy holiday with DAISO's colorful acrylic yarn today 🎄 I tried making a Christmas wreath-style scrunchie 🎅🏻 As expected, it’s adorable. Just looking at Christmas colors makes me feel happy 😌✨#crochet#crochetHandmadeKnitting#Christmas
♬ original sound – BestOfChristmas
Would you like to try making a Christmas-themed scrunchie with crochet? First, prepare a basic hair elastic and work single crochet all the way around it.
Next, increase stitches as you go and work double crochet to create a frilled effect.
Then, finish by edging in Christmas-colored yarn followed by white yarn, and you’re done! It’s a festive yet easy-to-wear design, making it a great way to add a touch of Christmas to your everyday look.
Feel free to customize it with your favorite types and colors of yarn.
Christmas hair clip combining ribbons

Combine ribbons to make a cute hair clip.
We’ll use thread, but there’s no sewing involved.
First, take two ribbons with patterns you like, layer them while checking the balance, shape them into a bow, and tie the center with thread.
Next, prepare two more ribbons with a different pattern, layer them with good balance and glue them together, then decorate the center with beads.
Attach the clip hardware to the back, and you’re done.
Try matching the ribbon designs and bead colors to create a festive Christmas look.
Snowflake hair accessory

Let me show you an easy snowflake hair accessory that even beginners can make.
You’ll need wire, beads, U-pins, and floral tape.
Cut a piece of wire about 30 cm long, thread one bead onto it, then fold the wire in half.
Position the bead at the fold and twist the wire to secure it—about 1 cm of twisting.
Next, thread one bead on each side and secure them the same way.
Repeat this step once more to finish one component.
Make a total of five identical components, stack them together, then fan them out to form a snowflake shape.
Finally, secure them to a U-pin with floral tape, and you’re done.
[Beads] Snowflake Hairpin
![[Beads] Snowflake Hairpin](https://i.ytimg.com/vi/lpQLH6RDktM/sddefault.jpg)
Make it with pearl beads! Here’s how to create a snowflake hairpin.
You’ll need wire, materials for your favorite motifs, a hairpin, and beads.
In the video, elongated pearl beads and star-motif beads are used to complete the design.
Try making your own original hairpin with your favorite beads and materials.
We recommend sparkly materials and metallic-finished beads! Since you’ll be handling wire, please be mindful of safety while you craft.
[Resin] Mini Hair Clip
![[Resin] Mini Hair Clip](https://i.ytimg.com/vi/PYOkqAAGEP4/sddefault.jpg)
Create your favorite Christmas design! Here are some mini hair clip ideas.
This idea uses liquid resin that can be cured.
It’s a perfect item for anyone who wants to try working with resin! What you’ll need: hairpins with settings, resin, resin ink, Christmas-themed nail stickers, and decorative parts like holograms.
Have fun making them with your own creative touch—try different placements of nail stickers and holograms as you like!