Ideas you can use for autumn wall decorations

Autumn is full of charm—vividly colored nature, delicious fruits, moon-viewing, Halloween, and more.
How about bringing that autumn charm into your wall decorations and enjoying the season together with the children?
Here, we’ve gathered ideas for autumn wall displays perfect for nurseries and kindergartens.
We’re also introducing fun craft ideas that use child-friendly autumn motifs.
After enjoying autumn crafts with a variety of materials and unique techniques, display the works to decorate your room with an autumn feel.
Let’s all make the most of autumn together!
- [Childcare] November wall decorations and autumn craft ideas
- Preschool: Autumn-Themed Craft Ideas Recommended for November
- Fun November craft ideas for 1-year-olds!
- Introducing ideas for September wall displays and autumn-themed wall and room decorations
- Ideas for October wall decorations: an autumn wall display that makes use of children’s artwork.
- [Childcare] Autumn craft ideas
- September: Autumn crafts! Ideas you can use in childcare
- [October] Craft ideas for fall you can use in childcare
- [Autumn Activities] Nature Play and Craft Ideas for Fall to Incorporate into Childcare!
- [Crafts for 3-Year-Olds] A Collection of Fun Ideas for Autumn! Let's Incorporate Seasonal Motifs
- Craft ideas for 4-year-olds to try in autumn! Enjoy creative activities with seasonal motifs and events.
- Exciting September crafts for 4-year-olds! A special collection of fun ideas with autumn-themed motifs
- [Childcare] For 5-year-olds! Autumn craft ideas
Ideas you can use for autumn wall decorations (21–30)
Wobbly fun! Paper-cup bagworm

Hang these on the wall to meet lots of colorful, fun bagworms! First, prepare two sheets of origami paper in your favorite colors, then tear each one vertically into roughly four strips.
Next, apply glue to one end of a torn strip and randomly stick it onto the side of a paper cup near the bottom.
You can alternate the two colors or group the same color together—either is fine! At this point, also attach the bagworms’ eyes made from construction paper or origami.
Finally, use an awl to make a hole in the bottom of the paper cup, thread through some kite string for hanging, and secure it—that’s it! Please make sure that a kindergarten or nursery teacher, or a guardian, handles the hole-punching with the awl.
Make a cute bagworm with kraft paper and washi tape!
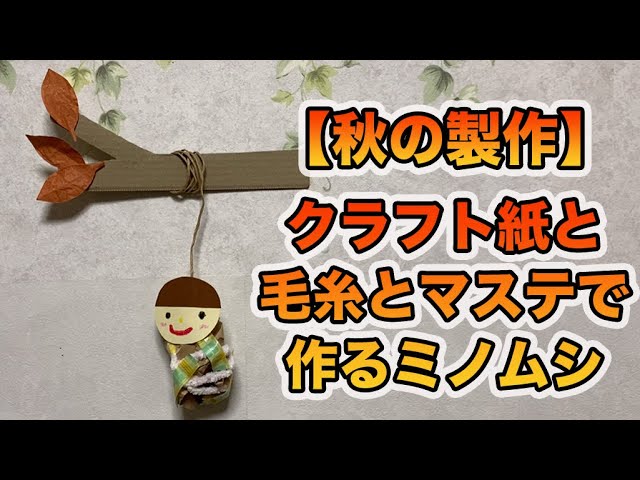
I’ll show you how to easily make a bagworm using kraft paper, yarn, and masking tape! First, roll up the kraft paper to form the body.
Wrap yarn around it and stick pieces of masking tape on randomly.
Next, draw a face on the face parts you made from colored construction paper, then attach it to the body with double-sided tape.
Finally, tape a string to the back of the face with clear tape, and you’re done! If children will be handling it, twine is recommended.
It looks super cute if you also make a tree branch out of cardboard and hang it, so give it a try!
Make it with handprints! Wobbly bagworm
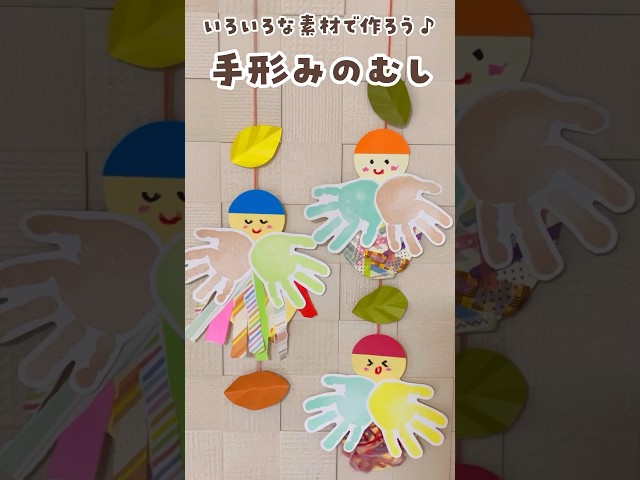
Here’s a craft idea for making bagworms using children’s handprints and footprints! First, create the bagworm’s body out of colored construction paper.
Next, take origami paper in your favorite colors and tear it into long, thin strips.
Paste the strips onto the body with glue, and use the child’s handprints to make a cute outfit.
Draw the face, attach a piece of yarn to hang it, and you’re done! You can also decorate with yarn instead of or in addition to origami paper.
Making lots in different colors and displaying them looks super cute, so it’s highly recommended.
Be sure to have fun tearing and pasting together with the kids!
Yarn Winding! Bagworm Ornament

Let’s try making a bagworm craft that also lets you have fun with yarn.
First, glue colored construction paper onto white construction paper and cut it into an egg shape.
Make small slits around the edge, then wind the yarn around and around, tucking it into the slits as you go.
Wrap gently so the paper doesn’t warp, but firmly enough that the yarn doesn’t loosen and come off.
Once you’ve finished wrapping the yarn, decorate the case with round stickers, draw the face with a pen, add a touch of pink to the cheeks with blush, and you’re done!
Autumn wall display! Mushrooms and bagworms

This is a wall decoration of mushrooms and bagworms that’s fun to stick on with glue.
First, make the parts.
Using construction paper in your favorite colors, cut out mushrooms in various shapes.
If you’re working with small children, please cut them in advance.
After cutting slits in the mushrooms, cut separate pieces of construction paper to serve as the stems.
Next, make the bagworms.
Have the children help with what they can, like drawing the eyes.
Now for the assembly.
Tear pieces of construction paper and glue them onto a background sheet to form the bagworm’s body.
Add the eyes and a little hat, too.
Finally, overlap the mushroom pieces at the slits and glue them so they become three-dimensional—that’s it, you’re done.
Chestnut made with origami
@hoikushi_worker Produced in OctoberNovember productionAutumn CraftsorigamiOrigamiOrigami folding instructionsChestnutNursery teacher / Childcare worker#Childcare Crafting#Nursery School CraftKindergarten craftMaking and crafting play#Making Play#Childcare topic#HandmadeToysInfant Craft
Seventh Song – RADWIMPS
After folding the origami paper into a triangle twice to crease it, open it up and fold the top corner down to the center.
Turn the paper over, fold the bottom corner up to the center, then make another valley fold.
Turn the paper over again, and fold the top edges inward from both sides so they meet along the vertical crease.
Fold up the sections sticking out from both sides of the triangle, tuck the left and right corners inward, and shape it into a chestnut to finish.
Draw patterns on the white part of the origami and use it as a piece for wall decorations or as a little accent in your crafts.
One-sheet fold! Autumn tree

Let’s try making a freestanding autumn tree.
We’ll begin with a series of crease-making steps.
Since you’ll be folding along these creases later, please proceed carefully.
Note that there are steps where you only make creases on certain sections without folding everything.
Once the creases are in place, the trunk and the base of the leaves come together in an instant.
The part where you create the branches is a bit tricky, but adding them makes a noticeable difference in the final result, so give it your best.
For the trunk, flatten the pocketed section, and finish by forming a small triangle at the end.