[Childcare] Perfect for 3-year-olds! October craft ideas

October brings a stretch of autumn-like weather.
Many preschools and kindergartens are likely planning events such as field trips and sports days.
Children grow in both mind and body as they gain a variety of experiences.
Here are some craft ideas perfect for October.
You can create activities that connect seamlessly with everyday care, using seasonal materials or motifs from seasonal events.
Let’s watch over the children so they can stay focused and enjoy their time.
Because the children’s creations are treated as works of art, we use the term “制作” (seisaku: creation/production) in the text.
- [October] Craft ideas for fall you can use in childcare
- [November] Enjoy with 3-year-olds! Craft activity ideas recommended for autumn
- [Childcare] Recommended for 3-year-olds! Craft activity ideas
- [Preschool] Recommended for 3-year-olds! Easy-to-make fall origami craft ideas
- Preschool: Autumn-Themed Craft Ideas Recommended for November
- [Crafts for 3-Year-Olds] A Collection of Fun Ideas for Autumn! Let's Incorporate Seasonal Motifs
- Craft ideas for 2-year-olds! A cute collection of creations to enjoy October events
- List of Reggae Festivals Nationwide [2026]
- [Childcare] Ideas inspired by October events: Activities you can use in everyday childcare
- [Childcare] Fun for October! Craft ideas recommended for 4-year-olds
- [For 3-year-olds] Perfect for September! A Collection of Craft Ideas to Enjoy Autumn Nature
- In October childcare, kids will be captivated! A collection of play ideas to fully enjoy autumn
- Make October Even More Fun for Preschoolers! A Collection of Origami Ideas
[Childcare] Perfect for 3-year-olds! October Craft Ideas (21–30)
Three-dimensional bagworm

Here’s a 3D bagworm origami idea.
You’ll make it in two parts: one head piece and two cloak (mino) pieces.
First, we’ll make the head.
Fold the paper into a triangle to make a crease.
Fold the bottom corner up to the crease, then roll up the bottom edge about 5 mm.
Fold along the crease again to return it to a triangle.
Flip the paper over, fold both corners inward, then fold them back outward.
Fold the outer corners of the small triangles you just made upward, and also fold the bottom corner inward.
Next, for the cloak: Fold the paper into a triangle, then fold both side corners up to meet the top corner.
Slightly fold the raised top corner back down, open that part, and squash it flat.
Flip the squashed section to the back, then fold the lower left and right edges slightly inward.
That’s one cloak piece done.
Make two of these, attach them to the head, draw the face, and you’re finished.
A bagworm papercraft made with an envelope
Let me share an idea for making a bagworm using a brown envelope.
Cut off the top of the envelope with scissors, then fold the top left and right corners to the back.
Stick on eyes made by layering white and black round stickers, and then decorate the body with colored paper or yarn to represent the case.
Tear the colored paper into small pieces beforehand, and cut the yarn into suitable lengths.
Finally, tape a piece of jute string to the back of the envelope, and it’s done.
In addition to colored paper and yarn, you could also glue on leaves or small twigs you collected on a walk for a cute touch.
Wobbly fun! Paper-cup bagworm

Hang these on the wall to meet lots of colorful, fun bagworms! First, prepare two sheets of origami paper in your favorite colors, then tear each one vertically into roughly four strips.
Next, apply glue to one end of a torn strip and randomly stick it onto the side of a paper cup near the bottom.
You can alternate the two colors or group the same color together—either is fine! At this point, also attach the bagworms’ eyes made from construction paper or origami.
Finally, use an awl to make a hole in the bottom of the paper cup, thread through some kite string for hanging, and secure it—that’s it! Please make sure that a kindergarten or nursery teacher, or a guardian, handles the hole-punching with the awl.
Make a cute bagworm with kraft paper and washi tape!
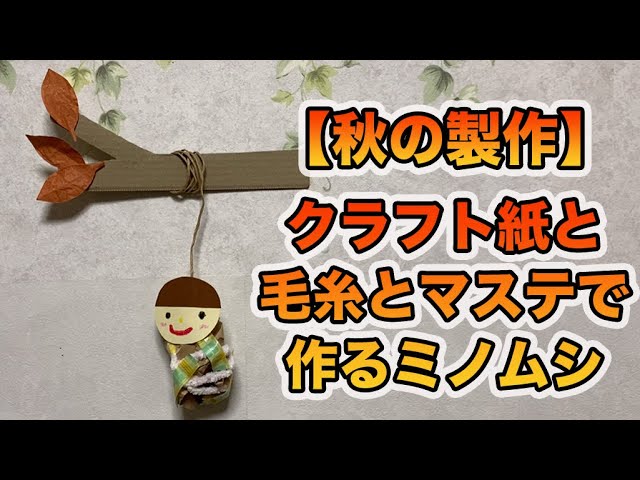
I’ll show you how to easily make a bagworm using kraft paper, yarn, and masking tape! First, roll up the kraft paper to form the body.
Wrap yarn around it and stick pieces of masking tape on randomly.
Next, draw a face on the face parts you made from colored construction paper, then attach it to the body with double-sided tape.
Finally, tape a string to the back of the face with clear tape, and you’re done! If children will be handling it, twine is recommended.
It looks super cute if you also make a tree branch out of cardboard and hang it, so give it a try!
Make it with handprints! Wobbly bagworm
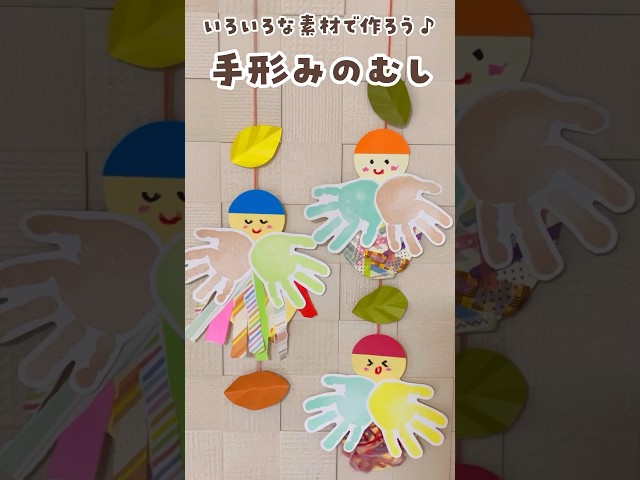
Here’s a craft idea for making bagworms using children’s handprints and footprints! First, create the bagworm’s body out of colored construction paper.
Next, take origami paper in your favorite colors and tear it into long, thin strips.
Paste the strips onto the body with glue, and use the child’s handprints to make a cute outfit.
Draw the face, attach a piece of yarn to hang it, and you’re done! You can also decorate with yarn instead of or in addition to origami paper.
Making lots in different colors and displaying them looks super cute, so it’s highly recommended.
Be sure to have fun tearing and pasting together with the kids!
Yarn Winding! Bagworm Ornament

Let’s try making a bagworm craft that also lets you have fun with yarn.
First, glue colored construction paper onto white construction paper and cut it into an egg shape.
Make small slits around the edge, then wind the yarn around and around, tucking it into the slits as you go.
Wrap gently so the paper doesn’t warp, but firmly enough that the yarn doesn’t loosen and come off.
Once you’ve finished wrapping the yarn, decorate the case with round stickers, draw the face with a pen, add a touch of pink to the cheeks with blush, and you’re done!
Perfect for Halloween! Black Cat Origami
@hoiku.labo [Halloween Origami♪] How to fold a black cat 🐈⬛🎃ChildcareNursery teacher / Childcare workerKindergarten TeacherChildcare job openingsChildcare Column#NurseryTeacherThings#IWantToConnectWithChildcareWorkers#Nursery School Craft#DaycarePreparationNursery School PracticumChildcare studentAspiring childcare workerChildcare Job LabNursery teacher skillsJob change activities#JobChange#nursery_teacher_job_changeNursery teacher employmentProductionOrigami CraftTranslationOrigamiOrigami creationsHalloween# Halloween CraftHalloween
♬ Halloween – TonsTone
After folding the paper into a square using the zabuton fold, lift two of the corners gathered at the center to make the cat’s ears.
Fold the corners sticking out from the base of the ears inward, then tuck in the remaining corners to shape the face.
Flip the paper over, and your cute cat is complete! Draw the face and whiskers to finish it off.
The vibe changes depending on the color of the paper, so try making it in your favorite color.
If you pop a witch’s hat on it, it might feel even more Halloween-y!