Stylish ways to wrap with wrapping paper: A roundup of cute gift-wrapping ideas

There are times when you give presents or gifts to someone—family, a partner, friends, or people who’ve helped you out.
In those moments, you might do the wrapping yourself, and if you’re going to do it, you probably want the packaging to feel special.
With just a little extra effort, you can put more heart into it, and it will look stylish and cute, too.
In this article, we’ll thoroughly introduce how to wrap with wrapping paper—from basics to advanced techniques!
We’ll also show you how to tie ribbons, so if you’re struggling with gift wrapping, be sure to check it out.
- Christmas wrapping ideas using paper bags
- Easy flower craft ideas you can make with a single sheet of origami paper
- Handmade gifts perfect for Christmas: ideas for presents that are sure to delight
- [Christmas] Handmade Gift Box Idea Collection
- [Birthday] Handmade decoration ideas using construction paper
- A collection of handmade bouquet ideas that convey feelings of gratitude and celebration
- A collection of handmade money envelope ideas: from simple to elaborate
- Easy Cute Christmas Origami
- Paper quilling ideas made by rolling strips of paper
- Handmade diaper cake ideas. Simple and cute wrapping.
- A box made from flyers: practical and stylish ways to fold boxes
- Cute Origami Ideas for Girls
- [Origami] She’ll love it if you fold these! Simple ideas for girls
How to wrap with wrapping paper (1–10)
Attach a band with tracing paper.

When a box has a beautiful design, it can feel wasteful to hide it with wrapping paper.
In such cases, how about adding a band made from tracing paper? It reinforces the box so it doesn’t come loose while showcasing the design, and you can add your own touch as a small accent.
It’s a simple method: print a design you created in an app onto tracing paper, cut it into a band, and wrap it around the box.
Depending on how you want to highlight the box’s design, you can also adjust the band’s width and the thickness of the paper you use.
Dress shirt wrapping

This is a unique wrapping style inspired by a dress shirt, with a tie threaded through the collar and knotted.
It’s perfect for Father’s Day or gifts related to work.
Leave some extra room at the top of the wrapping paper, wrap the tie fabric into it, and make a slit.
Roll it to form the neckline and tie the tie to complete the wrapping.
Choosing colors that evoke a dress shirt—such as using striped wrapping paper—is a key point.
Diagonal Wrapping

The diagonal wrap is considered a basic wrapping method, and its resistance to tearing and overall sturdiness are major advantages.
First, place the box on the wrapping paper so that three corners fit within the paper, then wrap the box diagonally by draping the paper over it.
Next, roll the box along the paper to cover the entire surface, smooth it out, and secure it with tape to finish.
It’s also important to decide which side of the paper should overlap and how to fold in any excess.
Paying attention to these details will result in a neat and durable wrap.
How to wrap with wrapping paper (11–20)
Envelope wrapping

This is a simple wrapping method where you just put the item into an envelope made from wrapping paper.
It’s perfect for flat items, and it also makes it easy to see where to open it.
If the envelope is too large, the contents may move around, so it’s best to make the envelope to fit the size of the item.
Also, to prevent anything from falling out, reinforce the edges of the envelope securely with double-sided tape or similar.
Since an envelope alone can look plain, the key is to add a proper decoration at the end, such as a ribbon.
cylindrical wrapping
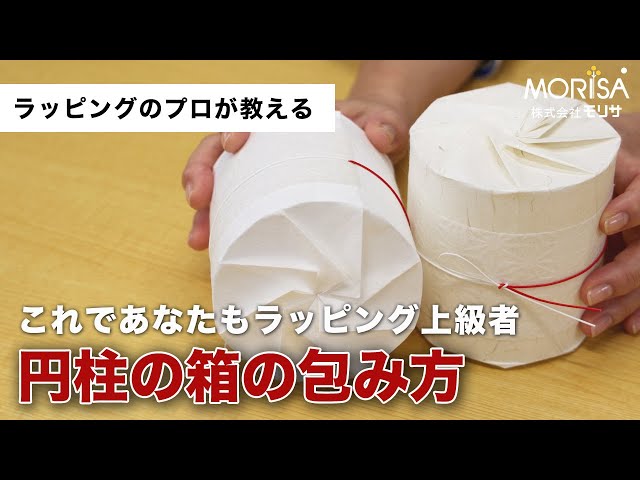
This is a method for wrapping a cylindrical box that makes good use of the creases in the wrapping paper.
When the cylinder’s curves are wrapped neatly, it naturally draws attention to how it was wrapped.
Divide the wrapping paper into blocks and crease them firmly in advance, then fold in the top and bottom of the box to match those creases.
Since you use the excess paper, the top and bottom will inevitably lift a bit, but that slight lift conveys a softly wrapped feel.
Cylindrical curves create a simple look, so I recommend adding decoration, such as a band, for an extra touch.
How to tie a ribbon (1–10)
crossbody

This is a way of wrapping a ribbon so that two lines run across the box, with a knot on one of them.
Mark the center of each side, then thread the ribbon diagonally toward those marks.
Once you’ve gone all the way around the box, use the first corner to tie a knot, and move the knot to wherever you like to finish.
If the ribbon is loose it will slip off, so it’s important to wrap it firmly with the corners in mind.
This affects not only appearance but also strength, so make sure to check the ribbon’s front and back sides as you wrap.
one character

This is a simple method where the ribbon is wrapped straight across the box or wrapping with just a single knot at the center.
Because it’s tied in a straight line, there’s little risk of the ribbon flipping over, and it also allows the box or wrapping paper design to really stand out.
Form the ribbon’s knot using the edge of the box; keeping this in mind will help you wrap the ribbon securely.
You can decorate the box with just the ribbon, but layering a straight-across ribbon over a band wrapped around the box to create a sash-like effect makes it easy to incorporate a Japanese aesthetic—highly recommended, too.