Handmade ideas for summer decorations. Perfect for interior decor and craft activities!

When summer comes, you start wanting to decorate your rooms with cool, refreshing interiors.
In this article, we’ll introduce handmade ideas for summer decorations.
From authentic summer decor you’ll want to display at home to projects that can be used in childcare and eldercare settings—and ideas that will delight at events like Tanabata—we’ve got you covered.
There are many types of decorations, such as garlands, hanging ornaments, and wreaths, so try finding ideas that perfectly suit where you want to display them.
Let’s make summer a bit more comfortable with cool-looking decorations.
- I want to decorate in summer! Handmade garland ideas
- [For Adults] Simple yet Impressive Crafts: A Stylish, Eye-Catching Collection
- Handmade decoration ideas for summer festivals
- Let's make a handmade wind chime! Summer craft & interior decor
- Handmade winter garlands: cute ideas that are easy to make
- Handmade lantern ideas. Let's make festival decorations!
- Fun craft ideas using seashells. Turn your summer memories into crafts!
- Stylish and Easy! DIY Wall Decoration Ideas
- Handmade Uchiwa Fan Ideas: Perfect for kids’ crafts, cheering, and supporting your favorite idols!
- [Summer Vacation Crafts] Stylish Ideas for Girls
- Handmade snow globe ideas: simple yet cute crafts
- [Milk Carton Crafts] Fun ideas for elementary school kids. Perfect for summer vacation homework!
- Simple and breezy handmade fans | A curated selection of ideas you can whip up in no time!
Handmade ideas for summer decorations. Perfect for home decor and craft activities! (21–30)
suncatcher

Do you know what a sun catcher is? A sun catcher is an item made by hanging pieces of glass or similar materials on strings.
Its hallmark is that it reflects sunlight into seven colors.
Because of its beautiful sparkle, it’s also known as a lucky charm.
To recreate a sun catcher, you can use tissue paper.
First, make the frame of the motif you want, and then attach tissue paper in various colors to it.
It also resembles stained glass in appearance, so it’s recommended for those who like that style as well.
Jellyfish charm
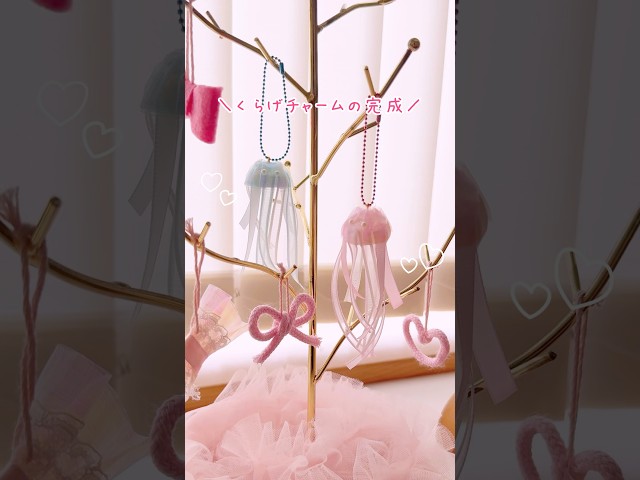
Let’s make a jellyfish charm that looks cute on bags or clothes.
Cut a super ball in half, then use double-sided fabric tape to attach ribbon and lace.
Using small pearls for the eyes makes it extra cute.
Drill a hole near the top, apply glue to the finding, and insert it.
Thread a chain through the finding, and your jellyfish charm is complete.
Super balls come in clear and unusual colors, and the vibe changes depending on which one you use.
Try making it with your favorite super ball!
Candy Magnet

Let’s make a magnet that looks like a candy with twisted ends.
The materials and steps are very simple, so it’s highly recommended.
First, prepare strong magnets from a 100-yen shop, a plastic bottle cap, and a fabric scrap with a pattern you like.
Start by gluing the magnet to the back of the bottle cap.
Next, cut the fabric scrap to 14 cm by 10 cm, then fold back and glue three sides, leaving just one of the short sides unfolded.
Once the glue is dry, wrap the bottle cap with the fabric and secure it with glue.
Finally, to create the candy shape, gather and stitch the fabric at both ends with thread.
You’re done! Try making lots in different colors and patterns.
Watermelon garland

One popular handmade idea is garlands.
They’re appealing because they’re easy to display anywhere.
Still, some of you might be thinking, “I want to make a garland that’s a little different from the usual.” That’s where this watermelon garland idea comes in.
It’s a garland made with pennant-shaped watermelon motifs.
Besides its cute look and summery vibe, there’s another big attraction to this idea: when you roll it up, it looks like a halved watermelon.
It might be nice to hang it somewhere you can move it around and play with it.
desk lamp
@gakky_07 How about this for your summer vacation project?Summer Vacation Craft#Summer VacationDesk lamp
♬ Fun Isono Family / Sazae-san [Cover] – Sound Works
Here’s an idea for making a desk lamp that uses a magnet-mountable LED light.
The stand is entirely wooden, and the arm is movable so you can adjust the angle.
First, think about what size you want and what kind of structure you’re aiming for, and try drawing a design plan.
Once the plan is ready, figure out the lengths and quantities of wood you’ll need and source the materials.
These days, you can even find small pieces of wood at 100-yen shops, so those might work as well.
One of the joys of woodworking is choosing the finish—whether to go for a natural look with varnish or oil, or paint it your favorite color—so definitely consider a variety of options.
Key rack made from 100-yen shop materials

This is a key rack packed with ideas, made using photo frames.
Prepare three identical photo frames: two will form the body and one will be the lid.
Start by making the body.
First, cut a cork sheet to fit the inside dimensions of a photo frame, apply a decorative remake sheet, and attach it to the first frame.
Next, glue the second frame on top of the first.
That completes the body.
Then, use hinges to connect the third frame to the body as a lid.
Finish by attaching an arch latch.
By inserting aluminum pins into the cork sheet, you can hang your keys on them.
It’s a creative project that turns photo frames into a key rack.
Try painting it or adding your own touches to make it uniquely yours.
cool pen holder

Let me introduce a very handy and stylish pen holder.
Prepare a wooden box, wooden boards, an interior mesh frame, paint, a brush, glue, and sandpaper, and let’s get started.
Cut the wooden boards, paint them, and glue them together.
Glue on the interior mesh frame as well.
Once it’s dry, it’s complete.
This pen holder makes the contents easy to see and offers great ventilation—give it a try! Adding illustrations or decorations to give it a personal touch will make it even more wonderful.