Toddler-approved fun! DIY toy ideas for 2-year-olds


At around age two, as a sense of self begins to emerge, children start to assert themselves clearly.
Their curiosity and desire to say “I want to try!” become stronger, which expands their range of activities.
They can also perform finer finger movements, widening the kinds of play they enjoy.
It’s wonderful to support their physical and emotional development through lots of play.
With that in mind, here are some recommended handmade toys for two-year-olds.
From toys that use the fingers, to sound-making items, to things perfect for pretend play—this collection is packed with handmade toy ideas that two-year-olds will be captivated by.
Find the ones that best fit your child’s stage of growth and give making them a try.
- For 2-year-olds! Fun craft activities and indoor play ideas
- [Childcare] Recommended play ideas for caring for 2-year-olds
- Make it with everyday materials! A collection of DIY toy ideas recommended for 1-year-olds
- Let's make toys with paper cups! Simple and fun handmade toys
- Origami for 2-Year-Olds: Fun and Educational! Origami Ideas for Toddlers
- Ideas for indoor play, physical activities, and games suited to the development of 2-year-olds
- [Nursery/Kindergarten] Crafts you can play with after making them
- [For toddlers] Simple but amazing craft ideas — including toys they can play with
- [Age 2] Summer Fun! Simple Origami Toys Perfect for Indoor Play
- September crafts for 2-year-olds! A collection of make-and-play ideas to enjoy autumn
- No prep needed! Indoor play and game ideas that 2-year-olds will enjoy
- Let’s make it with 3-year-olds! Fun handmade toy ideas
- Let's make toys with milk cartons! Easy and fun DIY crafts!
Homemade Toy Ideas (1–10) That Delight 2-Year-Olds
Ball Rolling & Puzzle
This craft lets you enjoy both a puzzle and a marble-rolling game with a single creation, so it’s great for keeping kids engaged for a long time.
The puzzle is simple: cut out the round parts of the illustration and fit them back in, making it suitable even for younger children.
When playing the marble-rolling game, remove the round pieces used for the puzzle, place a ball on the illustration, and tilt it so the ball falls into the cut-out holes.
Since you can switch between the two modes daily, it’s also a craft that older adults can enjoy regularly without getting bored.
drop-in box toy
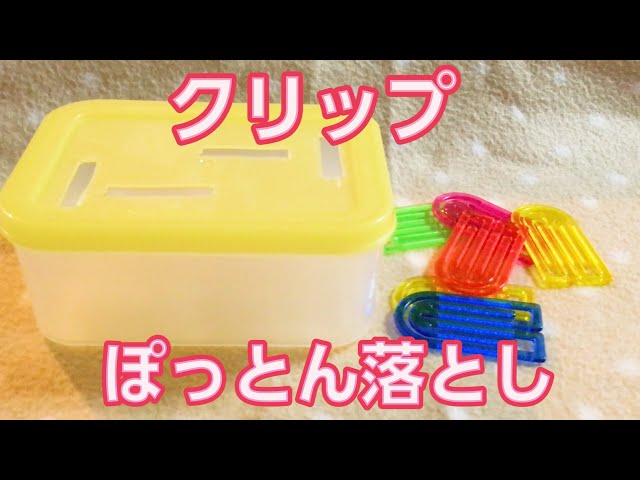
“Poton-otoshi” (drop-in game) is a recommended item for keeping two-year-olds engaged and focused.
You can make one yourself with large clips and a plastic container with a lid.
The method is simple: just make holes in the lid that are the right size for the clips! Create several holes at different orientations.
Let the children play by dropping the clips—“poton”—into the holes.
It’s a simple setup, but picking up the clips with their fingers and inserting them into the holes requires fine motor skills.
It’s wonderful to be there to witness their “I did it!” moments.
fishing
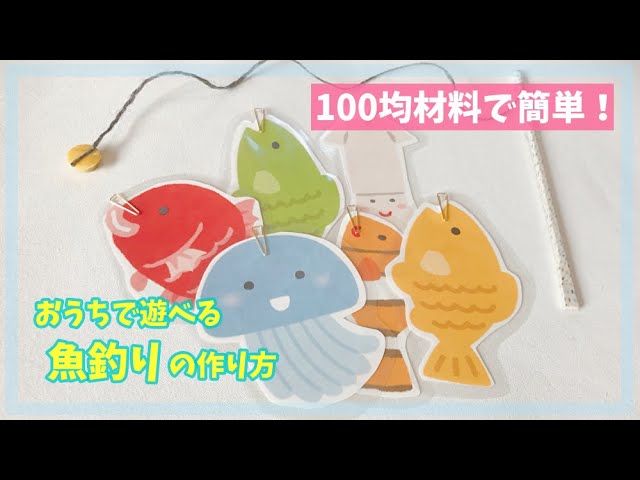
A fishing game is a fun activity where the thrill comes from the “I caught one!” moment.
Prepare pictures of fish, octopuses, and other sea creatures using free illustrations, hand-drawn art, or coloring pages—whatever you like.
Make them together with the kids and have fun.
Then coat them with laminating film from a 100-yen shop.
Next, attach paper clips to the laminated pieces.
After that, tie a string to a pair of chopsticks and attach a magnet to the end, and you’re done! It’s a simple setup where the paper clips stick to the magnet, but it’s so much fun when you catch a lot.
Be sure to play it a lot with the kids!
Toddlers Will Love It! Handmade Toy Ideas (11–20)
bodkin (drawstring threader)

Two-year-olds are becoming more dexterous and can concentrate on tasks that use their fingertips.
A perfect activity for this stage is “stringing.” First, make motifs from milk cartons in your child’s favorite colors and shapes.
After cutting them into the shapes you like, cover them with felt or add patterns, and make plenty of pieces.
Next, punch holes in the motifs with a hole punch.
Prepare a string of suitable length, tape one end with cellophane tape to make threading easier, and you’re done! Have fun threading the string through the motifs to connect them together.
Felt Sandwich

You can make a “felt sandwich” using a puzzle mat.
First, prepare two pieces by attaching felt to mats cut into the shape of sandwich bread, and fix them in place with a gap between them.
Next, use felt to create various fillings that fit into that gap.
Make whatever you like—fruit sandwiches, egg sandwiches, ham, lettuce, and more.
Just slide the fillings into the bread and your sandwich is complete! It’s sure to make pretend play even more fun.
clothespin

It’s said that developing finger dexterity in two-year-olds provides good stimulation for the brain.
Try incorporating a clothespin activity as a finger-use play.
First, make a favorite motif out of construction paper.
Think of a design that will be completed by attaching clothespins.
Next, reinforce the motif by laminating it or covering it with clear tape.
After that, let your child have fun attaching clothespins to the motif however they like.
If you choose wooden clothespins, they won’t hurt as much even if fingers get pinched, and you can also paint them in any colors you like.
sensory bottle

A sensory bottle is not only an item that stimulates sight with the slow movement of glittering materials, but also something children can play with by moving the bottle with their hands.
Choose a container with a smooth surface, such as an empty lactic acid bacteria drink bottle.
Fill it with cooled boiled water and liquid laundry starch (or clear glue), then add fun elements that move—like glitter, small beads, or rings—and it’s done! It’s fun to make many with different colors and themes.
To prevent leaks, secure the cap firmly with glue and tape.