[Origami] Simple Origami Folding Ideas to Savor Spring with 5-Year-Olds

Origami is one of those activities that nurtures dexterity in the fingers and boosts concentration, positively supporting children’s healthy development.
By the time children are five, the range of things they can make with origami increases dramatically, so it’s great to incorporate an environment in childcare where they can freely create anytime.
Here, we’re sharing spring-themed origami ideas for five-year-olds.
We’ve included plenty of fun folding instructions featuring springtime flowers, insects, and seasonal foods.
Add little twists—like drawing on what you made or adding stickers—to expand the play, and make good use of these ideas for spring crafts.
- [Origami] Easy spring-themed origami ideas to enjoy with 4-year-olds
- For 5-Year-Olds: Let’s Make It! A Collection of Craft Ideas to Feel the Spring
- [Origami] Simple Origami Ideas to Feel the Spring with 3-Year-Olds
- [Kindergarten (older class)] What kind of season is March? Let’s make events and natural objects with origami!
- [Childcare] Simple origami ideas for kids, perfect for spring
- Origami Butterfly Ideas That Are Easy for 3-Year-Olds
- [For 5-year-olds] Let's make it in April! A collection of craft ideas using recycled and natural materials
- [For 4–5 year olds] A collection of recommended origami ideas for March—featuring seasonal events and natural motifs
- [For 4-year-olds] Let's fold! A collection of simple rabbit origami ideas
- [For preschoolers] A collection of origami ideas to enjoy February, including Setsubun and Valentine’s Day
- [For 5-year-olds] Picture Books to Read in Spring | Let’s Explore Different Worlds with Children
- [Childcare] A roundup of easy summer origami ideas to enjoy with 5-year-olds
- [Childcare] Make it in April! Recommended easy origami folds
[Origami] Simple paper-folding ideas to enjoy spring with 5-year-olds (21–30)
A tulip you can stand up and display! A three-dimensional tulipNEW!

Here’s a cute tulip idea you can display on a tabletop rather than on a wall.
For the flower, fold a sheet of origami paper into a triangle twice, then squash the pocket into a square.
Fold the left and right corners inward to form the tulip shape.
Before spreading the flower open from the center, make a small cut at the bottom with scissors so you can insert the stem later.
The leaf and stem are made from a single sheet of origami paper.
First, fold it into a triangle once.
Open it after creasing, then fold the two left edges to the crease line twice, and the right edge once to the crease line.
This way, the stem will be on the left and the leaf on the right.
Finally, fold the stem and leaf together in half, and insert the stem into the flower to finish.
pill bug

Pill bugs are popular with kids! Here’s an idea for making one with origami.
What you’ll need: gray or black origami paper, white round stickers, and a black pen.
Pill bugs like damp places, such as under stones or fallen leaves.
They’re probably quite familiar to children, aren’t they? The key folding point is the zigzag accordion fold, shifting the paper slightly as you go.
It helps to imagine the shape of a pill bug as you make it.
Give it a try!
[Origami] Simple Origami Ideas to Savor Spring with 5-Year-Olds (31–40)
Cute in a row! Origami tulips

From a diamond shape to a tulip! This is a fun origami idea with a neat transformation.
First, fold the paper into a triangle, then fold the two top layers into triangles and tuck them inside.
Fold the left and right corners the same way.
Next, fold both sides up along the center line to make a diamond shape, flip the paper over, and fold the left and right corners to meet the center line.
Fold the inside of those corners to the center line to create three petals.
Finally, combine it with a stem and leaves made from green origami paper.
You’ll have a poised, beautiful tulip.
Even little kids can fold it! Cute tulip

Tulips are perfect for spring message cards and wall displays.
The method is simple, making it great for children’s fine motor practice.
Prepare two sheets of origami paper and fold them separately for the flower and the leaves.
For the flower, fold the paper in half into a triangle, then hold the left and right corners and fold them up diagonally.
Flip the paper over, fold the tip to round it off, and the flower is complete.
For the leaves, fold the paper into a triangle twice, then fold the tip toward the center.
When shaping the leaves, watch the balance and make them even.
It’s also a great idea to glue the finished leaves and flower together and add a message.
Give it a try!
A three-dimensional cherry blossom made from a single sheet of origami
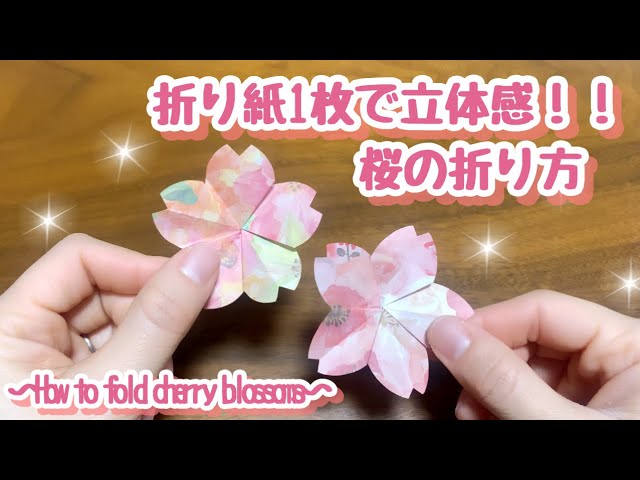
Let’s make a three-dimensional cherry blossom using just one sheet of origami paper.
First, fold the paper in half and crease an X on one side.
From the side without creases, fold toward the center of the X, then fold that side in half.
From the side with the creases, fold up to the edge of the section you just folded, then fold it outward in half from there.
When you have a shape like an irregular triangle, draw a petal-like outline of a cherry blossom, cut along that line, and unfold.
Following the creases on the flower, refold it into an accordion shape, then on both the front and back, make narrow creases from the left and right edges.
Using these creases as axes, unfold the flower again to complete a three-dimensional cherry blossom!
Fluttering butterfly

Let’s make and play! Here’s an idea for a fluttering butterfly.
All you need is one sheet of origami paper in your favorite color.
Crafts you can play with after making are always popular with kids.
Unlike a paper airplane, this butterfly twirls and flutters as it flies, which is really charming.
The steps are simple and easy to follow, but it seems there’s a trick to getting it to fly well.
Try adjusting the angle of the wings as you fly the butterfly.
Give it a try—make one and have fun!
Sakura petal made of origami

Let’s make cherry blossom petals that look a bit like hearts, with a cute three-dimensional feel.
After folding the origami paper into a triangle twice, fold the tip inward along the center line.
Flatten the upper part to shape it into a petal.
Cut the center area while leaving the edges intact, then overlap one side over the corner-folded side, and overlap the other side to create depth; glue them together to finish.
If you make lots of petals and everyone assembles them into a big cherry blossom tree, the project will feel richer and more fun.