[For Adults] Fun Craft Ideas Perfect for Killing Time

When you find yourself with some free time, how do you spend it?
Many people probably end up doing the same things they usually do, like playing mobile games or watching videos.
But this time, how about taking your eyes off your phone or tablet and trying a craft project?
In this article, we’ll introduce craft ideas that are perfect for adults looking to pass the time.
We’ve gathered a variety of projects—from ones you can try casually to those you can savor over a longer stretch.
Every now and then, try a digital detox and spend some peaceful time on something analog!
- [For Adults] Simple yet Impressive Crafts: A Stylish, Eye-Catching Collection
- [For Adults] Make the Most of Your Free Time! Ideas to Kill Time
- [100-Yen Store Crafts] Handmade ideas that captivate adults too. Stylish DIY/handmade.
- Craft projects recommended for adult hobbies: a stylish and cute collection of works
- Easy-to-make crafts for adults. Projects recommended for beginners.
- [Indoor Activities] A Collection of Craft Ideas Recommended for Elementary School Students
- [Great for killing time!] Winter-Recommended Craft Ideas for Adults
- Simple and easy! Crafts perfect for killing time
- Christmas crafts for adults: stylish project ideas you'll want to display
- [For Kids] Today’s Handmade Craft Ideas
- [For Adults] Recommended Craft Kits
- Crafts parents and kids can enjoy together. Recommended craft ideas to keep children entertained.
- [DIY] A Collection of Handmade Moving Toy Craft Ideas
[For Adults] Fun Craft Ideas Perfect for Killing Time (1–10)
UV resin accessories

Resin liquid is now widely recognized as a staple material.
It hardens easily under sunlight or a UV lamp, making it very convenient.
Here, including the resin and molds, let’s try making earrings and pierced earrings using only items you can get at a 100-yen shop.
It’s rewarding because you can enjoy the process and also use what you create.
While you could probably make your own molds, using ones sold at 100-yen shops lets you get started right away.
Add glittery materials, beads, or anything you like inside to create accessories that are uniquely yours.
Lantern
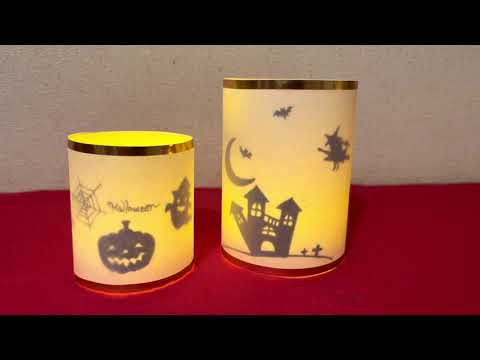
Let’s try making a lantern using an empty plastic bottle.
Besides the empty bottle, you can get everything you need at a dollar store, such as copy paper, glue, and scissors.
Cut off both ends of the plastic bottle using a heated utility knife.
Print a pattern on copy paper and cut it to match the size of the cut bottle.
You can also draw your own illustrations for a more original touch.
Cut a sheet of tracing paper to the same size as the copy paper.
Wrap the copy paper inside the plastic bottle and the tracing paper on the outside, then attach them with glue or similar adhesive.
Place a candle-style LED light inside, and you’ll have a lovely lantern with softly glowing images.
Wooden puzzle

If you enjoy focusing on a task, how about trying a wooden puzzle? Even if you don’t make one from scratch, there are plenty of kits available that you can simply assemble.
For adults in particular, I recommend intricate 3D puzzles with finely detailed pieces.
Wooden puzzles that faithfully recreate things like battleships or towers are perfect for passing the time.
Once completed, they make great interior decor, and if you want to take it a step further, you can even paint them.
Find a motif you like and give it a try.
[For Adults] Fun Craft Ideas Perfect for Killing Time (11–20)
kaleidoscope

A kaleidoscope creates different patterns every time you twist it.
Beautiful designs are reflected on many surfaces, and just looking at them can make you feel a sense of wonder.
It may seem delicate and difficult to make, but there are easy ways to craft one.
Put beads or other items that will form the pattern into a small transparent container, then wrap construction paper around a plastic card case used as the core.
A real kaleidoscope uses mirrors inside to make it look like there are many patterns.
You can substitute mirrors with a transparent card case shaped into a triangular prism.
You can also decorate the body of the kaleidoscope to your liking by using patterned construction paper or origami paper.
Give it a try and make a lovely kaleidoscope!
stained glass

When we think of stained glass, we often picture an elegant hobby for adults, but you can make something similar using items from a 100-yen shop.
First, prepare a photo frame from the 100-yen store.
Cut a clear plastic sheet to the same size and sketch your design.
Then use glass paint to draw the outlines.
Once the outlines dry, fill the inside with colored glass paint.
To make the transparent areas look like glass, randomly drop UV resin and cure it with a UV light.
You can work on it little by little in your spare time, so give it a try!
smartphone stand

A handy smartphone stand for setting your phone down for a moment.
This piece combines hobby and practicality.
Let’s make it using a small box made of thin cardboard.
First, fold the box and flatten it, then divide it into two parts.
There’s a blueprint available, so downloading it will make the process easier.
Fold the two separated pieces, combine them, and make them into one.
You can leave it as is, but you can also decorate it by gluing colorful paper to the sides of the cardboard or adding tape and stickers.
plastic model kit

Some of you probably built plastic model kits when you were kids.
If you try building them again as an adult, you might discover a new kind of enjoyment by creating more authentic, detailed pieces.
For example, it could be fun to build a Gundam model you loved as a child, a castle, or even a model of your own car.
In your spare time,