How to Tie a Hachimaki: Handpicked Cute & Cool Styles Perfect for Sports Festivals


Many schools use hachimaki headbands at sports festivals to boost team spirit! The most common way is to wrap it around your forehead or slightly above, then tie it at the back of your neck.
But maybe you’ve wanted to take it up a notch with a cuter or cooler style than the simple wrap.
In this article, we’ll introduce different ways to style a hachimaki.
We’ve gathered a variety of patterns—from cute arrangements combined with hairstyles to cool looks that radiate fierce determination.
Stand out from other teams with a hachimaki style that’s a cut above the rest!
- Top Songs to Hype Up Sports Day and Athletic Festivals [2026]
- Hairstyles for sports festivals and school field days (hachimaki headbands are OK)
- [Boost Your Energy] A Collection of Cool and Funny Team Huddles
- [2026] Curated J-POP to Energize Sports Days and Athletic Festivals! Also Great as Entrance Music
- Popular Dance Songs Ranking [2026]
- [Tearjerker] Songs that make your heart tremble with tears & moving tracks with lyrics that touch the soul
- [Dance Tracks] Perfect for School Sports Days! A Curated Selection of Fun, Popular Songs to Dance To [2026]
- [Korean-Style Hair Arrangements] Perfect for Sports Day! Carefully Selected Recommended and Trendy Hairstyles
- Double the thrills and excitement! Borrowed-Item Race prompts
- Cool Dance Moves! A Roundup of Popular Girl Idol Groups
- Get hyped! A collection of Vocaloid songs to energize your sports day and athletic festival
- [Sports Day] A roundup of popular Japanese songs perfect for mass performances [Athletic Festival]
- [Sports Day Cheer Songs] A roundup of classic cheer anthems and recommended parody-song picks [2026]
How to Tie a Hachimaki: Top Cute and Cool Styles for Sports Festivals (11–20)
braided on the side

This side braid style is recommended for medium to long hair.
First, gather and tie all the hair above the ears, except for the bangs, to either the left or right side.
Place a headband at the knot so that both ends are even in length, and tie it once.
Move the knot to the back, then start a three-strand braid, weaving the headband into two of the three sections of hair.
Once you’ve braided to a certain length, tie off the braid together with the headband.
Finally, use the remaining ends of the headband to tie a bow at the end of the braid, and you’re done!
twisted headband
This twisted hachimaki can be enjoyed by anyone, regardless of gender.
Making the twist is very simple—just take both ends of the hachimaki and twist them around! That’s all it takes to make a twisted hachimaki with ease.
When you twist it, it becomes quite slim, giving it a headband-like look that’s stylish.
A plain, untwisted hachimaki can stand out quite a bit when you wear it, but in this shape you can enjoy a more subtle, fashionable hachimaki style.
If you want a bolder, cooler twisted hachimaki, it’s best to use one made from wider fabric or a tenugui.
fighting knot

The name might be a bit surprising, but this style lets you enjoy a very bold hachimaki look.
Bring the headband to the back of your head and wrap it around to your forehead.
Tie it once at the center of your forehead.
The key is to make it a vertical knot (reef knot aligned vertically).
Then, carefully remove it from your head without ruining the shape and tie it again over the first knot so it becomes a vertical knot once more.
As you tie, adjust so that the end that ends up on the lower side (top-and-bottom side) doesn’t stretch out too long.
Shape it neatly, wrap it back around your head, and do a final round of shaping to finish.
It’s a cool arrangement where a single horn-like end of the hachimaki sticks out.
Muko Shibari (a rope-tying technique in Japanese bondage)
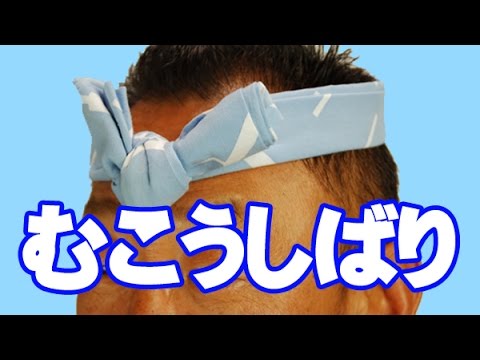
The mukō-shibari style gives you a look like you’ve grown cool horns.
It’s very easy to make: first, wrap the headband from the back of your head and tie it lightly once at the center of your forehead.
Then, carefully remove it from your head without ruining the shape, and tie it again just above the knot you made.
Adjust the knot so that the remaining ends stick out sharply upward at a slight angle to the left and right.
Put it back on your head, make final adjustments to the knot and the upward-angled “horns,” and you’re done!
kururinpa twin tails

A flip-through twin-tail hairstyle that works for both long and medium hair.
It’s perfect with a headband (hachimaki), so if you find regular twin-tails boring, this is a must-try! Divide your hair into two sections, take the hair above the ears, and loosely tie each side with a thin elastic.
Then flip the tied section through (topsy tail).
To finish, gather the remaining hair together with it and tie.
The key is to tie it slightly higher behind the ears to create space for the hachimaki to pass through.
Do the same on the other side and adjust the height on both sides.
Since this style keeps the hachimaki from slipping, give it a try when you want to bring your A-game on sports day.
Energetic Knot

If you want a bold, cool look, we recommend this Energetic Knot.
First, wrap the headband around your head from the back and adjust it to fit your head size.
While firmly holding the length that matches your head size with your fingers, remove the headband from your head.
Using the point you were holding as the starting point, start tying the knot.
Fold the end of the headband to create a triangle shape as you tie.
Once you’ve made a solid triangle, you’re done! Put it on so the knot sits right in the center of your forehead.
How to Tie a Hachimaki: Top Cute & Cool Styles for Sports Festivals (21–30)
Ponytail with a ribbon bow
@sapporoshinyo Hachimaki arrangements for the sports festivalSapporo#JKHachimaki arrangementShinyou High School#SeriousChallengeGem Student
♫ Original song – rino – 27__blue___
For those with long hair, we recommend tying a ribbon on a ponytail! First, make a regular ponytail.
Then bring the headband to the knot and simply tie it in a bow! Instead of looking like a headband, it looks like you’ve tied on a big ribbon—super cute! If you check in a mirror or get a friend to help adjust the loops and ends of the bow, it will look even neater.
It’s a style that adds a lively touch to a standard ponytail.