Let's handcraft friendship bracelets! A collection of cute designs that will make you want to create them

Misanga bracelets are said to grant your wishes when you wear them.
They’re worn on the wrist or ankle, and there’s a rule that once you put one on, you shouldn’t take it off—but many people enjoy wearing them casually as accessories.
They’re also popular as matching items for sports days and school athletic festivals!
In this article, we introduce how to make misanga bracelets.
We cover a variety of designs—hearts, flowers, ribbons, leaves, and more—so feel free to use them as a reference and give it a try!
Let's make friendship bracelets by hand! A collection of cute, must-make designs (1–10)
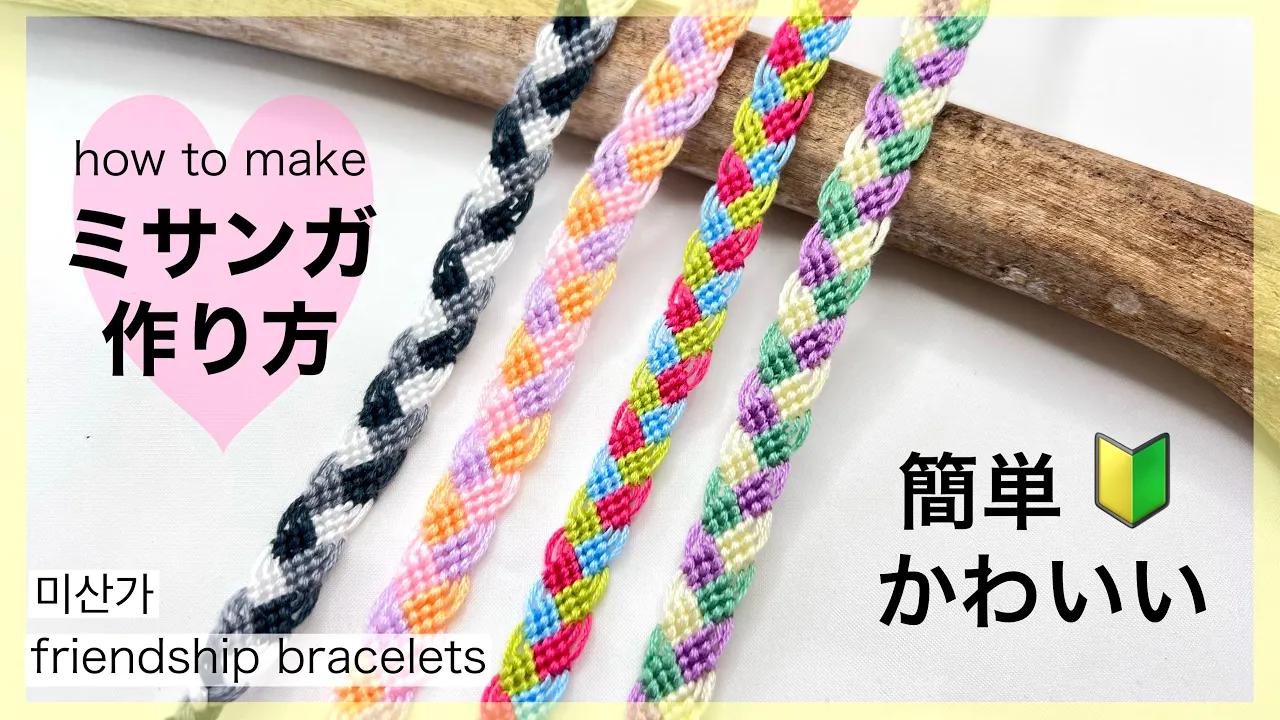
Cute! Three-color misanga (friendship bracelet)

This is a friendship bracelet with three alternating colors of shapes that look beautiful and convey a soft feel.
You’ll use a total of nine threads: three colors with three strands of each, grouping each color together.
Start on the left: knot the left color over the adjacent color using a 4-shaped (forward) knot, working the strands in order from the one touching the neighboring color.
Once the left-side color has moved to the center, switch to the right side and weave that color toward the center in the same way.
By repeatedly moving the colors to the center alternately until you reach the desired length, the bracelet is complete.
V-shaped woven friendship bracelet [6 strands]
![V-shaped woven friendship bracelet [6 strands]](https://i.ytimg.com/vi/Kqpba8kHS-A/sddefault.jpg)
It has the impression of a basic friendship bracelet shape, with three colors forming V’s lined up in sequence.
You fold three colored threads in half, secure the ends, and braid using six strands.
Arrange the same colors from the inside to the outside, then weave one row at a time from the outside toward the inside.
As you knot the outer strand toward its neighbor in order, the strand that started on the outside will end up on the inside.
Then, with that new arrangement, you again knot the outer strands toward the inner strands, and repeat.
Make sure to tighten each knot firmly, and be mindful of placing the knots so the bracelet ends up flat.
Small Heart Friendship Bracelets [Set of 4]
![Small Heart Friendship Bracelets [Set of 4]](https://i.ytimg.com/vi/TEN4jBkK1hM/sddefault.jpg)
This is a cute friendship bracelet that looks like small hearts in two colors lined up alternately.
You layer two types of threads, fold them, secure the end, and then start knotting—so you’re essentially working with four strands: two colors, two strands each.
Arrange the four strands as outer color and inner color, then tie the outer strand to the neighboring strand twice, repeating this for each side, and then swap the color positions.
Next, take the same color that moved inward and tie it twice; that completes one sequence.
Repeat the same steps in this arrangement.
It’s also important to slide the knots firmly up to the secured end and to tie tightly with consistent tension.
Flower friendship bracelets [6 pcs]
![Flower friendship bracelets [6 pcs]](https://i.ytimg.com/vi/EAaLA3XeRO0/sddefault.jpg)
In addition to its appearance of connected circles, this friendship bracelet is charming for the flower-like pattern where the circles intersect.
You’ll use three colors of thread: a loop thread, a flower center thread, and a petal thread; keep the loop thread longer.
First, wrap the loop thread to hide the other threads.
Once you reach a certain length, bend it, arrange the three colors in two strands each, and braid them to form the flower shape.
After completing a flower, tape it in place, then use the loop thread to braid the left and right sets of three-color threads as in the first step.
When braiding with the loop thread, handle the left and right bundles separately; when making the flowers, braid the left and right threads together.
The method is simple, but there are many steps, so paying attention to each knot is important.
Ribbon friendship bracelets [5 pieces]
![Ribbon friendship bracelets [5 pieces]](https://i.ytimg.com/vi/VA10lWbHe1c/sddefault.jpg)
This is a cute-looking friendship bracelet with three-dimensional ribbon-like decorations placed along the way.
It uses a layout of three threads in the center and two threads on each side, with the three center threads tied into a raised ribbon shape.
The non-ribbon sections are worked in flat knots that wrap around the central threads.
To make the later ribbon sections stand out, be sure to knot firmly so the central threads don’t show.
After braiding to a certain length, move on to the ribbon step: bundle the central threads and tie a knot by wrapping them around the outer threads.
Then simply repeat the flat-knot sections and the ribbon sections to complete the bracelet.
It’s also recommended to decide on a set number of flat knots between ribbons so the spacing remains consistent.
Initial bead friendship bracelet

A design where a bead is incorporated into the friendship bracelet—especially with the person’s initial—makes it easier to identify the owner if it’s lost.
Secure the bead firmly by creating a knot, using it as the starting end, and then braid the bracelet outward from both sides with the threads.
The braiding method is a simple three-strand braid: gather the threads that extend from the bead into three bundles and braid them in sequence.
Once you’ve braided to a sufficient length, tie off the ends to finish.
It’s recommended to keep the lengths from the bead the same on both sides.
[Bead Weaving] Friendship Bracelet with Letters
![[Bead Weaving] Friendship Bracelet with Letters](https://i.ytimg.com/vi/sUGrSH2DBmQ/sddefault.jpg)
This is a friendship bracelet that uses threads as the base and creates various patterns with beads.
You can adjust the number of beads per row, so you can enjoy flexible designs, not just patterns but also letters.
The layout places thick threads at both ends with thin threads arranged between them.
Imagine lining beads between these thin threads, then weaving in a beaded thread through them.
To make it more durable, pay attention to how you pass the beaded thread relative to the warp (vertical) threads as you work.
Color balance is also important—choose bead colors that harmonize with your threads.