[Crafts for 3-Year-Olds] A Collection of Fun Ideas for Autumn! Let's Incorporate Seasonal Motifs

Autumn is a season when you can really feel nature, with things like nuts and fallen leaves.
There are also plenty of events, such as Respect for the Aged Day and Halloween.
You’d love to enjoy making crafts, but don’t have time to come up with ideas…
For teachers like you, we’ve gathered craft ideas that three-year-olds can enjoy in autumn! We introduce a variety of ideas with different aims—using natural materials or creating items for events.
Please use these as a reference and enjoy calm, autumnal days with the children.
Note: Since items made by children are treated as works (artworks), we use the term “seisaku” (制作) in the text.
- [November] Enjoy with 3-year-olds! Craft activity ideas recommended for autumn
- Preschool: Autumn-Themed Craft Ideas Recommended for November
- [Preschool] Recommended for 3-year-olds! Easy-to-make fall origami craft ideas
- [Childcare] Recommended for 3-year-olds! Craft activity ideas
- Autumn Acorn Craft Ideas! Enjoy with Your Kids
- [For 3-year-olds] Perfect for September! A Collection of Craft Ideas to Enjoy Autumn Nature
- [October] Craft ideas for fall you can use in childcare
- [Autumn Activities] Nature Play and Craft Ideas for Fall to Incorporate into Childcare!
- Autumn craft ideas that will captivate 2-year-olds! Have fun making them and enjoy the fall to the fullest
- Grape craft ideas to enjoy in childcare! Have fun making autumn fruits
- Craft ideas for 4-year-olds to try in autumn! Enjoy creative activities with seasonal motifs and events.
- [Childcare] Perfect for 3-year-olds! October craft ideas
- [Childcare] Autumn craft ideas
[Crafts for 3-Year-Olds] A Collection of Fun Ideas for Autumn! Let’s Incorporate Seasonal Motifs (21–30)
Three-dimensional bagworm

Here’s a 3D bagworm origami idea.
You’ll make it in two parts: one head piece and two cloak (mino) pieces.
First, we’ll make the head.
Fold the paper into a triangle to make a crease.
Fold the bottom corner up to the crease, then roll up the bottom edge about 5 mm.
Fold along the crease again to return it to a triangle.
Flip the paper over, fold both corners inward, then fold them back outward.
Fold the outer corners of the small triangles you just made upward, and also fold the bottom corner inward.
Next, for the cloak: Fold the paper into a triangle, then fold both side corners up to meet the top corner.
Slightly fold the raised top corner back down, open that part, and squash it flat.
Flip the squashed section to the back, then fold the lower left and right edges slightly inward.
That’s one cloak piece done.
Make two of these, attach them to the head, draw the face, and you’re finished.
A self-standing pine cone!

A three-dimensional pine cone that’s perfect for autumn decorations can be made by gluing together several parts.
Prepare four pieces cut from a single sheet of origami paper divided into quarters.
Fold each piece into a triangle, then fold both sides up at positions set slightly away from the center line.
Open it up and fold the triangular tip to create a part.
Make four identical parts, then glue them together to form the shape of a pine cone.
The key is to glue them while checking the balance and width.
Give this three-dimensional, autumn-inspired pine cone a try!
[Crafts for 3-Year-Olds] A Special Feature of Ideas to Enjoy in Autumn! Let’s Incorporate Seasonal Motifs (31–40)
Two types of Mushichan only for infants and toddlers
Here are two fun bagworm craft ideas using twisted tissue paper and paper tape loops.
First, cut a square piece of tissue paper and round off one side with scissors.
Gently twist the side you didn’t cut, and glue it onto a base for the bagworm made from construction paper.
Prepare tissue paper in various colors to make a colorful “mino” (the bag).
Attach a face made from construction paper to finish.
For the paper tape version, cut the tape to a suitable length, glue one end to the base, then overlap the other end to form a loop and secure it.
Cover the whole body in rows, and finish it the same way by adding the face.
A bagworm papercraft made with an envelope
Let me share an idea for making a bagworm using a brown envelope.
Cut off the top of the envelope with scissors, then fold the top left and right corners to the back.
Stick on eyes made by layering white and black round stickers, and then decorate the body with colored paper or yarn to represent the case.
Tear the colored paper into small pieces beforehand, and cut the yarn into suitable lengths.
Finally, tape a piece of jute string to the back of the envelope, and it’s done.
In addition to colored paper and yarn, you could also glue on leaves or small twigs you collected on a walk for a cute touch.
Make a cute bagworm with kraft paper and washi tape!
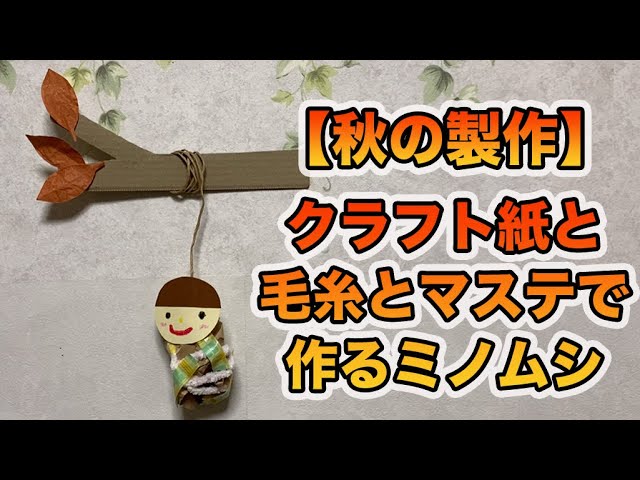
I’ll show you how to easily make a bagworm using kraft paper, yarn, and masking tape! First, roll up the kraft paper to form the body.
Wrap yarn around it and stick pieces of masking tape on randomly.
Next, draw a face on the face parts you made from colored construction paper, then attach it to the body with double-sided tape.
Finally, tape a string to the back of the face with clear tape, and you’re done! If children will be handling it, twine is recommended.
It looks super cute if you also make a tree branch out of cardboard and hang it, so give it a try!
Grapes made with origami
Open the origami after folding it into a triangle, and place it so the crease runs horizontally.
Fold the two left edges in to meet the crease, then fold the right corner toward the center.
If the origami forms an isosceles triangle, the base for the grapes is complete.
Apply double-sided tape to the front and attach crumpled tissue paper to represent the grape berries.
Finally, glue on a stem made from construction paper to finish.
Using several shades of the same color for the tissue paper gives a vibrant look.
Switch to green to make muscat grapes.
How to fold a 3D persimmon that even 3-year-olds can make!

Let’s make this idea using double-sided origami paper in orange and green.
The steps up to opening the paper into a diamond—folding the paper into a triangle twice, squashing it into a square, and opening it—are the same as for a crane.
From there, fold the diamond by layering its flaps, then fold the corner that will become the center of the model inward to create a crease.
Fold the bottom corner up to meet that crease, and then, imagining you’re forming a box, repeat the same folds for the remaining three sides.
Unfold the corners you folded down once, make a slit along the horizontal crease, fold it back to the reverse side, and switch the color to green.
This will be the stem.
The center portion will be the fruit, so shape it so it looks plump.