[Crafts for 3-Year-Olds] A Collection of Fun Ideas for Autumn! Let's Incorporate Seasonal Motifs

Autumn is a season when you can really feel nature, with things like nuts and fallen leaves.
There are also plenty of events, such as Respect for the Aged Day and Halloween.
You’d love to enjoy making crafts, but don’t have time to come up with ideas…
For teachers like you, we’ve gathered craft ideas that three-year-olds can enjoy in autumn! We introduce a variety of ideas with different aims—using natural materials or creating items for events.
Please use these as a reference and enjoy calm, autumnal days with the children.
Note: Since items made by children are treated as works (artworks), we use the term “seisaku” (制作) in the text.
- [November] Enjoy with 3-year-olds! Craft activity ideas recommended for autumn
- Preschool: Autumn-Themed Craft Ideas Recommended for November
- [Preschool] Recommended for 3-year-olds! Easy-to-make fall origami craft ideas
- [Childcare] Recommended for 3-year-olds! Craft activity ideas
- Autumn Acorn Craft Ideas! Enjoy with Your Kids
- [For 3-year-olds] Perfect for September! A Collection of Craft Ideas to Enjoy Autumn Nature
- [October] Craft ideas for fall you can use in childcare
- [Autumn Activities] Nature Play and Craft Ideas for Fall to Incorporate into Childcare!
- Autumn craft ideas that will captivate 2-year-olds! Have fun making them and enjoy the fall to the fullest
- Grape craft ideas to enjoy in childcare! Have fun making autumn fruits
- Craft ideas for 4-year-olds to try in autumn! Enjoy creative activities with seasonal motifs and events.
- [Childcare] Perfect for 3-year-olds! October craft ideas
- [Childcare] Autumn craft ideas
[Crafts for 3-Year-Olds] A Special Feature of Ideas to Enjoy in Autumn! Let’s Incorporate Seasonal Motifs (31–40)
An easy way to fold fallen leaves (origami)

Fold the paper into a triangle with the colored side on the inside.
Next, fold the base of the triangle back diagonally, leaving about 2 cm from the edge.
Then place it so the 90-degree corner is at the lower right, and fold so that the tip points downward.
From there, continue folding in an accordion (zigzag) manner so that each fold overlaps the one you just made.
When you open up the part you’ve been folding at the end, you’ll have a fallen leaf with veins expressed by the crease lines! Using various colors of origami paper—brown, orange, yellow, and so on—might make it feel like you’re enjoying autumn leaf viewing.
How to fold a cute fox

After folding the origami paper in half into a square twice to make creases, open it, then fold the left and right edges to meet the central crease.
Next, fold the top and bottom edges to meet the horizontal central crease.
Open and flatten the folded top and bottom sections into boat shapes, then make a mountain fold down the center so the two boats overlap.
Hold the lower-left corner of the top boat and fold it upward perpendicular to the boat to form the fox’s face.
Fold the right corner upward toward the back, keeping the two layers together.
The remaining part is the body, and the section you just folded up is the tail.
Draw the face to finish it cutely.
Easy way to make grapes
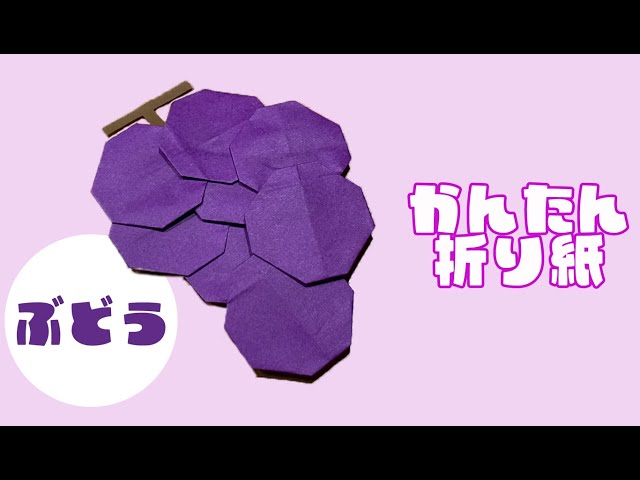
We’ll make this using sheets of origami paper cut in half.
First, fold the origami paper in half vertically, then fold all four corners in toward the crease.
Next, fold it in half so the fold is perpendicular to the first crease.
This will create two 90-degree corners; fold those corners inward toward the center to make creases.
Open it back up, then tuck along the creases to form a square.
Next, take the corner on the closed side of the square and make two small folds; when you open the square, it will look like two quadrilaterals connected together.
Finally, fold the corners to make an octagon, and you’re done.
Make four of these and glue them together to create a bunch of grapes.
Some steps may be a bit hard to understand, so please watch the video carefully as you work.
Since you’ll be making several of the same piece, the children will likely get better at it as they go!
Perfect for Halloween! Ghost origami

After folding the origami into a triangle, open it, then fold the two left edges in to meet the crease.
Rotate the paper so that the newly formed point is at the bottom, and open the two opposing corners along the crease outward into triangles.
Fold the upper left and right edges in to meet the crease, then fold the top point down to the base of the triangle.
Slightly tuck the two top corners inward, then fold the bottom corner up to the left diagonally.
Unfold to set the crease, then fold the left edge of the triangle beneath the crease in to meet the crease.
Finally, fold up along the crease, and your ghost is complete.
Fun in autumn! Roasted sweet potato origami

After folding the origami into a square and creasing it, open it up and place the paper so the crease runs horizontally.
Fold the top and bottom edges to the crease, then fold all four corners inward to complete the roasted sweet potato.
This alone gives plenty of autumn vibes, but let’s add one more touch.
Tear the roasted sweet potato you made in half, and insert a yellow “roasted sweet potato” made the same way inside.
Now you’ve made a half-eaten roasted sweet potato.
It also works as a wall decoration and seems like an idea that could contribute to children’s food education.
[Crafts for 3-Year-Olds] A Special Collection of Ideas to Enjoy in Autumn! Incorporate Seasonal Motifs (41–50)
Grape craft for ages 1 and up
@hoikushisatomi From around age 1: Just roll and pop it in! Simple fine-motor play craftNursery teacher / Childcare workerKids will love it#NurseryTeacherDailyLifework#OuchiMonteTranslation#grapes
♬ Whistling you want to go for a walk – Ken Nakagawa
A cute bunch of grapes that’s finished by crumpling tissue paper, putting it into a bag, and shaping it.
Change the color and you’ve got muscat grapes, too.
Cut grape leaves out of construction paper and stick them on.
Using tissue paper in the same color family with different shades will make it look even more vibrant.
Once it’s done, you can display it as is to enjoy an autumn mood, or stick it on the wall and have a grape-picking game.
Since the tissue paper gets packed into the bag, it doesn’t need to be perfectly crumpled.
Let the kids enjoy the feel of the tissue paper while they work on it.
Grapes stamp with a paper core featuring beautiful bleeding-style painting
Cut a toilet paper roll core in half, dip the cut edge in paint, and stamp to create the base with grape berries.
Next, use a wet brush to trace the edges of the berries you drew, then spread the paint inward to fill each berry.
Paint the stem with paint, and for the leaves, apply paint to real leaves and stamp them.
Once the paint is dry, cut the base into the shape of a bunch of grapes to finish.
If you use several colors for the initial berry paint, it will create a beautiful gradient when you spread it.