[For Seniors] Simple crafts that feel like autumn: a fun creative activity


Here are some craft ideas perfect for autumn, recommended for seniors!
From projects that capture the colors and spirit of fall to crafts that inspire a touch of nostalgia, this collection is full of simple, enjoyable ideas tailored for older adults.
If you’re planning daily recreation activities at a day service or care facility, or you’re simply looking for autumn crafts, feel free to use these as inspiration.
Most projects avoid fine motor tasks and focus on easy steps like rolling and gluing, so seniors are sure to enjoy them!
- Simple, Recommended Autumn Crafts for Seniors
- Recommended November craft ideas for day service centers
- [For Seniors] Let’s Make It Together! Wonderful November Wall Decoration Ideas
- Wall decoration ideas for seniors recommended for September
- For Seniors: Easy Crafts Recommended for October
- [For Seniors] Wall Decorations to Enjoy October
- [For Seniors] Simple Craft Ideas to Feel the Autumn Season with Fall Foliage
- [Theme: Persimmons] Recommended for seniors! Simple and fun autumn craft ideas
- [For Seniors] Simple Handicrafts Recommended for Finger Exercise
- [For Senior Care Facilities] Easy! September Craft Ideas to Feel the Autumn Season
- [For Seniors] Practical Crafts to Make in Day-Service Recreation: Idea Roundup
- [For Seniors] Introducing Fun Crafts Made with Plastic Bottle Caps
- [For Seniors] Recommended September Origami to Feel the Autumn Season
[For Seniors] Simple Crafts to Feel Autumn: Fun Creative Activities (31–40)
Halloween Decorations Made with Felt and Toilet Paper Rolls

Using the many empty toilet paper rolls that usually end up as trash to make cute Halloween decorations sounds both eco-friendly and fun.
If you’re going to make them, why not gather everyone and create a whole “Halloween Army” to display? The method is very simple: cut the toilet paper rolls to a suitable length, cover them with felt, and add eyes, noses, ears, and other features—that’s it! If you want them to stand firmly, you can stuff paper clay or similar material inside the roll.
Divide the work and make pumpkin heads, ghosts, Frankenstein’s monsters, and swarms of bats together.
Paper core bat

These bats are incredibly handy when decorating a room with a Halloween vibe.
Make plenty of them and they’ll look like a swarm, boosting the spookiness.
First, cut a toilet paper roll in half—leave it as is if you want a bigger bat—and cover it with black paper.
It’s a good idea to line the inside with black paper too.
For the wings, use cellophane or plastic and craft the shape.
Make the eyes a vivid yellow or gold to contrast with the black! If you decorate with fluorescent paint, they’ll glow in the dark.
These bats will spark all kinds of creative ideas!
A jack-o’-lantern that lights up with a lamp

Halloween week always makes my heart dance, but the real excitement comes at night, doesn’t it? Eerie bats flap their wings, mysterious mansions light up, and pumpkin heads’ eyes glow ominously—nighttime is when Halloween truly shines.
Let’s make a jack-o’-lantern to liven up the scene even more.
If you craft the lantern body from paper, the eye cutouts from film, and the hat from felt, using different materials for each part gives it a great three-dimensional feel.
And of course, those mini lights from the 100-yen shop are a must!
Running?! Halloween Character

Seeing something you made come to life and move—people who are fascinated by building airplanes or cars must have all felt the same excitement.
If you’re good with your hands, why not try making a moving toy? You can use rubber bands and toothpicks to make a small paper cup move—you can kind of imagine the basic principle of how it works, right? The creativity and ingenuity are the fun part.
If you decorate the paper cup with a Halloween theme, you’ll instantly be in the Halloween spirit.
People might be startled when the paper cup suddenly starts moving! But even if it’s Halloween, be careful not to scare them too much.
dragonfly

Autumn skies are also a time when many dragonflies flit about, aren’t they? Some older folks may have even twirled a finger in front of a dragonfly perched on a branch to make its eyes spin.
Let’s make a calendar with dragonfly origami that brings back memories like that.
Using a single sheet of origami paper, we’ll fold both the dragonfly’s body and wings.
Of course, we’ll also make its distinctive eyes from the same sheet.
When you think of dragonflies, red or yellow might come to mind.
But if you use different kinds of origami paper, you’ll get a colorful result.
Give it a try!
[For Seniors] Simple Crafts to Feel Autumn: Fun Creative Activities (41–50)
dragonfly ornament

When it comes to autumn scenery, many people probably imagine a scene at dusk with dragonflies darting about.
This activity shows you how to make dragonflies—an essential element of that autumn landscape—using disposable chopsticks and washi origami.
First, wrap hemp twine around a cut piece of chopstick to create the dragonfly’s body.
Next, attach coiled twine pieces as the eyes, and form a loop from origami paper; shape it and attach it in the position of the wings to complete the whole piece.
Choose your colors and shapes to bring out your own originality.
Dragonfly craft
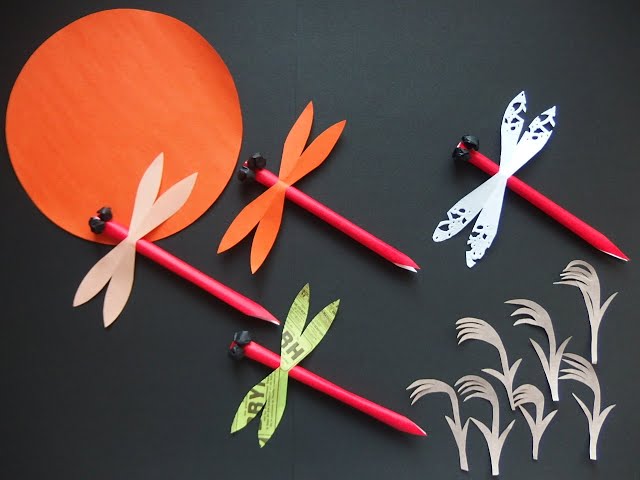
The sight of dragonflies darting about against the backdrop of a sunset is one of the quintessential scenes that evokes autumn, isn’t it? Let’s recreate that landscape of dragonflies silhouetted by the setting sun using origami.
The key is how to make the dragonfly: roll a strip of red origami paper into a slender tube for the body, then attach parts like the eyes and wings to give it a three-dimensional look.
Next, paste elements like the setting sun and plants such as pampas grass onto a backing sheet, and layer the dragonflies on top to complete the scene.
Choosing different colors for the dragonflies to create your own unique style is another fun aspect.