[For Seniors] Brighten Up December Walls! Christmas Decoration Ideas


For December wall decorations, why not handcraft the Christmas atmosphere everyone looks forward to? You can make trees and bells with origami, create garlands with felt, and craft lovely décor using familiar materials.
It’s also great fun to make an Advent calendar to build anticipation for Christmas and enjoy opening it day by day! Let’s keep winter walls from feeling bare by enjoying the creative process together and bringing warmth to the space.
With simple materials and steps, these wall decoration ideas are enjoyable from start to finish—why not give them a try with everyone?
- For seniors: Decorate the December wall with a tree. Easy ideas using origami and yarn.
- [For Seniors] Wall decorations to fully enjoy the seasonal atmosphere: Fun Christmas decoration ideas
- [For Seniors] Recommended Wall Decorations for December: Ideas Collection
- [For Seniors] Recommended for December Wall Decorations! Santa Craft Ideas
- For seniors: Introducing handmade decoration ideas to welcome a wonderful Christmas
- [Childcare] Perfect for December wall displays! A collection of Christmas tree ideas
- [For Seniors] Stylish and Cute! Handmade Christmas Card Ideas
- For Seniors: Fun for Everyone! Christmas Party Activity Ideas
- [For Seniors] Try Making a Handmade Christmas Wreath! A Collection of Ideas Using Everyday Materials
- [Childcare] December Wall Decoration Ideas: Festive Crafts for Christmas and Winter
- Recommended winter wall decorations for seniors: heartwarming ideas
- [Handmade] Cute Christmas Decoration Ideas Collection
- [Easy] Handmade Christmas Wreath Ideas
For Seniors: Liven Up Your December Walls! Christmas Decoration Ideas (21–30)
Paper Plate Santa
@peta_peta_anyo Santa Claus Craft 🎄Materials- Paper plate- Construction paper- Crayons- Pom-poms (decorative parts)- Cotton- Glue (liquid) - Glue stickHow to make it- Cut the paper plate in half.- Snip little cuts along the rim of the paper plate with scissors.- Cut the construction paper into a triangle.- Apply glue and stick on the paper plate.- Attach a pom-pom with liquid glue to the tip of the hat. (It’s fine to fold the tip of the hat or leave it as is.)- Color the face area with crayons.- Glue cotton along the seam where the paper plate and construction paper meet.- Finally, draw the nose and mouth with crayons, add eye stickers, and you’re done! (It’s cute even without eye stickers ♡)Thank you always for looking! 🌟 To revisit this post later, “Save” is recommended!Teacher Mayu 🧸 @peta_peta_anyo[Ideas for easy crafts you can do tomorrow!]- Recording real kids’ voices and reactions from the field- Active nursery teacher | Fun childcare for both kids and teachers ☺︎ˎˊ˗I’d love your follows and likes 🤍Nursery teacher / Childcare workerChildcareProductionWinter CraftChristmas crafts#Christmas#ChristmasTreeMade in DecemberDecember CraftsSanta Claus#Santa#Santa craftInfant CraftToddler CraftsEasy to make
♬ Christmas song “Let’s decorate” – 3KTrack
Cut a paper plate in half to make the base for the face.
Snip small cuts along the rim with scissors to create the beard.
Cut a red piece of construction paper into a triangle, add a pom-pom to make a hat, and glue it onto the plate.
Color the center of the plate with crayon to match a skin tone, then draw the nose and mouth.
Finally, make hair with cotton and attach eye parts to complete your Santa Claus.
Feel free to enjoy it by sticking it on the wall or hanging it as a decoration.
It would also look nice attached to a cone-shaped body as a standing ornament.
Crumpled tissue paper tree
https://www.tiktok.com/@buchiko_hoiku/video/7438179122947411220Here’s a cute Christmas tree idea where you stick crumpled tissue paper onto a cone base.
First, roll a piece of thick paper into a cone to make the base and cover the surface with double-sided tape.
Next, crumple green tissue paper and stick it on to fill the base.
Once the tree itself is done, decorate it with Christmas stickers as ornaments.
To evoke snow, loosely wrap white yarn around the whole tree, then add a star on top to finish.
Try using tissue paper in various colors to create a tree that reflects your own style.
[For Seniors] Brighten Up December Walls! Christmas Decoration Ideas (31–40)
Snowman ornament
@kazuyo_u Snowman ornamentOrnament#Christmaswork#Kindergarten#Nursery schoolHandmadeChristmas decorations
♬ Take a picture – NiziU
Let me show you how to make a cute snowman ornament with just a few simple steps.
Fold the two bottom corners of a clear bag into triangles and tape them down, then stuff the bag with white cotton and seal the opening.
Fold the left and right corners of the sealed opening into triangles and tape them as well.
Next, twist two pipe cleaners together to make a scarf, wrap it around the middle to cinch the bag, and shape it into a snowman.
Use round stickers for the eyes and nose, draw the mouth with a pen, and finish by adding a paper hat.
Thread a string through the scarf, and you can hang it on your tree.
100-yen shop DIY Christmas wreath

When you go to the 100-yen shop, you’re sometimes surprised to find they even sell things like this.
They offer all kinds of products, and craft and DIY supplies are well stocked too.
You can make a lovely wreath using only 100-yen items, so why not give it a try? Attach cotton bolls and pinecones to a wreath base with a hot glue gun.
A hot glue gun dries faster than wood glue.
However, it gets very hot, so please be careful when used by older adults.
A Christmas with a wreath they made themselves is likely to give older adults a real sense of satisfaction.
Christmas tree with holly and bells

This is an idea for creating a wall tree by decorating it with holly leaves and bells in different sizes and colors.
For the holly, make green leaves from origami paper and red leaves from tissue paper.
You can download a template for the green leaves, so be sure to use it.
For the red leaves, stack three rectangular sheets of tissue paper, accordion-fold them, staple the center, then open each layer to form a flower-like shape.
For the bells, cut yellow origami paper into a half-circle and roll it into a cone shape—that’s it.
Combine them however you like to complete a colorful wall tree.
Christmas gift-shaped charm

Christmas just isn’t complete without presents! So, here’s how to make a Christmas gift-shaped charm.
First, prepare some craft paper and design your favorite motif.
You can draw it with a pen, or use origami paper, colored paper, yarn, and other materials to give it a three-dimensional finish.
Next, put cotton and beads into a small transparent bag to create a snowy effect, then place your designed craft paper inside, seal the bag, and fold the top two corners to the back, securing them with tape.
Glue the bag onto a piece of felt that will serve as the base of the charm, and shape the felt into a gift shape.
Finally, tie a ribbon, and your charm is complete.
A Christmas garland that also works as a sun catcher
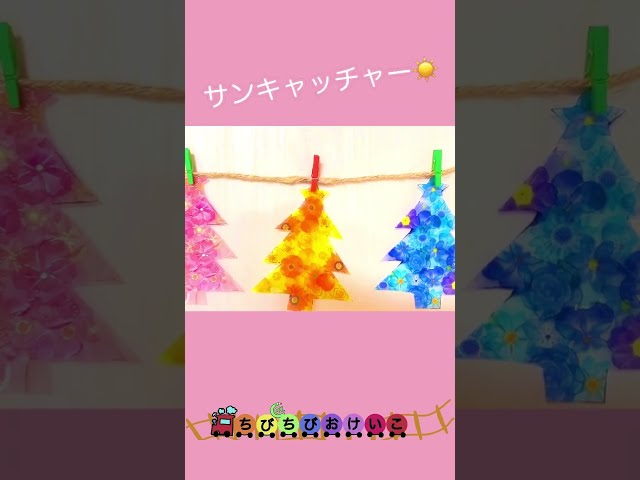
Recommended for anyone looking for an easy-to-make garland! First, draw a tree on a clear file folder and fill in the inside with your favorite stickers.
If you’d like to use it as a sun catcher, use translucent stickers.
Once the stickers are in place, cut it out in the shape of a tree and clip it together to complete your garland.
Using the same design with stickers in different colors can give you both a unified look and a festive touch.
It might also look cute to decorate the edge of the clear file with sparkly pipe cleaners.