[For Seniors] Fun Crafts Recommended for December


December brings fun events and major occasions like Christmas and New Year’s.
Let’s help older adults feel the season with crafts that capture the spirit of December! We’ve gathered many projects that are easy to prepare and simple to make, using recycled materials and items from 100-yen shops.
Moving the fingers during crafting can also have brain-training benefits.
You can display the finished pieces, or take them home to use if they’re practical items.
Enjoy a wonderful time with crafts that are perfect for wrapping up the year.
- Take-Home Craft Ideas for Winter: Perfect for Day Services for Seniors
- [Christmas & New Year] Craft Ideas for Day Services in December
- For seniors: Decorate the December wall with a tree. Easy ideas using origami and yarn.
- For Seniors: Auspicious Handmade Zodiac Ornament Craft Ideas
- [For Seniors] Try Making a Handmade Christmas Wreath! A Collection of Ideas Using Everyday Materials
- [For Seniors] Heartwarming and Cozy: Perfect Wall Decoration Ideas for Winter in Care Facilities
- [For Seniors] Lovely Christmas Crafts: Easy Ideas Using Recycled Materials and 100-Yen Shop Supplies
- [For Seniors] Perfect for winter events! Easy craft ideas
- [For Seniors] Handmade Christmas Gift Ideas That Feel Warm and Heartfelt
- Recommended winter wall decorations for seniors: heartwarming ideas
- [For Seniors] Recommended in December! Safe and Fun Indoor Recreation
- [For Seniors] Simple Handicrafts Recommended for Finger Exercise
- [For Seniors] Enjoy the Cold Winter! Simple, Recommended Crafts
[For Seniors] Fun Crafts Recommended for December (41–50)
Just cut and paste. Shaka-shaka ornament.
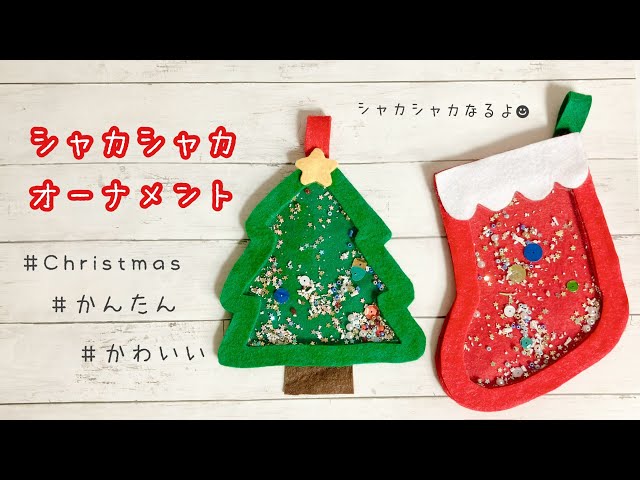
Let’s handcraft warm, felt Christmas ornaments.
First, create your favorite shapes—like a stocking or a tree—using thick paper.
Next, use this template to cut 0.3 mm plastic sheet and the felt that will serve as the ornament base.
Cut out the inside of the thick-paper template to make a frame-only template, then use that to cut three felt frames.
Glue two of the felt frames onto the felt base to add height, and place your favorite beads or sequins inside.
Glue the plastic sheet and the remaining felt piece on top, attach a hanging component, and you’re done!
Papercut Tree

Fold a sheet of green construction paper in half and draw the shape of half a tree.
Cut along the line with scissors and open it up so it becomes a full tree shape.
Once it’s cut, keep it folded and make slits starting from the folded edge.
Cut parallel to the base, being careful not to cut off the outer edge.
To make all the folds into mountain folds, open the slit sections alternately to the left and right.
Decorate with a star made from yellow construction paper, and add round stickers to represent ornaments—then it’s done.
There are also instructions for making snowflakes, so why not make some to decorate together?
Easy wreath made from a single sheet of origami paper

There are various ways to make wreaths out of origami.
You can create a cute wreath with just a single sheet.
From a 15-centimeter square sheet of origami paper, cut it into nine pieces measuring 5 centimeters each.
Set one piece aside, and fold the remaining pieces into the parts for the wreath.
The trick is to make four pieces with the colored side facing outward and the other four with the white side facing outward.
Once the parts are finished, assemble them into the wreath.
Fold and cut the remaining piece to make a ribbon and decorate the wreath with it.
You can also enjoy customizing it by adding round or star-shaped stickers.
It’s a project that older adults can enjoy making while chatting with those around them.
Santa stuck in a chimney

How about making a Santa Claus decoration trying to climb down a chimney to deliver presents? It’s a humorous piece that will surely make you chuckle and feel delighted every time you see it.
All you need are a toilet paper roll, colored construction paper, a pen, scissors, and glue.
First, draw a chimney pattern on brown construction paper with a white pen and paste it onto a slightly flattened toilet paper roll.
Next, use red, white, and black construction paper to create Santa’s lower half.
Once Santa is ready, glue him upside down on top of the chimney.
Finish by adding snow pieces and a white sack to the chimney.
Christmas wreath made from construction paper

December is the season when dazzling, colorful decorations abound.
Using construction paper, you can make a wreath that stands up to those decorations.
By turning construction paper with slits cut in two colors into a ring, you can create a spiral-like Christmas wreath.
For the piece that will be on the outside, place masking tape or stickers over the slits.
They add a nice accent and give the spiral wreath a more delicate finish.
Older adults may also find this intricately made wreath rewarding to create.
Three-dimensional tree
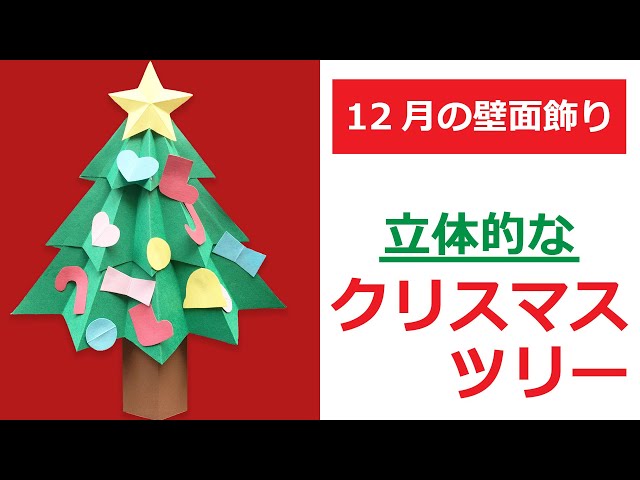
Here’s an idea for a paper tree that uses folds to create a three-dimensional finish.
First, cut the tree’s foliage, trunk, and ornament parts from construction paper; you can download the templates and use those.
For symmetrical parts, place the template on folded construction paper and cut them together to save time.
For the tree and star parts, add folds at the designated points to give them a 3D look.
Attach the folded foliage pieces to the tree base in tiers, then glue on the trunk and star.
Finally, decorate with the ornament parts to complete the project.
Holly and Bells

Decorating with holly at Christmas is a classic tradition, and it carries the meaning of warding off evil.
How about brightening up your Christmas with a mascot featuring holly—imbued with that sacred image—and a bell? Crease green origami paper, then use the folds as guides to shape it into holly with two spreading leaves.
The key for the bell is to create steps by folding back sections; let’s finish it neatly and precisely.
Combine the pieces at the end to complete the decoration, and for an even more vivid look, we recommend adding red accents.