[For Seniors] Let’s Get Excited with Halloween Crafts! Fun and Easy Decoration Ideas


The glow of jack-o’-lanterns emerging in the dark night.
How about expressing the fun atmosphere of Halloween with handmade creations? This time, we’re introducing crafts you can enjoy together with seniors.
From pumpkin decorations and ghost mascots made with familiar materials like milk cartons and toilet paper rolls, these projects are full of creative ideas.
As you work with your hands, lively conversation is sure to follow.
Decorate your facility with the finished pieces, and you’ll be all set for a wonderful Halloween party.
- [For Seniors] Fun Halloween wall decorations: from ghosts and pumpkins to spiders and castles
- For Seniors: Simple and Lovely Crafts – A Collection of Take-Home Project Ideas for Day Service
- [For Seniors] Simple crafts that feel like autumn: a fun creative activity
- For Seniors: Easy Crafts Recommended for October
- [For Seniors] Handmade Halloween Treats to Enjoy: Fun Ideas with Pumpkins and Ghosts
- Simple, Recommended Autumn Crafts for Seniors
- Fun Halloween recreation activities at a nursing care facility
- [Day Service] Craft Ideas for Seniors to Make in October
- [For Seniors] Fun Halloween Games: Ideas to Enjoy with Ghosts, Mummies, and Spiderwebs
- [For Seniors] Let’s Start a Fun Craft Activity
- [Theme: Persimmons] Recommended for seniors! Simple and fun autumn craft ideas
- [For Senior Care Facilities] Easy! September Craft Ideas to Feel the Autumn Season
- [For Seniors] Wall Decorations to Enjoy October
[For Seniors] Let's Get Excited with Halloween Crafts! Fun and Easy Decoration Ideas (1–10)
Halloween Decorations Made with Felt and Toilet Paper Rolls

Using the many empty toilet paper rolls that usually end up as trash to make cute Halloween decorations sounds both eco-friendly and fun.
If you’re going to make them, why not gather everyone and create a whole “Halloween Army” to display? The method is very simple: cut the toilet paper rolls to a suitable length, cover them with felt, and add eyes, noses, ears, and other features—that’s it! If you want them to stand firmly, you can stuff paper clay or similar material inside the roll.
Divide the work and make pumpkin heads, ghosts, Frankenstein’s monsters, and swarms of bats together.
Running?! Halloween Character

Seeing something you made come to life and move—people who are fascinated by building airplanes or cars must have all felt the same excitement.
If you’re good with your hands, why not try making a moving toy? You can use rubber bands and toothpicks to make a small paper cup move—you can kind of imagine the basic principle of how it works, right? The creativity and ingenuity are the fun part.
If you decorate the paper cup with a Halloween theme, you’ll instantly be in the Halloween spirit.
People might be startled when the paper cup suddenly starts moving! But even if it’s Halloween, be careful not to scare them too much.
Toilet Paper Ghost
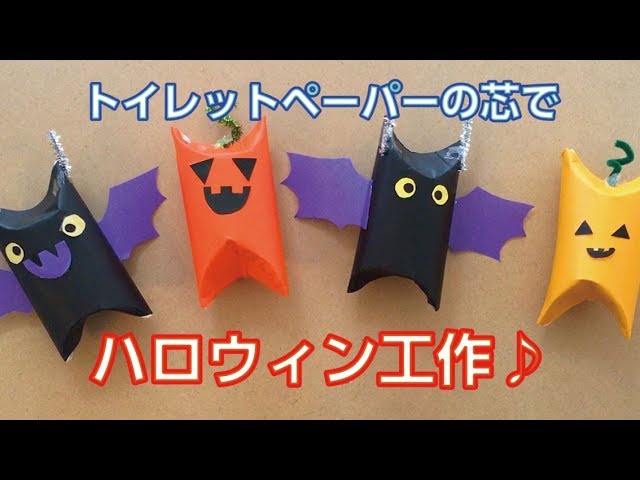
These are must-have Halloween decorations—bats and pumpkins—made using toilet paper rolls.
First, wrap the roll with origami paper in black or orange, then flatten and overlap the ends to create a shape with two pointed “horns” sticking out.
Next, attach parts cut from origami paper: for the bat, eyes and wings; for the pumpkin, eyes and a mouth.
For display, mounting them on a wall is recommended.
Their three-dimensional look gives them a strong presence, especially if you get creative with the arrangement.
[For Seniors] Let's Get Excited with Halloween Crafts! Fun and Easy Decoration Ideas (11–20)
[Flower Paper] Monster Wreath
Cut the cardboard into a circle and remove the center to make a wreath base.
Crumple tissue paper and glue it to the base, then attach the eye parts.
Glue on fangs, horns, candies, and other pieces made from origami to finish.
Use tissue paper in Halloween or monster colors to make it vibrant.
By intentionally varying the sizes and the order of colors you attach, you can bring out a mysterious, monster-like feel.
You can also customize the candies into bats or spiders—decorate however you like!
A jack-o’-lantern with a light shining

This mascot is inspired by the classic Halloween decoration, the jack-o’-lantern.
Since it has an open space in the center, you can place a light inside to give off an eerie glow that enhances the Halloween vibe.
The base is a plastic cup; attach strips of orange paper cut lengthwise to it and shape it into a jack-o’-lantern.
Once the whole piece is rounded, add the facial features made from black paper to finish.
It also pairs well with other Halloween motifs like black cats or bats.
Mummy-kun

Here’s a great idea to try when you’re looking for a Halloween-season craft.
It’s a mummy mascot you can make using a Yakult bottle, pipe cleaners, and yarn.
First, attach the pipe cleaners to the bottle as arms, then wrap the yarn around to create the mummy.
Finish by sticking on googly-eye stickers you can find at 100-yen shops.
The steps are simple, but wrapping the yarn may require some dexterity.
It’s a recommended idea when you want a craft that doesn’t take much time but still gives your fingers a good workout.
Origami Halloween Lantern

Lanterns that glow on Halloween night have such a beautiful, atmospheric feel, don’t they? By making this lantern, you can enjoy the seasonal festivities while keeping your hands busy.
Please prepare origami paper, glue, scissors, and a small LED light.
Halloween-patterned origami paper is recommended.
Cut the origami, then use glue to attach the edges and build the lantern.
Once you’ve made the base and the roof, place a small LED light inside and you’re done.
If you’re planning a Halloween event, be sure to give it a try!