[For Seniors] Let’s Get Excited with Halloween Crafts! Fun and Easy Decoration Ideas


The glow of jack-o’-lanterns emerging in the dark night.
How about expressing the fun atmosphere of Halloween with handmade creations? This time, we’re introducing crafts you can enjoy together with seniors.
From pumpkin decorations and ghost mascots made with familiar materials like milk cartons and toilet paper rolls, these projects are full of creative ideas.
As you work with your hands, lively conversation is sure to follow.
Decorate your facility with the finished pieces, and you’ll be all set for a wonderful Halloween party.
- [For Seniors] Fun Halloween wall decorations: from ghosts and pumpkins to spiders and castles
- For Seniors: Simple and Lovely Crafts – A Collection of Take-Home Project Ideas for Day Service
- [For Seniors] Simple crafts that feel like autumn: a fun creative activity
- For Seniors: Easy Crafts Recommended for October
- [For Seniors] Handmade Halloween Treats to Enjoy: Fun Ideas with Pumpkins and Ghosts
- Simple, Recommended Autumn Crafts for Seniors
- Fun Halloween recreation activities at a nursing care facility
- [Day Service] Craft Ideas for Seniors to Make in October
- [For Seniors] Fun Halloween Games: Ideas to Enjoy with Ghosts, Mummies, and Spiderwebs
- [For Seniors] Let’s Start a Fun Craft Activity
- [Theme: Persimmons] Recommended for seniors! Simple and fun autumn craft ideas
- [For Senior Care Facilities] Easy! September Craft Ideas to Feel the Autumn Season
- [For Seniors] Wall Decorations to Enjoy October
For Seniors: Let’s Get Excited with Halloween Crafts! Fun and Easy Decoration Ideas (21–30)
jack-o’-lantern

How about a pumpkin lantern made from reused plastic bottles? By taking advantage of the bumps on the bottom of the bottle, you can achieve a pumpkin-like shape! Use two cut-off bottoms from plastic bottles, finely cut crepe paper in your favorite colors, and stick it on with glue thinned with water.
If you don’t have crepe paper, tissue paper or washi paper will work too.
Let it dry thoroughly, add a pumpkin face, and it’s done! You can fill it with candy or put in an LED light to use as a lampshade—there are lots of fun ways to enjoy it!
hanging Halloween decorations

Here’s a hanging pumpkin decoration I recommend for anyone who wants to make a three-dimensional Halloween ornament.
Prepare one sheet of orange construction paper and cut it into strips about 1 cm wide.
Gather the strips together and punch holes at the top and bottom.
Thread them onto a chenille stem (pipe cleaner) with one end bent so it won’t slip off.
Twist the pipe cleaner at the point where the paper forms a half-circle, then fan the strips out and shape them into a pumpkin.
The pipe cleaner will be the vine, so curl it into spirals.
Attach facial features made from black construction paper, tie a thread to hang it, and you’re done!
Halloween letter garland

Here’s a Halloween letter garland that will instantly boost the festive vibe when you hang it in your room! Both the garland base and the letter pieces are made entirely from origami paper.
First, fold the top and both side edges of the base origami 2 cm inward.
Make a slit in the center of the bottom edge, then open it outward to align with the bottom corners to form the garland shape.
For the letters, cut another sheet of origami into four strips.
Fold the two long edges toward the center line, then shape them into letters.
Once you’ve made all the letters for “HAPPY HALLOWEEN,” attach them to the base one by one, string the garland on a cord, and hang it up!
Halloween witch girl

Perfect for Halloween! Let’s make a decoration of a little witch.
Cut out the face, body, hat, and broom parts from construction paper and glue them together.
You can download free templates, so use those to finish it up.
If you change the hat decorations or hairstyle, you can express different kinds of witches.
When displaying it on a wall, decorating it together with a moon, a witch’s house, or ghosts will make it an even lovelier Halloween decoration.
Coming up with your own variations is part of the fun of this craft time.
Felt Halloween wall hanging decoration
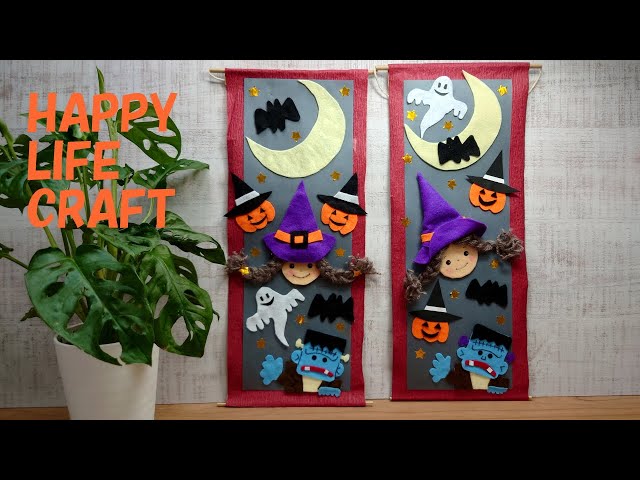
Let’s make a Halloween-themed wall hanging using felt.
For the base, adhere cardboard to reversible crepe paper and attach bamboo skewers at the top and bottom to create a scroll-like look.
Then, finish by gluing on parts made from felt and yarn.
The parts featured in this idea are the moon, bats, a witch, a jack-o’-lantern, Frankenstein, and a ghost.
Any Halloween-style motif will work, so you might enjoy designing your own original version.
Felt Halloween decorations
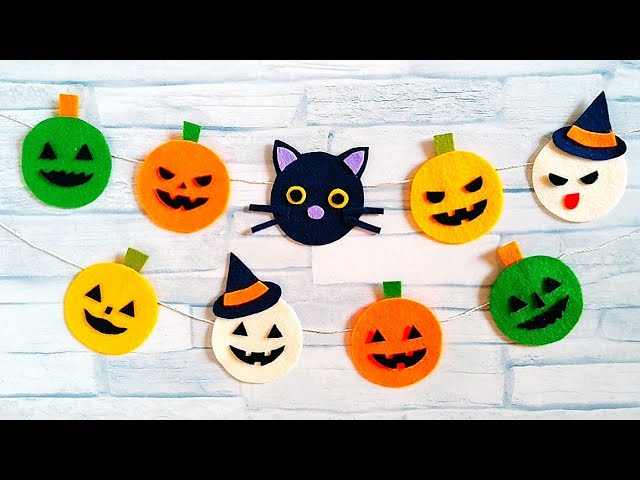
Here’s a DIY idea for a Halloween garland using felt from a 100-yen shop.
Basically, you’ll cut out pieces from the felt and glue them together.
The examples include a pumpkin, ghost, and black cat, but feel free to use any Halloween-themed motifs you like, such as a witch or a bat.
Once finished, attach the pieces to a string at equal intervals and hang them up to decorate your room.
It’s helpful to have templates when cutting out the parts, so make them in advance using thick paper.
Crescent moon × black cat × honeycomb pumpkin

A moon adorned with flowers and pumpkins… and a black cat standing there gives this wall decoration a truly mysterious feel.
This idea comes with templates, so start by downloading and printing them out.
Basically, you’ll cut out the pieces according to the templates and glue them together.
The honeycomb pumpkins and flowers are made three-dimensional by combining several parts.
There are many pieces, but the steps are simple, so take your time and complete it bit by bit.