[For Seniors] Handmade gifts they’ll love: a roundup of simple ideas


Gifts given at senior facilities for events like birthday parties and Respect for the Aged Day celebrations.
Seeing the delighted faces of seniors holding their gifts makes everyone around them happy too, doesn’t it?
That said, coming up with gift ideas can be tough, and it’s easy to end up giving the same kinds of items over and over.
This time, we’ll introduce handmade gift ideas that seniors will love.
We’ve gathered items that are easy for busy staff to make and highly practical, among others.
When a gift is filled with the maker’s care, it can bring even greater joy to the seniors who receive it.
- Handmade Gifts: Ideas That Will Delight Older Adults
- [Respect for the Aged Day] With heartfelt gratitude: Handmade gift ideas that will delight residents in senior care facilities
- [For Seniors] Small craft ideas: for yourself and as gifts!
- Respect-for-the-Aged Day: Heartfelt, Handmade Gift Ideas They’ll Love
- For Seniors: Simple and Lovely Crafts – A Collection of Take-Home Project Ideas for Day Service
- [For Seniors] Handmade Christmas Gift Ideas That Feel Warm and Heartfelt
- For seniors: Gifts that delight—well-loved presents you can pick from the 100-yen shop
- [For Seniors] Recommended Birthday Gifts for Those Living in Care Facilities
- [For Seniors] Recommended for day services! Simple and cute small craft ideas
- [For Seniors] DIY Strap Craft Ideas. Great as Gifts, Too!
- Recommended for seniors! Origami gifts
- For Seniors: Needle-Free Crafts. A Safe and Easy Collection of No-Sew Project Ideas
- [For Seniors] Introducing Fun Crafts Made with Plastic Bottle Caps
[For Seniors] Handmade Gifts They’ll Love: Simple Ideas (31–40)
caricature colored paper

No one would be unhappy to receive a portrait drawn with heartfelt care.
It’s the perfect gift for Grandma from a grandchild or a child who’s good at drawing! Drawing on familiar drawing paper is fine, but using shikishi (stiff illustration boards) adds durability, so it’s safer for display.
Children can draw freely, while adults who want a more polished result can start with a pencil sketch and then use Copic markers or watercolors.
Take a good look at Grandma herself or her photos as you draw.
Carnations that change color in water

Let’s make carnations that become stylishly colored when you sprinkle water on them! First, cut a double layer of kitchen paper into four pieces, stack them all together, fold them in an accordion, and secure the center with a rubber band.
Cut both ends into triangles, then spread out the kitchen paper as if you’re opening a flower.
Attach a straw to serve as the stem, and randomly add color to the kitchen paper with water-based pens.
Finally, mist it with water, and the water-based ink will bleed and spread, coloring the carnation! Once the water has dried, wrap it up to give as a gift or use it as decoration.
Realistic carnations made from paper

If preparing fresh flowers feels like a high hurdle but you want to give carnations that look just like the real thing, this is for you! First, make long, narrow leaves from green construction paper measuring 1 cm × 6 cm, and punch a hole in the center.
Next, prepare colored construction paper 7 cm × 7 cm for the carnation flower, fold it into a small, triangle-like shape, and make cuts so they will become carnation petals.
Unfold it, make deeper cuts, and prepare six sets like this; for some pieces, cut off a few petals.
Then punch a hole in the center, thread them onto wire starting with the pieces that have fewer petals, tidy everything with floral tape, attach the leaf, and you’re done! Even a single bloom looks impressive!
Carnations to decorate the framed picture
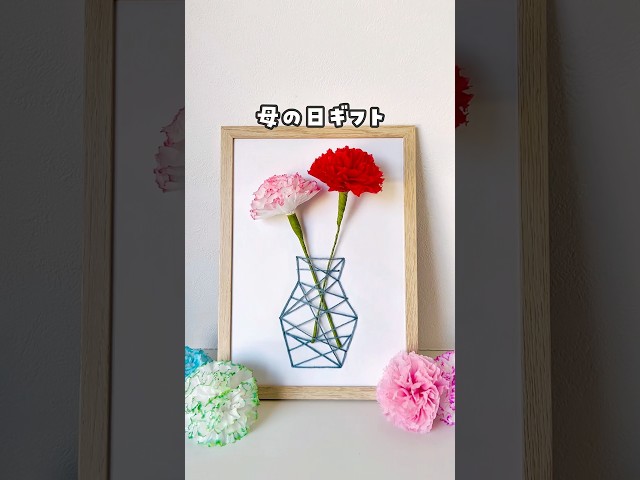
Here’s an idea for creating easy, eye-catching, three-dimensional carnation decorations.
First, get mini floral paper from a 100-yen shop and gently fluff it into the shape of a carnation.
Once the shape is formed, attach a wire to the center and wrap the whole piece with tape to complete the flower.
If you color white paper and lightly mist it with water, the pigment will naturally bleed to create a more realistic gradient.
Next, draw a vase and punch holes along the lines.
Wrap tape around the end of a thread and pass it through the holes so you can stand and display the carnations.
Finally, place the vase backing into a frame and arrange the carnations in a balanced way.
You’ll have a vibrant piece that looks like three-dimensional flowers are blooming inside the frame!
tissue case
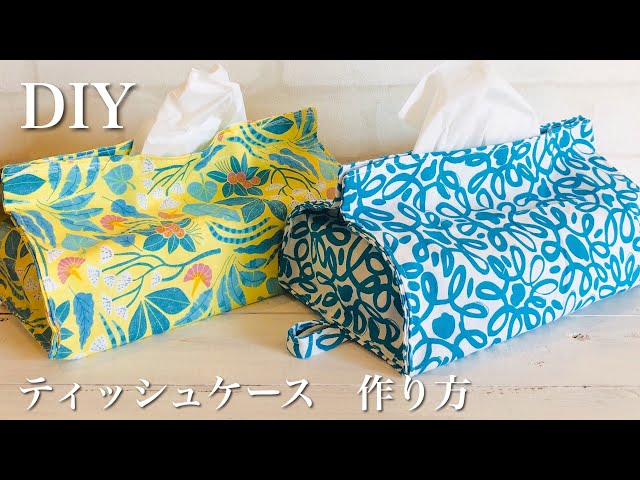
It’s nice to give presents that people will actually use, isn’t it? When you’re not sure what older adults might find useful, a tissue box cover is a great recommendation.
Lots of people use boxed tissues at home or in their rooms.
They’re very convenient, but they can make the space look a bit too lived-in.
With a tissue box cover in a lovely pattern, you can use boxed tissues without disrupting the room’s atmosphere.
It’s practical, making it a great gift for seniors.
[For Seniors] Handmade Gifts They'll Love: Simple Ideas (41–50)
Pressed Flower Chopstick Rest

Chopstick rests with pressed flowers that capture the beauty of blossoms are practical gifts you can enjoy both as decor and in everyday use.
Pour resin into a clear mold and arrange your favorite pressed flowers and foliage.
Use a toothpick to fine-tune their placement, and add glitter or holographic flakes for extra sparkle.
Then simply cure it under a UV light to finish.
From choosing the materials to the final result, every step is enjoyable, and you’ll create a one-of-a-kind piece.
When gifting to older recipients, incorporating seasonal flowers or plants tied to personal memories can make it even more meaningful.
These handmade pieces will brighten the dining table as chopstick rests and also delight as interior accents.
pencil case
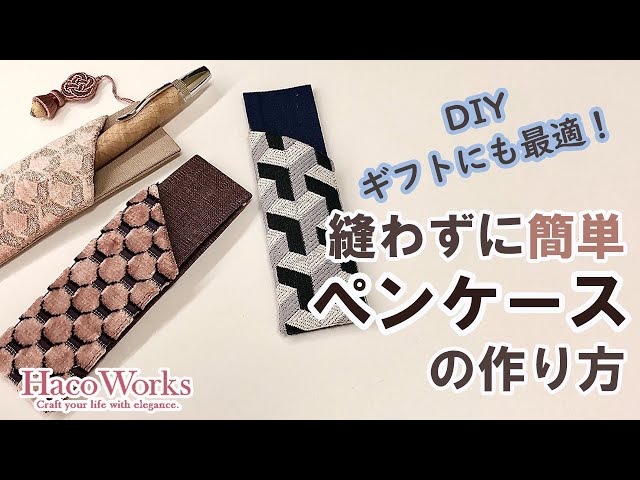
Introducing a pen case you can make just by gluing! Attach cardboard to the base fabric, then layer and adhere the pocket fabric on top.
The pocket has a slanted opening for a striking look.
Add a small decoration for a nice accent—perfect for gifts.
Basically, you just cut the fabric with scissors and glue it together, so you can complete a fabric accessory with a fun, craft-like feel.
Use solid fabric for the base and patterned fabric for the pocket to create a simple yet stylish piece.