Recommended Moon-Viewing Crafts for Seniors

Speaking of September, it’s time for the Harvest Moon and moon viewing.
It’s long been customary to spend the evening gazing at the moon, decorating with pampas grass and rice dumplings.
To help you enjoy tsukimi at day service centers and senior facilities, we’re introducing moon-viewing crafts recommended for older adults.
We’ve gathered plenty of craft ideas perfect for tsukimi, such as wall hangings, wreaths, and lanterns.
Enjoying seasonal events contributes to the mental and physical well-being of older adults.
If you’re wondering what to make for a tsukimi craft, please use this article as a reference.
Recommended Moon-Viewing Crafts for Seniors (1–10)
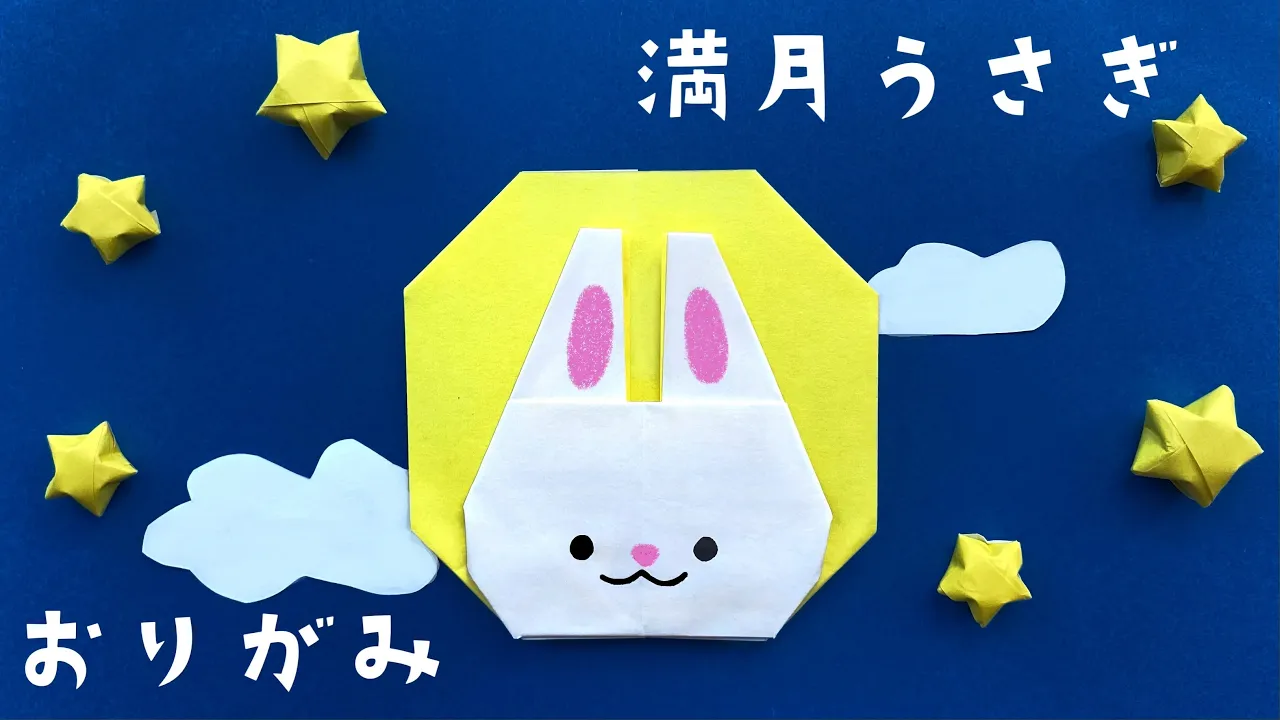
Full Moon Rabbit

This is a craft project where you create the image of a rabbit emerging on a full moon using a single sheet of origami paper.
By cleverly folding to form both the moon and the rabbit at the same time, it also helps develop fine finger movements.
As you proceed while understanding which part you are folding, the enjoyment of seeing it gradually come together should increase.
Once you’ve made the round full moon and the rabbit shape, draw the rabbit’s facial expression to finish.
Since this is a craft that reproduces a set form, add originality through how you draw the expression.
Moon Lantern

Here’s a lantern craft idea that brings gentle light at night.
Inflate a balloon and paste tissue paper onto it.
If you’re working with older adults, prepare pre-inflated balloons beforehand.
Also, pre-cut parts such as stars or faces and have diluted glue ready.
Once prepared, secure the inflated balloon so it won’t move and apply hand cream over the entire surface.
Tear the tissue paper into suitable sizes and use glue to attach it along with the pre-cut parts.
Leave the top area uncovered.
After you finish pasting, let it dry overnight, then pop the balloon and remove it.
Attach a handle, and it’s complete.
Moon-viewing wreath

Let’s make a cute Tsukimi-themed wreath that you can hang in various places, like on walls or doors.
You can craft everything out of origami—from the wreath base to the decorations—or you can make the base using a paper plate with the center cut out or donut-shaped cardstock, and then decorate it with parts made from origami or construction paper.
Create and attach parts that evoke Tsukimi, such as the moon, rabbits, pampas grass, and moon-viewing dumplings.
Also make good use of sparkly origami and stickers as you finish it up.
Attach a string or similar so it’s easy to hang, and you’re done.
Moon-viewing Rabbit

When it comes to moon-viewing, rabbits are indispensable.
So, let’s make a moon-viewing bunny using UV resin! For this project, you’ll need resin liquid, a UV light, tweezers, and a mold to cure the resin into a circular shape.
Many 100-yen shops carry these items, so give it a look if you like.
The workflow is to brush a thin layer of resin into the mold and cure it, then create the rabbit parts.
The fine work may be tricky at first, but take it step by step.
Once the parts are finished, assemble them with resin.
Add color at the end, and you’ll have an adorable moon-viewing bunny.
Moon-viewing Dumpling Wall Decorations

Even if it’s difficult to display real Tsukimi dango, a wall decoration lets you enjoy the moon-viewing scene without taking up space! Cut out Tsukimi dango and the sanpō (the tray that holds the dango) from construction paper and stick them on the wall.
If you want a slightly three-dimensional look, you could use cotton or crumpled tissue paper for the dango.
Around the dango, try adding a lively touch by sticking on a moon, pampas grass, and rabbits cut from construction paper as well.
Moon-Viewing Wall Hanging Decoration

This is a wall-hanging decoration that captures the moon-viewing scene—an essential event on long autumn nights.
It’s a simple craft made by using a paper plate with the center cut out as the base and adding decorations.
First, paint the paper plate black, then create a night sky by attaching sequins and a moon cut from yellow origami paper.
Next, place dango and rabbits—both staples of moon viewing—and attach a string for hanging to complete it.
It could be fun to think about how to color the night sky with the rising moon and what to include to convey the joy of moon viewing in your own way.
Moon-viewing dumplings made with cardboard and washi paper

Let’s make a sanpō (ceremonial tray) and dango that will be useful for a moon-viewing event.
There are templates for both, so please download those first.
Once you’ve downloaded the templates, cut the sanpō parts out of thick paper and attach them to washi paper.
After you’ve prepared all the parts, assemble them.
For the dango, roll up tissues lightly moistened with a misting spray, let them dry, then use glue to adhere chirimen fabric over the top.
Lay washi paper with red-painted edges on the assembled sanpō, place the dango on top, and you’re done! You’ll use a hole punch to make the decorative openings on the sanpō, but if you don’t have one, drawing black circles with a pen is fine, too.