For Seniors: Feel the Arrival of Warm Spring. Introducing Origami Ideas

When we get through the cold winter and start to feel the warmth of spring, it somehow lifts our spirits, doesn’t it? What comes to mind for you when you think of spring? Perhaps iconic spring plants like cherry blossoms and dandelions, or creatures like butterflies and ladybugs.
In this article, we’ll introduce origami ideas that let you feel the arrival of spring indoors.
Nice-weather days are perfect for a stroll, but going out isn’t always easy for everyone.
These spring-themed origami projects are perfect for such times and will instantly brighten up your space.
In addition to plants and animals, there are pieces that fit spring-related events, too.
Why not decorate your room and enjoy the feeling of spring’s arrival?
- [For Seniors] Enjoy the Arrival of Spring Indoors! Recommended April Origami
- [For Seniors] March Origami: Ideas to Brighten Your Room with Seasonal Flowers and Events
- [For Seniors] Spring Wall Decorations: A Collection of Ideas to Brighten Up Your Room
- [For Seniors] Feel the Arrival of Spring: A Collection of Cherry Blossom Craft Ideas
- [For Seniors] Embraced by Spring: Wall Decoration Ideas to Enjoy in April
- For Seniors: Feel the Arrival of Warm Spring. Cherry Blossom Wall Decoration Ideas
- [For seniors] Enjoy spring: April craft ideas
- Easy origami that delights the elderly. Enjoy a heart-lifting time with seasonal origami.
- [For Seniors] Color Your Care Facility’s Spring: Wall Decoration Ideas
- [For Seniors] Perfect Finger Exercises! Seasonal Flower Origami
- For Seniors: Come, Spring! Recommended March Craft Ideas for Daycare Services
- [For Seniors] Fun Spring Recreational Activities: A Collection of Games and Play Ideas
- [For Seniors] Introducing May-themed Origami!
[For Seniors] Feel the Arrival of Warm Spring. Introducing Origami Ideas (21–30)
Hina dolls made with round origami

Let’s make Hinamatsuri dolls out of chiyogami with a cute, gently rounded shape.
Fold a circular sheet of origami in half twice, then cut a slit at the center to form the neck.
Fold the left and right edges inward to align with the collar area, shaping the kimono.
Fold the Odairi-sama in the same way, then attach the fan, ladle, and crown, draw the faces, and you’re done.
Using round origami enhances the warm feel of the Ohina-sama and Odairi-sama.
Prepare patterned origami and try making your own original Hinamatsuri dolls.
Cone-shaped hina dolls
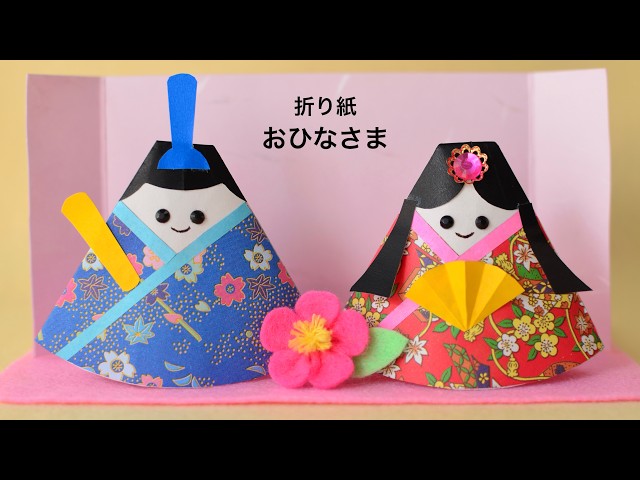
Perfect for Doll’s Day displays! Let’s make cute triangular hina dolls.
First, cut white paper into a half-circle and roll it into a cone.
Then wrap washi-patterned origami around it to represent the kimono.
Use the pointed tip of the cone as the face: add hair with black origami, and use rhinestones for the eyes and hair ornaments.
For the base, glue a U-shaped piece of thick paper upright onto a felt rectangle you’ve cut as the platform.
The look will vary depending on the origami and rhinestones you use, so prepare materials that match your image.
Hina dolls with distinctive kimonos

Let’s make a perfect set of the imperial couple (the emperor and empress) for Hinamatsuri.
First, mark the origami by folding it in half, then into quarters, in order.
Create creases at the corners and around the edges to form the shape of the kimono.
For the hair, take a small square of black origami paper, fold it into a triangle, then fold both sides toward the center to shape the hairstyle.
Attach the empress’s body and hair, then add the fan to finish.
For the emperor, the key is to make a crisp fold at the collar and fold the sleeves of the kimono upward to create the right angle.
Fold a crown from black origami paper to complete the emperor.
Feel free to draw the facial expressions in your own original style.
Self-standing Hina Dolls you can make even if you’re super clumsy

Let’s make some cute hina dolls that will look adorable even displayed at the entrance.
Cut a sheet of origami paper in half, fold it in half, then overlap and fold the left and right sides to create the kimonos for the empress (ohinasama) and the emperor (odairisama).
Tuck the triangular flap inside to finish.
For the face parts, prepare one sheet of black origami paper, fold it in thirds, then fold one third in half; as you fold the corners, shape the hair while checking the balance.
Finally, fold up from the bottom to complete the face parts.
For the odairisama, make the crown by shaping the tip to a point, then fold the corners to give it a rounded form.
Once you make the fan, ladle, and crown, it’s complete.
A simple Hina decoration you’ll want to display

Easy Hina Doll decoration you can make by downloading the template! Just paste the bonbori lanterns, hishi-mochi, and Hina dolls onto the background illustration to complete it.
First, mount the background illustration on thick paper and trim off the excess.
For the bonbori, cut several circular pieces from colored paper of your choice, fold each in half, then glue them together to form a hemisphere.
For the hishi-mochi, prepare pink, white, and green colored paper, cut them according to the template, and stack/glue them in layers.
For how to make the Hina dolls, check the video linked in the description and try folding along with it.
Cherry Blossoms of Japan

A background with traditional Japanese patterns enhances the beauty that feels uniquely Japanese.
So this time, we’re introducing an idea for making “Japanese cherry blossoms” with origami.
By placing pale pink cherry blossoms on backing paper with crepe (chirimen) motifs or classic patterns, you can create an elegant piece reminiscent of a folding screen painting.
Even if the folding method is simple, pairing it with the right background makes it look much more striking.
It’s easy enough for older adults to do without strain, and once finished, it can be enjoyed as a decoration in an entryway or common area.
This origami project, which lets you enjoy both Japanese taste and a sense of the season, is perfect for a calming, hands-on moment.
Please give it a try!
rapeseed blossoms

If you make one of spring’s representative flowers, the rapeseed blossom (nanohana), with origami, you can enjoy a spring atmosphere indoors.
By folding the small yellow petals and combining them with green leaves, you’ll have a cute, three-dimensional nanohana.
The steps are simple, making it easy for older adults to try, and it’s also effective for finger dexterity and improving concentration.
We recommend displaying the finished nanohana on a wall or exhibiting it as a spring craft.
Why not enjoy a fun crafting time while feeling the season?