For Seniors: Feel the Arrival of Warm Spring. Cherry Blossom Wall Decoration Ideas


As spring approaches, many people look forward to cherry blossom viewing.
Why not create a vibrant cherry blossom wall display at a day service or other senior facility and enjoy an early taste of spring?
In this article, we introduce ideas for cherry blossom wall decorations and crafts tailored for older adults.
Cherry blossoms have been beloved since long ago—so much so that they’re practically synonymous with spring.
Because they’re such a popular flower, there are plenty of craft ideas.
Through cherry blossom crafts perfect for this season, why not gather together and enjoy looking at them?
[For Seniors] Feel the arrival of warm spring. Cherry blossom wall decoration ideas (1–10)
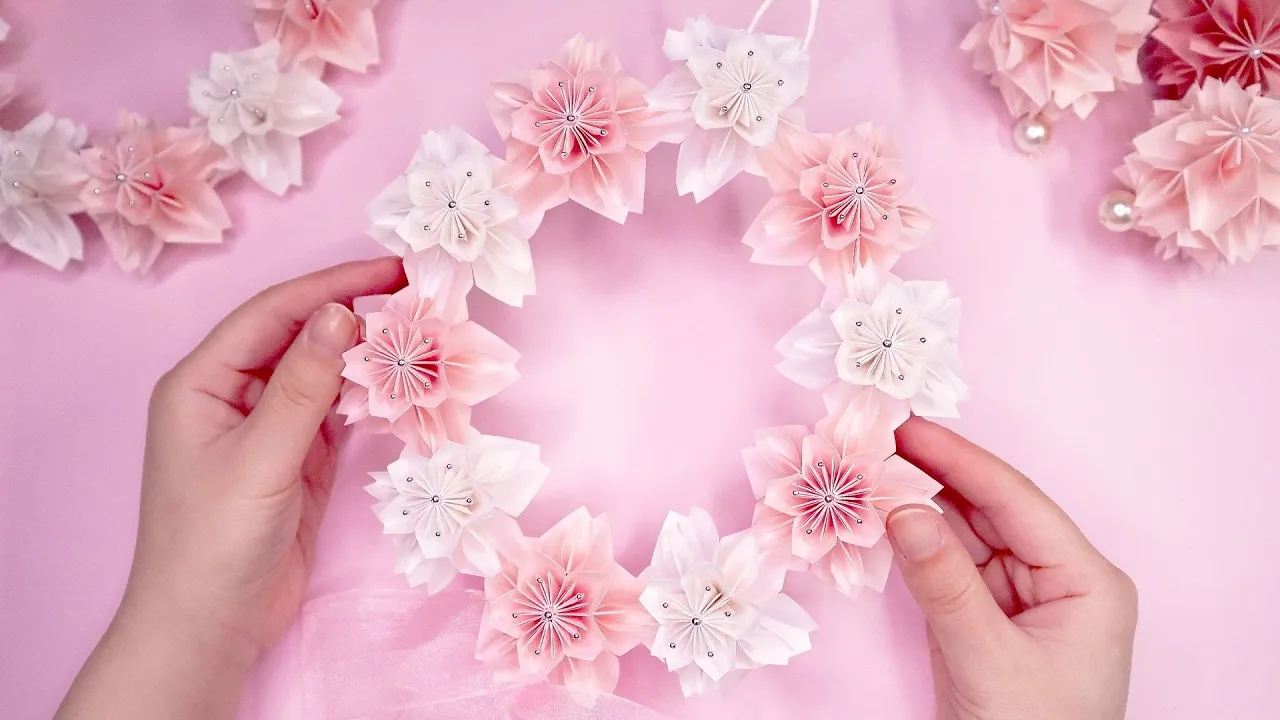
Wreath made from copy paper

This is a spring-perfect wreath inspired by double-flowered cherry blossoms, made by combining copier paper and paper cord.
Fold small, cut pieces of copier paper to create three-dimensional petals, then assemble them into the shape of double cherry blossoms.
Since you’ll arrange them in a circle for the wreath, it’s recommended to make them in multiple colors like white and pink.
The base of the wreath is made from paper cord; bundle and twist it, shaping it while keeping durability in mind.
Finally, attach the cherry blossoms to the base, add decorations such as ribbons, and your wreath is complete.
Cherry blossom wall hanging

A simple cherry blossom wall decoration made with origami is a great way to subtly style up a room.
First, fold a pink sheet of origami paper into a right triangle, then make two mountain folds so it’s layered, and round off the lower edge with scissors.
When you unfold the paper, it will form a petal shape; add crease lines on the back.
Make another set of petals the same way using a slightly smaller piece, and layer it on top.
Finally, craft the branch and leaves with green origami paper, attach them, and you’re done.
Felt cherry blossom hanging ornamentNEW!

This is a hanging decoration featuring soft, felt sakura motifs connected with string.
The key element is the cherry blossom motifs, and combining multiple flowers creates volume.
Cutting felt into circles, making slits, and assembling them to shape each flower in 3D is also crucial for adding volume at the end.
Choose string colors that match the sakura palette and maintain consistency through overall gradation as you proceed.
weeping cherry (tree)

The drooping branches covered with many blossoms make the weeping cherry tree especially beautiful.
How about recreating that look with a wall display? All you need are simple craft supplies like origami or colored paper, scissors, and a craft knife.
Crumple pink origami paper to add creases all over, then cut it out in the shape of cherry blossom petals.
Next, attach them to branch pieces made by folding brown construction paper into rectangles.
Finally, glue on multiple petals, layering them while gradually changing the shades of pink to create a gradient—and you’re done!
Night Sakura and Day Sakura

Let’s make wall decorations of night cherry blossoms and daytime cherry blossoms using soft washi paper! Although they’re set at different times of day, both the night and daytime cherry blossoms have irresistible charm.
Some older adults may find it difficult to go out and see the blossoms, so creating wall decorations could really delight them.
You’ll mainly cut origami and washi paper to make the parts.
Since there are many small pieces, it’s great for making in a large group! For contrast, pair the night sakura with a blue background and a moon, and the daytime sakura with a cream-colored background—how lovely!
Curtain of cherry blossoms

Let’s try making a cherry blossom curtain using tissue paper.
Because tissue paper is soft and slightly translucent, it’s perfect for expressing the delicate petals of cherry blossoms.
You can accordion-fold the tissue paper to create blossoms, or cut it into petal shapes and hang them.
When attaching string to the petals, use a needle threaded with the string to link the petals together.
You can hang the curtain in the facility’s windows, and older adults can also take theirs home to decorate their own spaces.
When the wind blows and the tissue-paper petals sway, it looks just like real cherry blossoms fluttering in the air.
You can adapt this idea for wall decorations as well, so give it a try!
Cherry blossom decorations made with tissue paper

We’d like to introduce a super-easy cherry blossom decoration made with tissue paper—perfect for facility event displays or day-service recreation! Tissue paper is a familiar material for many older adults, so why not give it a try? Stack several sheets of tissue paper, fold them in an accordion, and tie the center with packing twine.
Round off both ends with scissors, then gently fan it out, and you’ve got a cherry blossom! Staff can make the tree trunk, have participants create the blossoms, and then decorate the wall—it will look lovely.
The impression changes depending on how you display them, so feel free to arrange and enjoy!