For Seniors: Feel the Arrival of Warm Spring. Cherry Blossom Wall Decoration Ideas


As spring approaches, many people look forward to cherry blossom viewing.
Why not create a vibrant cherry blossom wall display at a day service or other senior facility and enjoy an early taste of spring?
In this article, we introduce ideas for cherry blossom wall decorations and crafts tailored for older adults.
Cherry blossoms have been beloved since long ago—so much so that they’re practically synonymous with spring.
Because they’re such a popular flower, there are plenty of craft ideas.
Through cherry blossom crafts perfect for this season, why not gather together and enjoy looking at them?
- [For Seniors] Feel the Arrival of Spring: A Collection of Cherry Blossom Craft Ideas
- [For Seniors] Color Your Care Facility’s Spring: Wall Decoration Ideas
- [For Seniors] Embraced by Spring: Wall Decoration Ideas to Enjoy in April
- [For Seniors] Spring Wall Decorations: A Collection of Ideas to Brighten Up Your Room
- [For Seniors] Enjoy Cherry Blossoms Indoors: Wall Decoration Ideas
- For Seniors: Recommended Wall Decoration Ideas for March
- [For Seniors] Make an April Calendar: Fun Ideas to Brighten Your Mood
- [For Seniors] Making a March Calendar: Introducing Spring-Themed Motifs and Arrangements
- For Seniors: Come, Spring! Recommended March Craft Ideas for Daycare Services
- [Day Service] Spring Take-Home Crafts: Ideas to Warmly Brighten Your Room
- [For Seniors] Brighten Up Hinamatsuri: Wall Decoration Ideas
- [For Seniors] Crafts to Make in March! Recommended Project Ideas
- [For seniors] Enjoy spring: April craft ideas
[For Seniors] Feel the arrival of warm spring: Cherry blossom wall decoration ideas (21–30)
cherry blossom petals

As the first of the four seasons often mentioned, spring in Japan is a season that evokes new beginnings.
Let’s make sakura (cherry blossom) petals out of origami to symbolize this season of beginnings.
It’s a simple project—just fold the paper, make a few scissor cuts, and unfold—but the key is to fold carefully along the guide lines so that the five petals open out nicely.
Because of its clean, single-color look, it’s easy to use as a spring-themed element in a variety of decorations.
Cherry blossom wall hanging

Let us introduce a cherry blossom wall decoration that brings a touch of spring into your room.
Flatten a toilet paper roll and cut it in half; decorate one half with washi paper or colored paper to make the base.
Cut the other half into long, thin strips and shape them into cherry blossom petals.
Create a petal-shaped template from construction paper, then cut pink origami to match.
Sandwich and glue the toilet paper roll petals between the origami petals—the roll’s natural curve adds a nice accent to each petal.
Attach the petals to the decorated base, add any embellishments you like, and it’s done.
You can stick it directly on the wall or punch a hole and thread a string to hang it.
Try decorating your room in spring colors!
[For Seniors] Feel the arrival of warm spring. Cherry blossom wall decoration ideas (31–40)
cherry blossom twig

Introducing a cherry blossom twig decoration that symbolizes spring in Japan.
Once you have pink origami paper ready, let’s make the blossoms.
Using a round dish or similar object makes it easy.
Cut out a circle, fold it in half, then fold it again so it becomes one-third the original size.
Sketch a petal shape with a pencil and cut along the line.
When you unfold it, you’ll have a cherry blossom with six petals.
Overlap one petal onto the neighboring petal to give it a three-dimensional shape.
Make a branch from brown origami paper and leaves from green origami paper, then attach them along with the blossoms to finish.
It looks adorable when added to a message card or gift box.
Give it a try!
Swaying Cherry Blossoms
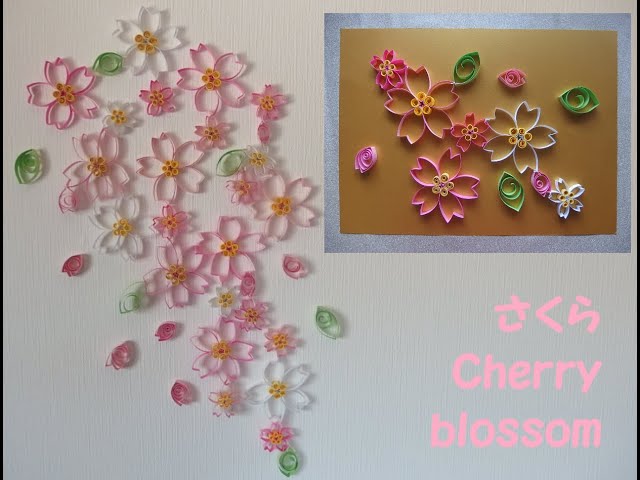
Here’s an idea for a wall decoration that evokes cherry blossom petals swaying in the wind.
Make petals by cutting origami paper into rectangles and forming each piece into a loop.
Combine four to five petals and glue a yellow piece in the center to create a three-dimensional cherry blossom.
If you press the inside of the flower and leaf pieces with a bamboo skewer to add curvature, they’ll gain a soft, rounded 3D look.
Connect the finished blossoms and leaves with thread and attach them to the wall so the design sways when a breeze passes through.
It’s a decoration that’s both visually striking and dynamic, letting you feel the arrival of spring.
Cherry Blossoms and Rapeseed Flowers

Spring is the season when flowers of many colors bloom in profusion; not only cherry blossoms but also rapeseed flowers brighten the landscape.
This is a three-dimensional decoration that depicts a spring scene and the uplifting feeling of rapeseed blossoms blooming around cherry trees.
The key is to make each part with tissue paper, carefully adding wrinkles and shaping them like flowers to create a soft, three-dimensional look.
A sturdy cherry tree with soft pink blossoms, arranged with yellow rapeseed flowers around it, completes the piece.
It might also be nice to emphasize spring by adding decorations like fallen petals and butterflies, not just flowers in bloom.
Sakura garland made with obi (kimono sash)

This is a garland made by linking cherry blossoms crafted from paper strips—its charm lies in the cute, three-dimensional look.
The key is that it’s not flat but 3D, giving it a popping sense of motion and strength.
First, fold two types of strips—one short and one long—into a zigzag shape, then bend the pointed tips and connect them into loops.
Finally, flip each piece over and neaten it to complete the cherry blossom shape, and then string them together to finish the whole garland.
Try varying the intensity of the pink strips and explore arrangements that make the colors look even more vibrant.
Cherry Blossom Fan

Motifs like cherry blossoms and fans are classic symbols that evoke Japanese scenery and tradition.
This piece aims to create a springtime-in-Japan decoration by attaching a cherry blossom pattern to the shape of a fan.
The procedure is simple: first add patterns to the paper, then fold the whole sheet like a screen to shape it into a fan.
The visual impact, however, comes from the decoration techniques used here.
For example, arrange small paper components and spray over the entire surface so their shapes remain, or add gold accents to highlight the blossoms.
Let’s think of ways to make the finish more vibrant.
Express originality through the shapes of the motifs and the overall gradation.