
For Seniors: Recommended Wall Decoration Ideas for March


March brings more warm days, and it’s a lovely season when colorful flowers like cherry blossoms, dandelions, and clover begin to bloom.
Many people may feel the arrival of spring and spend their days with excitement.
In this article, we’ll introduce wall decoration ideas for older adults.
There are plenty of opportunities to decorate in care facilities such as day service centers, so please use these ideas as a reference.
Let’s decorate your room with cute creations and enjoy an early taste of spring!
[For Seniors] Recommended in March! Wall Decoration Ideas (1–10)
flower(s)

How about decorating an entire wall with springtime flowers you can easily make from origami? The method is super simple: make two parts by accordion-folding the paper, rounding the corners, and folding each piece in half, then glue them together and fan them out 360 degrees.
You’ll get a cute, fluttery-looking flower.
You can stick them on the wall as they are, or create a tree trunk and arrange them around it to look like cherry blossoms—both turn out beautifully.
With few steps and a simple folding process, it’s an activity that even older adults can enjoy with ease.
weeping cherry (tree)

This time, we’re introducing a wall decoration idea featuring weeping cherry blossoms that evokes the arrival of spring.
In recent years, cherry blossoms have been blooming earlier, and in some areas they start flowering in late March.
Among cherry trees commonly seen in parks, it’s said that weeping cherry blossoms bloom a bit earlier than the Somei Yoshino variety.
To make the petals, first crumple origami paper by hand into a ball, then unfold it.
This gives the petals a three-dimensional look and a delicate, fluttering feel.
Carefully attach each petal to the paper branches one by one.
Since this activity involves lots of hand and fingertip movement, it may also offer brain-training benefits for older adults.
Displaying lanterns and dango alongside the finished weeping cherry blossoms can create a piece that makes people feel like they’re enjoying a hanami (cherry-blossom viewing).
Hanging decoration of plum blossoms
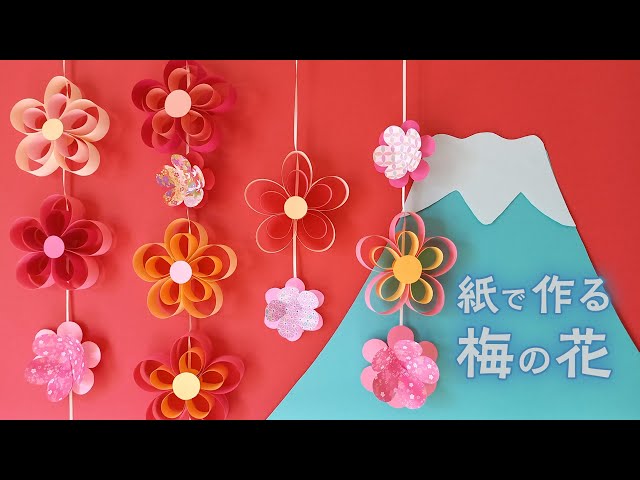
Let’s make spring-like plum blossom decorations! Take two strips of paper in different lengths, stack them, curve them into a loop, and staple them to create five petal pieces.
Apply glue to the center area, attach the petals together, and then add a circle of yellow paper to the center to complete the plum blossom! You can hang it directly on the wall, or add a ribbon to turn it into a hanging ornament—both look lovely.
You can also make a three-dimensional plum blossom by layering two sheets of origami cut into plum-blossom shapes, so try whichever method is easiest for you.
rapeseed blossoms

The soft texture of tissue paper perfectly captures the feel of rapeseed flowers! This is a wall decoration of rapeseed blossoms that you can make one stem at a time and arrange freely.
Cut yellow tissue paper into large and small flower shapes using a template.
Cut green tissue paper into leaf shapes, then accordion-fold to create creases, and crumple it to add a leafy texture.
Finally, attach the flowers and leaves in a balanced way to a long, narrow backing strip, and you’re done! Display it together with spring motifs like cherry blossoms and butterflies to fill your room with the spirit of spring.
Dandelion decorations made with tissue paper

Spring is the season when all kinds of flowers begin to bloom, and their colorful, soft appearance really highlights the warmth of the season.
Among these classic spring blossoms, this decoration features dandelions made from tissue paper to evoke a springtime feel.
For the flower heads, stack sheets of tissue paper, fold them in an accordion, tie them together, snip cuts into the edges, then fan them out to shape.
For stems and leaves, origami or construction paper is recommended—use different materials from the flower parts to emphasize the flower’s softness.
A key point is the versatility: you can stick them onto a background or attach strings and hang them, allowing for a variety of display styles.
Hinamatsuri wreath decoration

Introducing an idea for a Hina Matsuri wreath made entirely from origami parts! The parts you’ll make are the Emperor doll and Empress doll, lanterns, hishi-mochi rice cakes, cherry blossoms, a folding screen, a fan, a ritual baton (shaku), a stand, and a circular base to which all these parts are attached.
The base is made by combining 12 identical pieces.
Each individual part is created through simple steps, so although there are many pieces, it’s a project you can likely finish in a day.
For the Emperor and Empress kimonos, use washi-patterned origami paper—choose your favorite designs while imagining the final look.
Mini wreath of rape blossoms

This mini wreath, compactly shaped into a small ring and packed with the bright cheer of rape blossoms, is an origami piece that combines easy display with a touch of splendor.
Its hallmark is the process of making each yellow flower individually and arranging them with an eye for balance, advancing while envisioning the final look.
Rather than a simple repetition of steps, the placement of each flower changes the impression, making it enjoyable to experiment.
Another appeal is that once finished, it can be displayed almost anywhere—on walls, doors, or bulletin boards.
Lining up multiple wreaths creates a cohesive look that brightens the entire space.
It’s a seasonal origami idea that lets you enjoy both the making and the decorating.