![[For Seniors] Fun February Crafts: Ideas Inspired by Setsubun, Valentine’s Day, and Other Events](https://i.ytimg.com/vi_webp/ytJkEiabUHM/maxresdefault.webp)
[For Seniors] Fun February Crafts: Ideas Inspired by Setsubun, Valentine’s Day, and Other Events


February is a season filled with heartwarming events like Setsubun, Valentine’s Day, and Cat Day.
How about enjoying some crafts with construction paper and origami in a warm room on a cold day? Making things like ogre-themed pellet drums, heart-shaped accessories, or dangling plum-blossom decorations lets you move your fingers while savoring a touch of nostalgia, naturally bringing out smiles.
Displaying your finished pieces at home will brighten the atmosphere and make it feel more festive.
Here are some easy, charming craft ideas for February that you can try right away.
For Seniors: Fun Crafts for February. Ideas inspired by events like Setsubun and Valentine’s Day (1–10)
Making an oni maskNEW!
https://www.tiktok.com/@dai2amakeijusou/video/7467799884851170576We’d like to introduce a craft activity where you choose parts to complete an oni (demon) mask.
Since it can be difficult for older adults to make a mask from scratch, we provide facial parts on construction paper with cutting lines drawn, pre-cut hair base pieces, and yarn in various colors and patterns.
After choosing your favorite parts, combine them to complete your oni mask.
The nice thing about this idea is that you don’t have to create everything from scratch, and by trying out combinations in a basket, it’s easy to imagine what kind of oni it will become.
On the day of the Setsubun event, be sure to wear your handmade mask and join in!
Wreath of plum blossoms and bush warblers

Here’s a craft that brings a touch of spring in February, when we start longing for its arrival.
You’ll make parts like a bush warbler, plum blossoms, a plum branch, a wreath, and a base to attach the bird and blossoms.
Everything is made with origami, so feel free to choose springlike colors for the wreath and base.
The wreath is made by combining eight sheets of origami paper.
You can use all the same color, or alternate colors and patterns—either is fine.
Arrange the parts as you like, vary the number of plum blossoms, and enjoy completing your design.
Wall ornament of camellia sasanqua and narcissus

Let’s try making three-dimensional paper flowers with origami.
With this idea, you can create camellias for the cold season and daffodils.
The process is to cut out petal and leaf parts from origami paper and then glue them together.
You can download the templates from the description, so please make use of them.
For the winter camellia petals, use scissors or a pen to gently curl the back so they form an arch.
This will give them the characteristically rounded camellia shape.
Once your camellias and daffodils are finished, arrange them nicely on a backing sheet or a wall and enjoy the display.
Ear Pendants

Let me introduce a decorative Otafuku (good-luck) ornament you can make with origami.
The steps are very simple, so you can finish it quickly.
You’ll need construction paper for the base, white paper, and origami paper in red, black, pink, yellow, plus a Japanese-patterned sheet.
First, glue the construction paper and white paper together to create the base.
Then, cut the Otafuku hair from the black origami paper, cut round cheek pieces from the pink paper, and attach them to the base.
From the remaining papers, cut out circles in different sizes, layer them to form flowers, and use them to decorate the hair and open spaces.
Finally, draw Otafuku’s facial features with a pen to complete it.
The key tip is to tear the origami pieces by hand instead of using scissors when cutting out the parts.
This gives the piece a more charming, handcrafted look.
Daffodil wall decoration

How about brightening up your winter interiors with origami daffodils? The steps are simple, making this a great project for seniors to try.
Start by making three petal pieces from white origami paper.
The creasing steps are important here, so take your time and fold carefully.
Once the folding is done, draw the petal shapes and cut them out with scissors.
Punch a hole in the center of each of the three petal pieces, then insert a yellow origami cone (the corona) to complete the daffodil.
You’ll need two sets of petal pieces for each daffodil, so prepare as many as you need for the number of flowers you want to make.
Create the stem from green origami paper, and finish by arranging the daffodils on a frame base made of origami.
Blue Oni made with a toilet paper roll core

This is a cute blue ogre craft made with a toilet paper roll and origami.
Cut the roll in half, then wrap the lower half with a piece for the ogre’s pants—yellow origami decorated with patterns drawn in black pen.
Cover the upper half, which will be the face, with light blue origami.
Draw the eyes and mouth with a black pen, then finish by attaching cheeks, hair, and horn pieces cut from origami.
It’s rounded but very stable, making it perfect for display! It’s also lovely to make ogres in various colors and line them up.
Setsubun wreath made with yarn
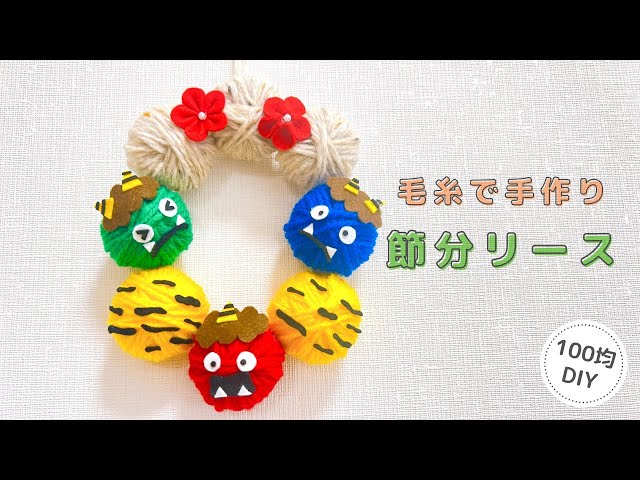
In February, the first big event is Setsubun! To get ready for it, how about making a cute, cozy wreath using yarn? First, crumple about three tissues into a ball.
Wrap the ball with yarn in your favorite color to make a sphere.
If you want to make red or blue oni (ogres), use red or blue yarn; if you want to represent beans, use beige-toned yarn.
For the oni spheres, attach felt pieces to create the face and hair.
Make about eight spheres in the same way, arrange them in a wreath shape as you like, and glue them together with a hot glue gun.
Add decorations like plum blossoms if you like, attach a string to hang it on the wall, and you’re done.