For Seniors: Recommended Wall Decoration Ideas for March


March brings more warm days, and it’s a lovely season when colorful flowers like cherry blossoms, dandelions, and clover begin to bloom.
Many people may feel the arrival of spring and spend their days with excitement.
In this article, we’ll introduce wall decoration ideas for older adults.
There are plenty of opportunities to decorate in care facilities such as day service centers, so please use these ideas as a reference.
Let’s decorate your room with cute creations and enjoy an early taste of spring!
- [For Seniors] Spring Wall Decorations: A Collection of Ideas to Brighten Up Your Room
- [For Seniors] Brighten Up Hinamatsuri: Wall Decoration Ideas
- For Seniors: Come, Spring! Recommended March Craft Ideas for Daycare Services
- For Seniors: Feel the Arrival of Warm Spring. Cherry Blossom Wall Decoration Ideas
- [For Seniors] Crafts to Make in March! Recommended Project Ideas
- [For Seniors] Color Your Care Facility’s Spring: Wall Decoration Ideas
- [For Seniors] March Origami: Ideas to Brighten Your Room with Seasonal Flowers and Events
- [Day Service] Excited for Hinamatsuri! Craft ideas to brighten up your room
- [For Seniors] Activities to Enjoy March: Games, Crafts, Music, and Snack Recreation
- [For Seniors] March-Themed Event Activities
- For seniors: Heartwarming and cozy. Recommended handmade Hina dolls
- [For Seniors] Making a March Calendar: Introducing Spring-Themed Motifs and Arrangements
- For Seniors: Wall Decorations to Brighten Up February — Festive Ideas for Setsubun, Valentine’s Day, Plum Blossoms, and More
[For Seniors] Recommended in March! Wall Decoration Ideas (51–60)
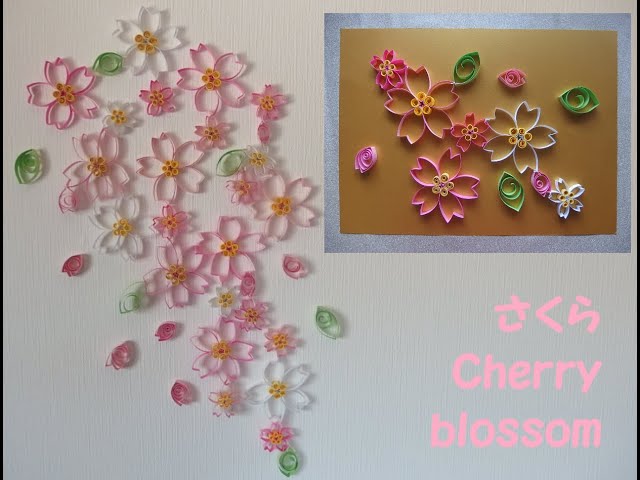
Sakura garland made with obi (kimono sash)

This is a garland made by linking cherry blossoms crafted from paper strips—its charm lies in the cute, three-dimensional look.
The key is that it’s not flat but 3D, giving it a popping sense of motion and strength.
First, fold two types of strips—one short and one long—into a zigzag shape, then bend the pointed tips and connect them into loops.
Finally, flip each piece over and neaten it to complete the cherry blossom shape, and then string them together to finish the whole garland.
Try varying the intensity of the pink strips and explore arrangements that make the colors look even more vibrant.
Cherry Blossoms and Rapeseed Flowers

Spring is the season when flowers of many colors bloom in profusion; not only cherry blossoms but also rapeseed flowers brighten the landscape.
This is a three-dimensional decoration that depicts a spring scene and the uplifting feeling of rapeseed blossoms blooming around cherry trees.
The key is to make each part with tissue paper, carefully adding wrinkles and shaping them like flowers to create a soft, three-dimensional look.
A sturdy cherry tree with soft pink blossoms, arranged with yellow rapeseed flowers around it, completes the piece.
It might also be nice to emphasize spring by adding decorations like fallen petals and butterflies, not just flowers in bloom.
Cherry blossom decoration made of paper

We’d like to introduce a cherry blossom craft that’s perfect as a mobile part, gently swaying indoors when hung with a string.
Prepare several sheets of construction paper cut into long, narrow rectangles.
Fold the paper and staple the ends to create cherry blossoms.
Older adults might recall past events while making these, too.
Conversations may liven up with memories of cherry-blossom viewing and stories from cherry blossom season.
Making many and decorating a wall to form a large cherry tree would also be lovely.
Try various arrangements and enjoy creating your own cherry blossom pieces.
Dandelion and Ladybug

When you hear “spring,” what comes to mind? I’m sure this motif will fit for some of you among the images you pictured.
Ladybugs and dandelions evoke a scene of sunlight filtering through the trees, don’t they? What you’ll need are origami paper, scissors, pinking shears, a craft knife, bamboo skewers, a pencil, wood glue, glue stick, colored pencils, a ruler, and templates.
Each step is careful and detailed, so it might be a good idea to divide up the tasks and work together! If you make lots of dandelions, it should look quite impressive.
[For Seniors] Recommended in March! Wall Decoration Ideas (61–70)
Swaying Cherry Blossoms
Here’s an idea for a wall decoration that evokes cherry blossom petals swaying in the wind.
Make petals by cutting origami paper into rectangles and forming each piece into a loop.
Combine four to five petals and glue a yellow piece in the center to create a three-dimensional cherry blossom.
If you press the inside of the flower and leaf pieces with a bamboo skewer to add curvature, they’ll gain a soft, rounded 3D look.
Connect the finished blossoms and leaves with thread and attach them to the wall so the design sways when a breeze passes through.
It’s a decoration that’s both visually striking and dynamic, letting you feel the arrival of spring.
Japanese bush warbler

When you hear the call “hoo-hokekyo,” it makes you think, “Spring is here,” doesn’t it? The Japanese bush warbler (uguisu) is familiar to many people, including seniors, as a bird that heralds spring.
So let’s try making a calendar with an uguisu motif.
You could use origami or a coloring-page design—either works nicely.
It’s also a great idea to add plum or peach blossoms.
There’s even a traditional auspicious expression, ‘ume ni uguisu’ (plum blossoms with a bush warbler).
Plum blossoms and the bush warbler are a well-matched pair, and because the two together symbolize harmony, the phrase is used to represent good fortune.
Incorporating this combination into your calendar’s layout would likely result in a lovely piece.
Dandelion wall decoration

Introducing a remarkably realistic dandelion wall decoration that could be mistaken for the real thing at first glance.
You’ll need yellow, green, and white construction paper, plus wooden coffee stirrers.
First, cut out eight leaf shapes from the green paper.
Then cut another strip of green paper lengthwise, crease along the top edge, and make fine slits below the crease to create the flower stem.
For the flower, cut a long strip of yellow paper, fold it in half, and cut fine slits along the edge without leaving gaps.
Attach the stem to the flower strip, then roll it up from the flower side.
Once glued, gently fluff and open up the stem and flower by hand.
You’ll have a beautiful blossom.
Glue wooden stirrers together in a grid—three vertically and three horizontally—then attach the leaves and flowers to finish.
You can also make seed heads by using white paper for the flowers.
The work involves fine details, but the sense of accomplishment when you finish is exceptional.
Give it a try!