[For Seniors] Enjoy the Cold Winter! Simple, Recommended Crafts


Here are some recommended winter craft ideas that are perfect for seniors!
Winter brings lots of fun events and occasions, such as Christmas and New Year’s.
You might also think of seasonal foods, games, weather, and the cold.
So this time, we’ve gathered many craft ideas that help seniors feel the winter season.
Why not enjoy some craft activities in a warm indoor setting?
Using your fingers and brain can also provide cognitive training benefits.
If the crafts are practical, you can take them home to use or display and enjoy.
Please make use of these ideas in your daily recreation activities.
- [For Seniors] Perfect for winter events! Easy craft ideas
- Take-Home Craft Ideas for Winter: Perfect for Day Services for Seniors
- Recommended winter wall decorations for seniors: heartwarming ideas
- [For Seniors] Fun to Make, Soothing to Display! Snowman Craft Ideas
- [For Seniors] January Craft Ideas for Day Service Activities
- [For Seniors] Have Fun Making Things Based on Today’s Mood! Today’s Recommended Craft
- [For Seniors] Fun Crafts Recommended for December
- [For Seniors] Practical Crafts to Make in Day-Service Recreation: Idea Roundup
- For Seniors: Simple and Lovely Crafts – A Collection of Take-Home Project Ideas for Day Service
- [For Seniors] Fun February Crafts: Ideas Inspired by Setsubun, Valentine’s Day, and Other Events
- [For Seniors] Easy and Fun! Tsumami Zaiku Craft Ideas
- [For Seniors] January Craft Ideas: Boost Your Luck with New Year Decorations and Good-Luck Charms
- For Seniors: Auspicious Handmade Zodiac Ornament Craft Ideas
[For Seniors] Enjoy the Cold Winter! Simple Recommended Crafts (41–50)
Fluffy snowman made with tissue paper
@hoiku.labo [For December Wall Decor] Fluffy Tissue-Paper Snowman ❄️⛄️#Childcare CraftingNursery teacher / Childcare worker#Drawers of Childcare#NurseryTeacherInTraining#NurseryTeacherThingsWith childrendrawing papertissue paper flowersPaper plate craftSnowman
♪ Original Song – Craft Ideas for Childcare ♪ Hoiku Kyujin Labo – Hoiku Kyujin Labo | Nursery Teacher Job Changes and Helpful Information
Here’s a craft idea for a snowman that could also become a wall decoration if you hang it with a string.
First, cut out the inside of a paper plate so only the rim remains, then glue on crumpled tissue paper.
Next, cut out a circular piece from construction paper for the head and a rectangular piece for the bucket hat.
Draw the face with a pen, attach the bucket, then glue it to the paper plate to finish.
It’s handy to pre-cut the tissue paper into sizes that are easy to crumple, but having the person making it tear the paper themselves can also be good finger exercise.
Paper Plate Snow Globe
@hachimitu_835 The laminate film is the hand-applied laminate from Daiso.Nursery teacher / Childcare worker#Nursery schoolProductionTranslationsnow globe#Wall Creation
♬ Loose and cute “Turkish March”(102686) – KK
Let’s make a paper-plate snow globe that looks beautiful when hung on a window and lit from behind.
First, cut out the inner part of a paper plate and attach a circular piece of laminate film.
Next, from the back, cover the entire opening with tissue paper cut into a circle, and seal the adhesive edge with OPP tape.
Finally, stick a construction-paper snowman onto the front of the laminate film, and you’re done.
In this idea, colorful tissue paper is used for a vibrant finish, but I think it would also look lovely unified in blue tones to evoke snow.
Christmas gift-shaped charm

Christmas just isn’t complete without presents! So, here’s how to make a Christmas gift-shaped charm.
First, prepare some craft paper and design your favorite motif.
You can draw it with a pen, or use origami paper, colored paper, yarn, and other materials to give it a three-dimensional finish.
Next, put cotton and beads into a small transparent bag to create a snowy effect, then place your designed craft paper inside, seal the bag, and fold the top two corners to the back, securing them with tape.
Glue the bag onto a piece of felt that will serve as the base of the charm, and shape the felt into a gift shape.
Finally, tie a ribbon, and your charm is complete.
Just cut and paste. Shaka-shaka ornament.
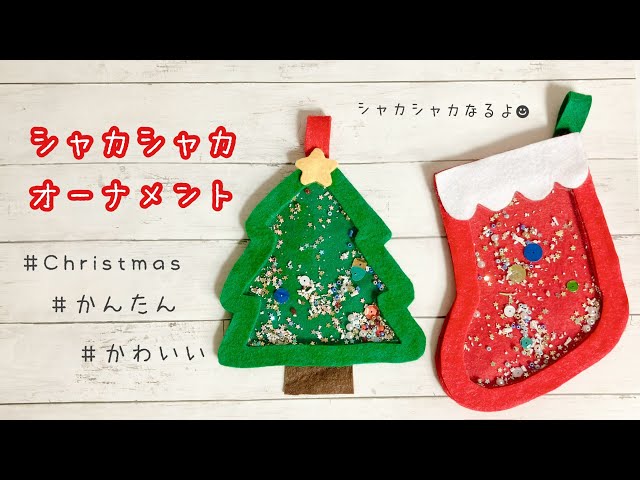
Let’s handcraft warm, felt Christmas ornaments.
First, create your favorite shapes—like a stocking or a tree—using thick paper.
Next, use this template to cut 0.3 mm plastic sheet and the felt that will serve as the ornament base.
Cut out the inside of the thick-paper template to make a frame-only template, then use that to cut three felt frames.
Glue two of the felt frames onto the felt base to add height, and place your favorite beads or sequins inside.
Glue the plastic sheet and the remaining felt piece on top, attach a hanging component, and you’re done!
Santa stuck in a chimney

How about making a Santa Claus decoration trying to climb down a chimney to deliver presents? It’s a humorous piece that will surely make you chuckle and feel delighted every time you see it.
All you need are a toilet paper roll, colored construction paper, a pen, scissors, and glue.
First, draw a chimney pattern on brown construction paper with a white pen and paste it onto a slightly flattened toilet paper roll.
Next, use red, white, and black construction paper to create Santa’s lower half.
Once Santa is ready, glue him upside down on top of the chimney.
Finish by adding snow pieces and a white sack to the chimney.
A fluffy, cozy pouch woven from cardboard

A fluffy, fuzzy pouch you can use for cosmetics or quick outings.
You’d never guess it was woven with cardboard.
Cut slits into both ends of a piece of cardboard and glue chopsticks to it.
Thread yarn through the slits and wrap it around the cardboard.
Using yarn attached to the chopsticks, weave over-under, over-under along the threaded yarn—similar to how you’d use a loom.
Once you’ve woven a sufficient length, cut it free from the cardboard.
Make two woven panels and tie the yarn at the ends to join them.
Turn it inside out, insert an inner pouch, add decorations, and you’re done.
Try making one with fluffy yarn!
Cushions woven from cardboard
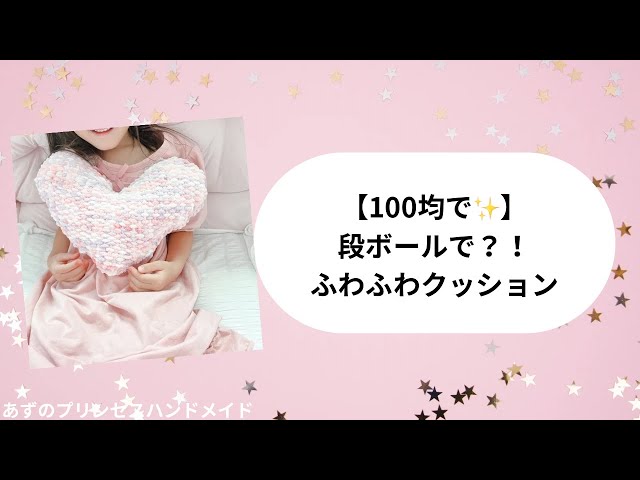
A cute cushion woven with cardboard feels nice to the touch and can be easily made with everyday materials.
Get your yarn, cardboard, chopsticks, and a comb ready.
Trace a heart shape made from construction paper onto the cardboard and cut it out.
Make small, frequent slits around the heart with scissors and hook the yarn onto them.
Next, use the chopsticks to weave the yarn so it goes over and under alternately; using a comb as you work will help the process go smoothly.
Tie off the yarn, trim it, and remove the piece from the cardboard.
Make a second heart of the same shape, stack the two together, and stitch around the edges with yarn.
Stuff generously with filling, and you’re done.
It’s a great project for parents and kids to enjoy together, so give it a try!