[Stylistic Techniques] A Collection of Ideas Useful for Graduation Projects


Are you struggling to come up with an idea for your graduation project? A graduation project, the culmination of your school life, is something special.
That’s exactly why it’s so hard to decide what to make.
In this article, we’ll introduce plenty of graduation project ideas, starting with stained glass.
We’ve gathered a wide range—from projects you can tackle with classmates to ones you can take on individually.
Use this as a reference, add your own creative touches, and make a memorable piece!
- A collection of moving graduation illustrations that will bring tears to your eyes. Memorable ideas.
- Feelings That Reach the Heart! Handmade Gift Ideas to Give at Graduation
- A graduation surprise that delivers heartfelt emotion: a collection of memorable ideas
- [Heartfelt] A Collection of Japanese Graduation Songs to Sing and Play on Guitar [2026]
- [Graduation Song] A tear-jerking track sung by an idol! A moving piece depicting friendship and gratitude [2026]
- Let's make a handmade graduation certificate! A collection of memorable design and crafting ideas
- Heartwarming surprise ideas that will excite everyone at school
- A graduation song that's trending and popular on TikTok. A perfect track for memory videos.
- A gift to give your teacher at graduation that conveys your gratitude
- [For High School Students] A Collection of Touching Friendship Songs
- [For Middle Schoolers] Recommended Classic Songs to Sing at Graduation Ceremonies
- From classic choral pieces to popular J-pop! Moving songs you’ll want to sing at graduation ceremonies
- How to Write a Graduation Essay That Conveys Your Feelings: A Collection of Moving, Ready-to-Use Example Ideas
[Rhetorical Techniques] A Collection of Ideas Useful for Graduation Projects (21–30)
silk screen

Let’s try one of the printmaking techniques! As the name suggests, silk screen printing is a method where ink is pushed through the open areas of a mesh—such as silk or nylon—to print.
Its appeal lies in the fact that you can print without reversing the image, achieve vivid colors and uniform color fields, and print on various materials and even curved surfaces, including paper, fabric, and boards.
In the video, they gather tools from a 100-yen shop and introduce the basics of how to print with silk screen.
Be sure to check it out for reference!
frottage

Let’s try frottage, a technique whose name comes from the French word for “to rub.” In this method, you place a thin sheet of paper over a textured surface and rub with a pencil or crayon to capture the patterns and edges on the surface beneath.
The video also introduces differences when using plant materials like leaves and flowers, as well as variations in texture depending on whether you use pencils or pastels.
Since it’s a technique you can easily try with simple materials like paper and pencils, be sure to give it a go.
Stamping
A simple, easy-to-understand, and easy-to-try technique! Stamping refers to a method where you apply ink such as paint to a stamp (a mold) and press it onto paper, fabric, and so on to transfer the pattern.
You can also use familiar materials for the molds, so it seems you can create interesting works by using recycled items like plastic bottle caps or cardboard, cross-sections of vegetables, or uniquely shaped objects.
Also, the amount of water appears to be a key point, so it’s best to adjust it as you work.
bleeding painting

It nurtures a sense of color and imagination! “Bleeding painting” (wet-on-wet painting) is a technique where you layer watercolor paint diluted with water or use water-based markers on materials like pre-wetted drawing paper, enjoying how the paint naturally bleeds and spreads across the surface.
Its features include color blending, serendipitous color shifts and patterns, and soft, gentle gradients—making it a technique enjoyable for both children and adults.
In the video, they create works using three watercolor colors, sponges, fabric, and drawing paper.
It’s simple and easy to incorporate, so it could be great for a graduation commemorative project.
Carving

A technique that refers to sculpture in general! One feature is that you can use not only wood, stone, metal, and leather but also familiar materials like soap, vegetables, and fruit.
By carving away material, you can create three-dimensional shapes and patterns.
The appeal lies in enjoying a wide variety of expressions depending on the purpose and material while making the most of each material’s characteristics.
In the video, the basics of soap carving are introduced, and it summarizes the steps and key points up to the completion of a piece.
It’s recommended to try it as a graduation keepsake!
Collage

A collage is made by pasting cutouts from magazines, photos, and the like.
How about making one using cutouts from your school life so far, or photos with friends and family? Once it’s finished, you can display it in your room.
It’s a photo piece filled with wonderful memories that you can enjoy looking at even after graduation.
Another recommendation is to make a collage by attaching your favorite cutouts to a photo frame.
Since it’s a photo frame, once it’s done, you can put in your favorite photos from your school days and display it.
string
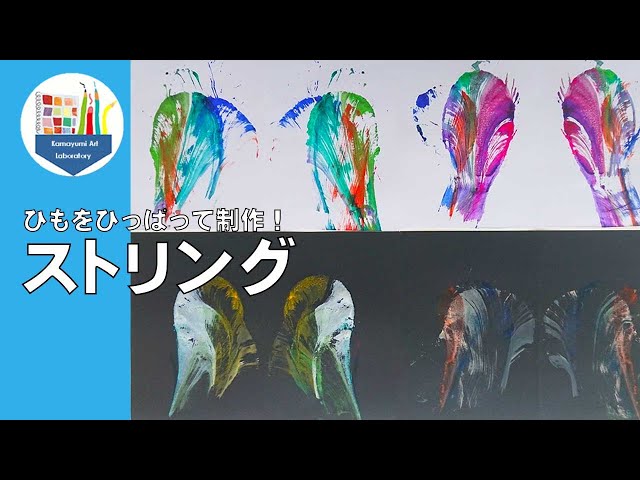
A piece made with the string-pulling technique—fun to make as well—would make a great graduation project keepsake.
Apply several colors of your favorite paint directly onto a hemp cord.
Use a water-dampened brush to spread the paint.
Place the cord between a sheet of drawing paper that has been folded to make a crease, and hold it firmly with one hand.
With your other hand, pull the cord out from between the paper to create a pattern.
The design changes depending on the colors you use and how you pull the cord.
The fact that no two pieces are the same is one of this project’s charms.
Once it’s finished, you can paste in memorable photos or write a message.
Besides a graduation project, it also works great as a card.