Halloween craft ideas: perfect for preschool projects and home decor

October, when the autumn atmosphere deepens, is also the fun season of Halloween.
Some of you may decorate your rooms or entryways with a Halloween theme.
In this article, we’re introducing Halloween craft ideas you’ll want to make before the big day arrives.
From pumpkin hats and candy bags that kids will love to projects that will appeal to adults who enjoy crafting, we’ve gathered a variety of ideas.
If you’re interested, give them a try!
- How to Make Handmade Christmas Boots [Great for Crafts with Kids and as Decorations!]
- [Halloween Crafts] Stylish Decoration Ideas That Adults and Kids Can Enjoy
- October origami kids will love! Easy ideas from Halloween to autumn flavors
- Fun to Make! A Collection of Easy DIY Ideas for Stylish Autumn Decorations
- Parents and kids will be hooked! Easy pumpkin origami ideas—perfect for Halloween crafts.
- Enjoy the sights of autumn using just scissors! A collection of easy paper-cutting ideas
- [For Beginners] A Collection of Easy and Recommended Craft Ideas
- Fun for daycare and kindergartens! A collection of DIY puppet ideas
- [Easy] Practical craft ideas. Great for beginners too!
- Let's make it with 100-yen shop materials! A roundup of Christmas craft ideas
- [Handmade] Cute hat ideas you’ll want your baby to wear
- Kids will be thrilled! A collection of DIY Christmas advent calendar ideas
- Christmas crafts for adults: stylish project ideas you'll want to display
Halloween craft ideas: for preschool crafts and home decor (11–20)
Witch’s broom

Why not make a magical broomstick that’s perfect as a Halloween costume accessory? You can whip one up quickly with yarn, so it’s great for anyone who wants to handcraft their costume props! Prepare a rectangular piece of thick paper and wrap three strands of your favorite colored yarn around it at the same time.
Adjust the number of wraps depending on the thickness and type of yarn.
Once you’ve finished wrapping, cut open one end with scissors and spread it out, place a straw in the center, and tie it with yarn.
Finally, smooth it by folding the right side and the yarn over to the left, and tie the upper part with yarn to finish! Adding Halloween-themed decorations makes it even more stylish.
Have fun customizing by changing the yarn colors or using patterned straws!
Easy: Paper Cup Headband
A headband made by arranging a paper cup.
Paint the paper cup and attach an elastic band around the rim.
For example, paint it orange for a jack-o’-lantern or black for a bat.
Use origami or construction paper to finish the piece.
Just imagining the headband perched cutely on the head feels heartwarming.
Since paper cups are easy to find, it seems simple to make.
It’s a headband that even small children can enjoy making, whether painting with paints or using construction paper and origami.
Handprint and footprint stamp Halloween card
Stamp your child’s handprints or footprints onto black construction paper and turn them into ghosts.
Draw eyes and a mouth with a pen, and top them with hats cut out from origami paper or similar.
Decorate the empty space cutely, and you’re done! Even babies who are still in the lying-down stage can take part, and it will make a memorable keepsake.
You can also combine handprints and footprints to create monsters, or change the background and ink colors to give a different feel.
Instead of drawing the face, using a photo of your child’s face could be a lovely touch, too.
A Halloween card with a pop-up witch hat
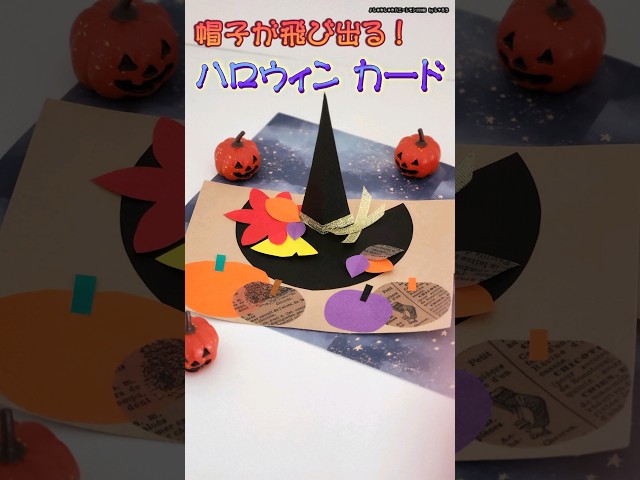
A high-impact message card where a large triangular hat pops up from the center when opened.
The hat’s wide brim gives you plenty of space to write messages, add patterns, or stick on your favorite stickers.
Cut the triangular hat and brim from black construction paper, glue them together, and attach a decorative ribbon.
Fold the base in half, then glue the folded triangular hat along the crease.
Use the remaining space to decorate for Halloween with any parts you like, such as pumpkins or bats.
[100-yen shop] Halloween wreath made with paper plates and paper napkins
@sana_tanosi 🌷 Teacher Sana @sana_tanosii A Halloween wreath you can make using only items from the 100-yen shop ✨ 🎃 There are tons of products in stock right now, so go while you can! I tried making the wreath with paper napkins instead of origami. I love that it turns out fluffy and three-dimensional! You can decorate it with ribbons and bats 🦇 and lots of other things ✨✨ Just hanging this wreath will boost your mood. If you’re not making it yet, save this for later. Twisting seems to be tricky for kids since they don’t have much experience with it. Keep twisting—you’ve got this 👍 Universal Studios’ Halloween Night has started too! Let’s enjoy Halloween at home as well 🧙♀️ ஐ༶⠜⢄⡱ஐ༶⠜⢄⡱ஐ༶⠜⢄⡱ஐ༶⠜⢄⡱ஐ༶⠜⢄⡱ஐ 🌷 Teacher Sana @sana_tanosii Thank you for reading to the end. I’ll keep sharing crafts, wall decorations, and more ✨ I hope to provide ideas that help you spend fun times with children! Thanks for your support (๑˃̵ᴗ˂̵) Follows, comments, and likes really encourage me ✨ ஐ༶⠜⢄⡱ஐ༶⠜⢄⡱ஐ༶⠜⢄⡱ஐ༶⠜⢄⡱ஐ༶⠜⢄⡱ஐ#Indoor Play Toddler Crafts Infant Craft Seasonal craftProduction ideas
♬ Halloween · cute horror song – PeriTune
A Halloween wreath made with paper plates and paper napkins full of Halloween vibes.
Get your paper plates, ribbon, construction paper, paper napkins, scissors, and glue ready.
Cut a hole in the center of the paper plate to make the wreath base.
Cut the paper napkins for decoration into pieces about 1/16 of their original size and twist them.
Using glue, attach the twisted napkins to the paper plate.
The key is to place them so there are no gaps.
Wrap a ribbon around it for an accent, and finish by attaching decorations made from construction paper—witch’s legs, a hat, and bats.
Give this parent-and-child Halloween wreath a try!
[Tissue Paper] A Halloween wreath that even infants can enjoy
@rin_hoiku_idea Just roll and stick! Halloween wreath 🎃 (for ages 0–1)Crafts for 0-year-oldsCrafts for 1-year-oldsEnjoy with childrenNursery teacher / Childcare worker#NurseryTeacherMom#DaycareMom#KindergartenMomChildcareEarly childhood educationProduction ideasCraft Playproduction activitiesSeasonal craftProduced in Octoberwall surface#Wall CreationHalloween# Halloween CraftPaper Plate CraftGhost making#HalloweenWreath
♬ Crazy Party Night – Kyary Pamyu Pamyu
Cut out the center of a paper plate to make the base.
Crumple tissue paper tightly into balls and attach them to the base with double-sided tape.
Cut the previously removed center into a ghost shape, then add a child’s face photo and a hat.
Hang the ghost in the center of the base with thread, and finish by attaching pumpkin, star, and candy pieces! You can make the pieces from origami or cut construction paper, but if you’re short on time, using ready-made craft parts might be a good idea.
Halloween Craft Ideas: For Preschool Projects and Home Decor (21–30)
[Flower Paper] Monster Wreath
Cut the cardboard into a circle and remove the center to make a wreath base.
Crumple tissue paper and glue it to the base, then attach the eye parts.
Glue on fangs, horns, candies, and other pieces made from origami to finish.
Use tissue paper in Halloween or monster colors to make it vibrant.
By intentionally varying the sizes and the order of colors you attach, you can bring out a mysterious, monster-like feel.
You can also customize the candies into bats or spiders—decorate however you like!