[Handmade] Christmas trees you can make with everyday materials: a collection of eye-catching ideas


This Christmas season, why not try handcrafting your very own original Christmas tree? A handmade tree that instantly elevates the atmosphere of your room is also perfect for making holiday memories.
These ideas are easy to start with familiar materials like yarn, washi tape, nuts and cones, and felt.
From simple, natural styles to whimsical and glamorous ones, we’ll introduce a variety of ideas you can choose from to suit your taste.
Let’s make a special tree together—one you’ll look forward to displaying every year!
- Christmas crafts for adults: stylish project ideas you'll want to display
- Christmas trees to make with kids! A collection of cute craft ideas for decorating
- For seniors: Introducing handmade decoration ideas to welcome a wonderful Christmas
- Christmas crafts with pinecones! A collection of ideas you can make with your kids
- [Easy] Handmade Christmas Wreath Ideas
- [Handmade] Cute Christmas Decoration Ideas Collection
- Christmas wreath crafting ideas: handmade projects that kids can enjoy too
- How to fold a Christmas tree using a single sheet of origami paper
- How to Make Handmade Christmas Boots [Great for Crafts with Kids and as Decorations!]
- Let’s play Christmas songs with handmade instruments! Craft ideas for sound-making instruments
- Handmade Tapestry Ideas for Christmas [Great for Arrangement and How-To Inspiration!]
- [Easy & Cute] Handmade Christmas Decoration Ideas
- Handmade Christmas Hair Accessories: A Collection of Ideas Using Ribbons and Resin
[Handmade] Christmas trees you can make with everyday materials: a collection of eye‑catching ideas (41–50)
Marble Christmas Tree

Let’s make a marble tree using a wooden light sold in online shops as the base.
Prepare a wooden light, your favorite marbles, decorative parts, and a glue gun.
First, arrange the marbles in a circle to match the shape of the base and glue them down.
Next, place and glue another layer of marbles on top.
Once you have a certain height, add marbles inside as well to create the final tree shape.
Attach a decorative piece to the top to complete your marble tree.
Turn on the light and enjoy it in the dark.
A Christmas tree that becomes a lamp

It’s an idea you can use as a tree when it’s bright and as a lamp when it’s dark.
Draw a net for a square pyramid on construction paper, cut it out with scissors, and use a craft punch to make star or heart holes in the triangular faces.
Be sure to make a hole in the center of the square that will be the base so the light can pass through.
Once that’s done, glue the net together to form the square pyramid.
Decorate the top with a ribbon or a star to complete your tree! Place it over an LED lamp and enjoy.
If you wrap brown tape around the sides of the lamp’s base, it will look like a trunk and make the tree look even more realistic.
Fluffy fabric Christmas tree
Here’s an idea for a self-standing tree that’s easy to display anywhere! It takes a bit of time since you’ll be sewing fabric with a machine, but once you make it, you can use it year after year.
First, create a tree pattern by adding a 1 cm seam allowance to the finished size.
Using the pattern, cut out six fabric pieces, then sew them together in pairs with right sides facing.
Be sure to leave an opening for turning and a hole for stuffing.
Once sewn, turn the fabric right side out, then stack three pieces together and sew along the center.
Insert stuffing through the opening, stitch it closed, and finish by decorating the top with a ribbon.
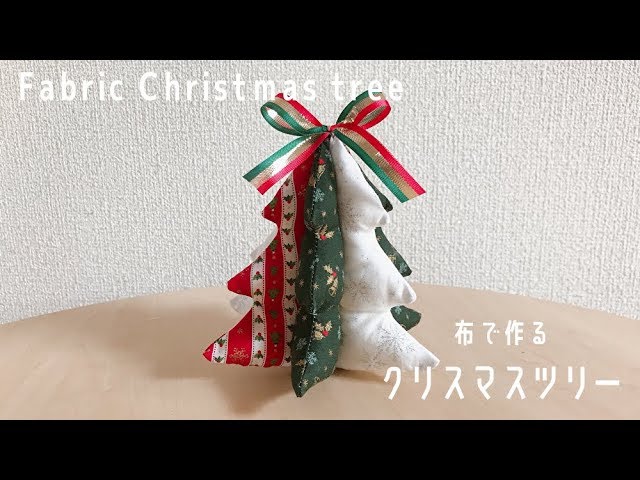
Simple cloth Christmas tree

Let’s make a tabletop tree using Christmas-colored fabrics.
You’ll use two different fabrics, so please prepare them in contrasting colors.
Cut eight isosceles triangle pieces from each fabric, pair them up one by one, and sew each pair right sides together.
Turn them right side out through the opening, stack all the pieces, and sew through the center.
Be sure to stack them so that pieces of the same color face each other across the center.
Hand-stitch the opening closed, then sew the two bottom corners of each section together in pairs.
Decorate the side edges by sewing on beads, and finish by topping the tree with any ornament you like!
Striped tree made with an eyedropper and paint

Here’s an idea for making a Christmas tree by dripping paint with a dropper.
Cut a paper plate in half, roll it into a cone, and secure it with double-sided tape to create the tree base.
Once the base is ready, prepare paints diluted with three times as much water in various colors.
Use a dropper to draw them up and freely drip them over the base from the top.
It’s fun to watch the paint flow and the colors mix and change into new shades.
After the paint dries, decorate with glittery stickers, sequins, and ribbons.
Give it a try and make a wonderful tree!
[Paper Quilling] A Cake-like Christmas Tree
![[Paper Quilling] A Cake-like Christmas Tree](https://i.ytimg.com/vi/jN5z_2ZX7M0/sddefault.jpg)
This is a three-dimensional Christmas tree, which can also look like a shortcake, made using long, thin strips of paper rolled up tightly.
The rolled paper is shaped like a teardrop and glued, then these parts are combined into rings and attached to a cone-shaped base to create stepped layers.
Once the gaps are mostly filled by overlapping the parts, add a star at the top and beads around it to finish.
Because the process involves repeatedly assembling small pieces and building them up, you’re likely to feel a sense of accomplishment when you see the finished piece.
Dreamy Fluffy Christmas Tree

How about making a fluffy, cute Christmas tree that feels like something from a dream world? Prepare materials you can use for the base—such as a milk carton or cardboard—and cut them into a triangle shape like a Christmas tree.
Cover the entire base with double-sided tape, then tightly wrap and stick white string around it until the base is no longer visible.
After that, just add decorations like dreamy, fluffy yarn, pastel-colored yarn, ribbons, stars, and hearts from the top, and you’re done! Attach a string to turn it into a Christmas tree ornament, or try displaying it in different spots around your room.