
When it comes to things you can’t do without at a summer festival, the mikoshi portable shrine surely comes to mind.
A mikoshi is considered a vehicle for the gods; as it is carried around the neighborhood, it is believed to ward off misfortune and grant wishes.
This article introduces DIY ideas for making your own mikoshi.
Since the materials are often just cardboard, you can create a lightweight mikoshi that even children can carry.
Cardboard can be cut without special tools, making it a fun craft project as well.
Of course, you can also make a more authentic mikoshi out of real wood!
- Simple DIY Drum Ideas: From Den-Den Drums to Taiko Drums!
- Handmade omikuji ideas: DIY crafts you can make and play with
- Handmade decoration ideas for summer festivals
- Handmade lantern ideas. Let's make festival decorations!
- Handmade toys with cardboard! DIY game ideas that will captivate kids
- Handmade summer festival games: a collection of ideas you can enjoy at kindergartens, daycare centers, and at home.
- How to Make a Senbon Kuji (Lottery Strings Game) with Everyday Materials: Fun Handmade Ideas to Liven Things Up
- [No kit required] Introducing an easy and fun way to make a DIY cardboard house!
- [Handmade] Let's play with shuriken! A collection of homemade target practice ideas
- A roundup of handmade decoration ideas perfect for summer festivals
- Toys you can make from cardboard crafts! Authentic ideas you can build and play with
- Great for festival stalls! Handmade game ideas
- Handmade mask ideas: perfect for events and festivals
Let's make a mikoshi by hand! From simple ideas to full-scale DIY!
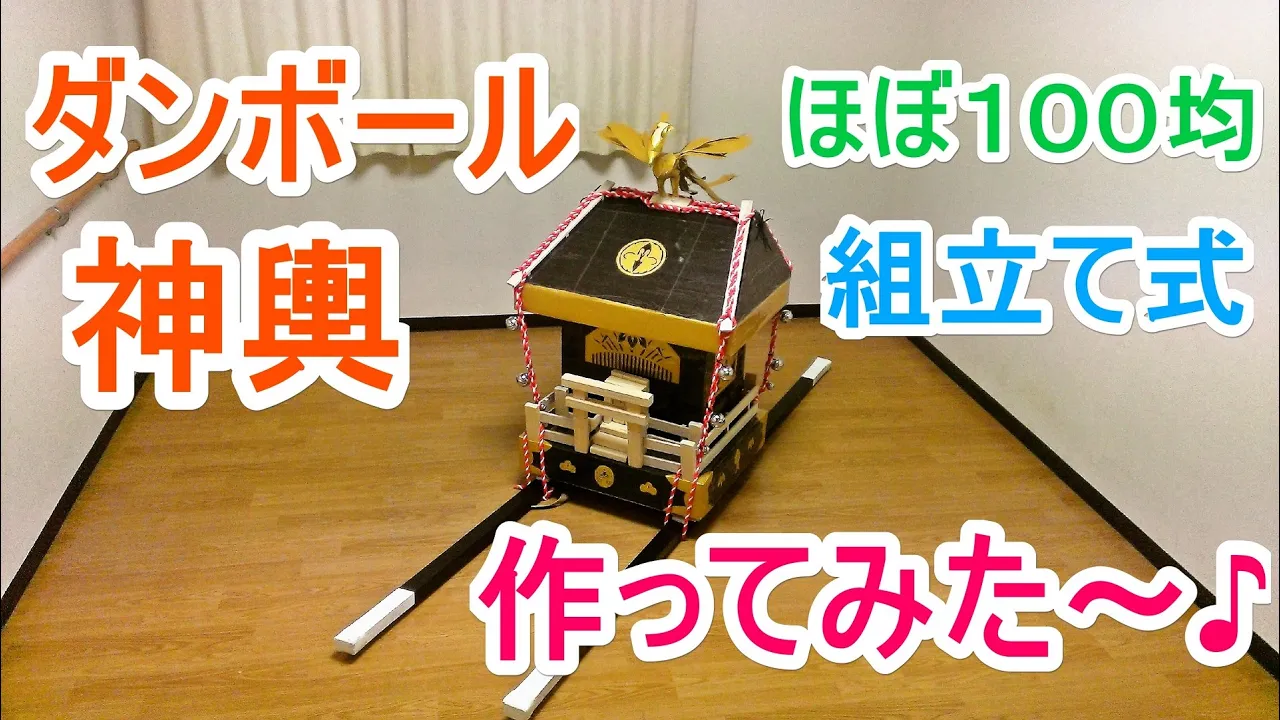
[Cardboard] Assembled Portable Shrine
![[Cardboard] Assembled Portable Shrine](https://i.ytimg.com/vi/nKwj4gN6-jg/sddefault.jpg)
This is a portable shrine (mikoshi) designed so that each part is made separately and then assembled using belts.
The main components are four parts—the carrying poles and base, the middle section, and the roof—which are put together with belts and cords that also serve as decorative elements.
A key feature is that each part has a mechanism that opens, and inside are the cords used for assembly as well as decorative items like a torii gate and a phoenix.
When not in use, the entire shrine can be compactly stored, making it a mikoshi that balances not only splendor but also thoughtful storage.
[Cardboard] portable shrine with a phoenix
![[Cardboard] portable shrine with a phoenix](https://i.ytimg.com/vi/wM82k0vSXM0/sddefault.jpg)
The basic shape we imagine for a mikoshi is that temple-like look with pillars extending out, right? And to make a mikoshi look more luxurious, the essential touch is the phoenix ornament mounted on the roof.
While paying attention to that phoenix ornament, let’s create a brilliant mikoshi using cardboard.
It’s best to start with the base, decorating it with a Japanese aesthetic using tapes in black, red, and gold.
For the phoenix ornament, shape it with paper clay and then cover it with gold paper to finish.
The key is to consider balance and craft the ornament in a size that matches the base.
[Plastic Corrugated Board] Ultra-lightweight! Children’s Portable Shrine
![[Plastic Corrugated Board] Ultra-lightweight! Children’s Portable Shrine](https://i.ytimg.com/vi/ZZOV0evarO8/sddefault.jpg)
By using plastic corrugated board, you can create a portable shrine (mikoshi) that balances lightness and strength.
Cut out parts such as the walls, roof, and pillars, add slits, and assemble them by interlocking the pieces to form the mikoshi.
It’s important to carefully measure the length of each part so the structure fits together securely.
You’ll decorate it by attaching paper in colors like black and gold, but it’s best to assemble the whole structure first and check its strength before adding decorations.
If you double-layer each part during assembly, you can make a sturdier mikoshi with a more robust look.
[Serious DIY] A Wooden Mikoshi (Portable Shrine)
![[Serious DIY] A Wooden Mikoshi (Portable Shrine)](https://i.ytimg.com/vi/5UL4vynrQr0/sddefault.jpg)
When you think of the highlight of a festival, it’s got to be the mikoshi, right? Just hearing those lively chants of “Wasshoi, wasshoi!” is enough to make your heart race.
But where do you even buy a mikoshi? Even if it’s hard to picture them being sold, you can indeed find them at shops that handle festival and Shinto ritual equipment.
Depending on the grade of the decorations, a large one can cost around 5 million yen.
If you don’t have the budget to buy one, organizing a mikoshi-making project as an event could be a great way to get everyone excited.
I’ve heard that mikoshi were originally vehicles for transporting the deity.
If you’re not particular about a specific traditional school, you have a lot of freedom with the design.
It’s best to use lightweight lumber to make it easier to carry.
Don’t forget to use plenty of gold to give it that deluxe look! If you know a carpenter, the build might go even more smoothly!
[Cardboard] Portable shrine for toddlers
![[Cardboard] Portable shrine for toddlers](https://i.ytimg.com/vi/0CTJ73qLABU/sddefault.jpg)
A simple yet high-quality mikoshi made from cardboard and everyday materials.
You start with a box-shaped piece of cardboard as the base, then attach parts like the carrying poles and roof, and add decorations.
Cover the entire cardboard with black paper, and attach a larger piece of cardboard for the roof than the main body.
Make sure to decorate thoroughly with black and gold paper so no cardboard is visible.
A key point is that the carrying poles run through the main body; stabilizing this section will let everyone enjoy the mikoshi safely.
[Cardboard] For Sports Day! A Portable Shrine You Can Use in Events
![[Cardboard] For Sports Day! A Portable Shrine You Can Use in Events](https://i.ytimg.com/vi/BaK9H-PMYxw/sddefault.jpg)
This is a portable shrine (mikoshi) that can be used for cheer battles and events at sports festivals.
It’s recommended to decorate it by incorporating your team’s colors while keeping a distinctly traditional Japanese feel.
Use a copy-paper box as the base and attach decorations like a roof to it, making sure to keep it lightweight.
If you’re using it for a competition, it’s easier to understand if you deliberately don’t attach the poles to the main body; instead, place the mikoshi on top of the poles and carry it to the finish line.
While keeping it light, also make it sturdy enough so it won’t lose its shape if it’s knocked over or dropped—add touches like doubling each part for extra durability.
[Thick Paperboard and Cardboard] Children’s Portable Shrine (Mikoshi)
![[Thick Paperboard and Cardboard] Children's Portable Shrine (Mikoshi)](https://i.ytimg.com/vi/fCGuPWxVKLc/sddefault.jpg)
An omikoshi made from thick paper and cardboard has two big advantages: it’s easy to decorate and light to carry.
While keeping the basic structure—a central palanquin with poles extending from it—let’s convey the fun of the festival with free-form designs.
One recommended approach is to build the omikoshi shape with white cardstock and then have everyone freely draw on it.
Don’t limit yourselves to images that just evoke a festival; it’s best to fill it with pictures that make people want to carry it—art that conveys excitement and joy to the fullest.