[DIY] A Collection of Handmade Moving Toy Craft Ideas

These days, the DIY sections at 100-yen shops and home improvement stores are incredibly well stocked! In the past, you had to walk all over the store to gather items, but now you can get everything in no time.
That just shows how popular the hobby of making things at home has become.
In this article, I’ve rounded up craft ideas on the theme of “moving toys”! I’ve focused on projects that even small children can easily try.
Be sure to read to the end!
- [Let’s Make and Play!] Handmade Toy Ideas You Can Create Yourself
- It's fun to spin! A collection of DIY toy ideas
- [For Elementary School Kids] Handmade Toy Craft Ideas
- Made with toilet paper rolls! Exciting and fun easy handmade toys
- Moving! Spinning! Flying! Fun handmade toys made with rubber bands
- Handmade toys with cardboard! DIY game ideas that will captivate kids
- Irresistible! A collection of motor-craft ideas that will captivate adults
- Kids and adults alike will be captivated! A collection of DIY marble run ideas
- [Indoor Activities] A Collection of Craft Ideas Recommended for Elementary School Students
- [Let’s Make and Play!] Handmade Ideas for a Target Shooting Game
- Let's make toys with paper cups! Simple and fun handmade toys
- Made of paper! A fun collection of DIY toy ideas you can play with
- Make It with Pipe Cleaners! A Collection of Simple, Fun, and Playable Toy Ideas
[DIY] Handmade Moving Toy Craft Ideas (11–20)
PET bottle car

Let’s try making a rubber band–powered plastic bottle car.
Prepare a plastic bottle, five caps, two bamboo skewers, and two rubber bands.
Make sure all the caps have a hole in the center.
Cut the plastic bottle in half to separate the top and bottom, then make holes where the wheels will go.
Insert a bamboo skewer through those holes and slide a cap onto each end, then cut off the excess skewer.
Tie two rubber bands together and wrap them around the rear wheel’s bamboo skewer, thread them through the space in the top half of the bottle, and pull them up to the bottle’s mouth.
Thread the rubber band through the hole in the remaining cap, insert a short bamboo skewer to keep it from slipping out, and fix it in place.
Finally, wrap the rubber band around the two caps that will be the rear wheels, and you’re done.
A little doll running along

This is a doll with a unique, bouncy motion, made by combining a paper cup and plastic bottle caps.
First, take two caps and tape them together with vinyl tape, placing a marble inside.
Then attach a rubber band to the joined caps, and hook that rubber band onto slits cut into the paper cup.
After that, draw a face and other features on the cup to finish.
Using the tension of the rubber band, the caps will move and show a traveling motion.
The movement changes depending on where you attach it on the paper cup and how much you wind the rubber band, so try various setups.
buzzing top

Here’s an idea for making a whirligig (spinning top) from a milk carton.
You’ll need the bottom of a milk carton, an awl, scissors, twine, a permanent marker, and tape.
First, use the awl to make two holes in the bottom of the milk carton, spaced 1 centimeter apart.
Thread the twine through the two holes and tie the ends together.
If the twine is hard to thread, put a bit of tape on the tip to make it easier.
If you color the milk carton with a permanent marker or add stickers, the spinning top will look colorful and fun when it spins! Enjoy customizing the shape and design, too!
pull-back car

This craft lets you experience the fun of a car you built yourself zooming forward powered by rubber bands.
Cut corrugated plastic (plastic cardboard) to match the size of the car body.
For the wheels, use bottle caps: make a hole in the center, then pass a bamboo skewer through to create the axle.
If you firmly attach this to the body with hot glue, it will start to look like a real car.
Hook a rubber band onto the rear axle and wind it by turning the axle forward, and you’re ready to go.
When you let go, the car surges ahead under the power of the rubber band.
You can freely design and color the body, so you can get particular about the appearance too.
Using everyday materials and a simple mechanism, it’s a hands-on project that’s both fun to build and a great way to learn, delivering dynamic motion.
Magnet Crane Game
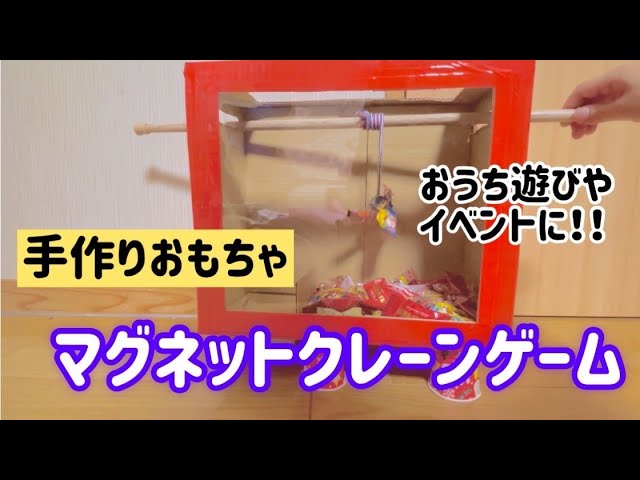
A crane game that uses magnets can become uniquely fun with just a few clever tweaks.
We recommend building a frame out of cardboard and attaching a clear plastic panel so you can see inside.
Install paper cups inside to hold prizes, and run a tension rod through the sides to create the crane’s range of motion.
Attach a magnet to the end of a string, and it turns into a mechanism that can lift prizes with metal embedded in them.
By turning a wooden rod to raise and lower the string, you can aim and drop with great control, making each attempt exciting.
It’s a compelling idea that lets you experience the fun of ingenuity while you play.
How to Make a State-of-the-Art Crane Arm
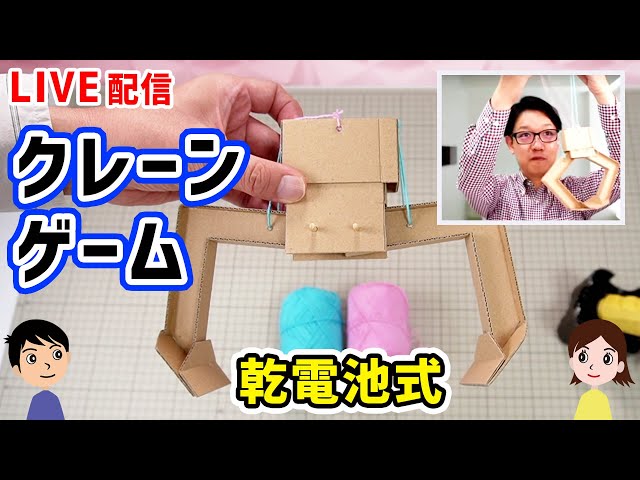
A crane game where you thoroughly assemble the arm is a craft that’s fun to build in itself.
Start by creating the arm’s frame, then attach the strap that supports the arm.
Add the part that grabs the prize to the tip and connect everything together to give it a crane-like shape.
To make it move, thread yarn through the arm, then run the yarn through the main box to set up a mechanism that transmits motion.
By changing the strength and angle with which you pull the yarn, the arm’s opening and closing will vary, helping you grab prizes more effectively.
The appeal lies in how the builder’s ingenuity changes the operability, and once it’s finished, the excitement comes from testing the controls as you play.
It’s a fun idea that sparks a spirit of challenge.
[DIY] Handmade Moving Toy Craft Ideas (21–30)
How to make a basic robot

Build a robot with your own hands! Here are some ideas for making a basic robot.
These days, we often see robots active in various roles.
In fast-food restaurants, there are robots that carry food and drinks, and some households even keep robot pets.
This time, let’s try making a simple robot.
You’ll need items like a ruler, scissors, a pen, thick paper or cardboard, batteries, a battery holder, a switch, a motor, and wires.
Be sure to work together with a teacher or a guardian.