Handmade accessory ideas that will delight the recipient! Easy DIY with everyday materials


“I want to give a handmade present, but what should I make?” If you’ve ever found yourself wondering that, you’re not alone.
The truth is, with simple materials and a bit of creativity, you can make charming handmade items that will warm the recipient’s heart.
In this article, we’ll share ideas for delightful handmade goods—from practical items you can use every day to interior decor that brightens up a room.
Even with simple methods, a piece made with care is sure to be appreciated.
Find the perfect idea to bring your kindness to life.
- [For Elementary School Students] A Collection of Simple Handmade Gift Ideas
- Happy to receive! Handmade fabric accessories gift
- [Easy and Simple] Popular DIY Ideas You Can Make with Materials from 100-Yen Shops
- [Easy] Practical craft ideas. Great for beginners too!
- Handmade Gift Ideas Kids Will Love! Small, Fun Presents
- [Beginner Friendly] Easy Craft Ideas You Can Do
- [Let's Make It with a Sewing Machine!] Gift Ideas That Will Delight
- [For Adults] Simple yet Impressive Crafts: A Stylish, Eye-Catching Collection
- Handmade amulet gift ideas for someone special
- Handmade Birthday Present Ideas
- Handmade plushies with everyday items! A collection of ideas perfect for beginners
- [Handmade] Birthday presents for Mom: A collection of heartfelt ideas
- [Handmade] Delightful Handmade Fabric Accessories to Receive
Ideas for handmade trinkets that are a joy to receive! Easy DIY with everyday materials (21–30)
drawstring pouch

Let’s make a cute drawstring pouch with a mouth that cinches shut, by combining different fabrics.
First, connect the lining and the outer fabric, then sew while leaving an opening for the drawstring, and close it to form the pouch—simple steps, right? Once the whole piece is finished as a pouch, just thread the cord to complete it, and be sure to check that it closes securely and slides smoothly.
The overall look changes with the design of the lining and outer fabric and the color of the cord, so putting thought into the combinations to add originality is highly recommended.
Easy Long-tailed Tit

This is about making a long-tailed tit, notable for its white and soft appearance, using faux fur fabric.
The key points are how to make the most of the fabric’s softness and how rounded to make the final shape.
You’ll cut the fabric using a pattern, sew the pieces together, then stuff them with filling to create a round form.
Since you’ll combine the body and tail before adding the stuffing, it may be important to sew while keeping the final shape in mind.
It’s also interesting that the impression changes depending on how much stuffing you use.
Ideas for handmade trinkets that are a joy to receive! Easy DIY with everyday materials (31–40)
A cute dog plushie made from a towel
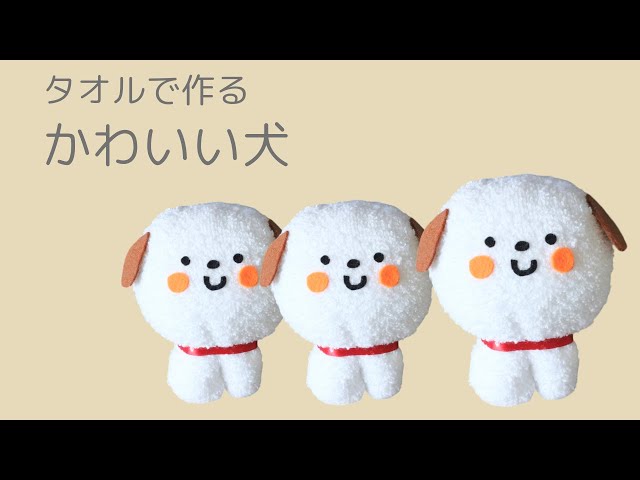
This is about making a cute stuffed dog using an everyday face towel you can find in any household.
First, cut the towel to create two identical pieces layered together.
Make small slits in both pieces, sew them together, turn the piece right-side out, and stuff it with cotton.
Then shape the overall form with thread and attach parts like the face made from felt to finish.
By changing the towel’s color and the facial expression, you can create plushies with a variety of looks.
A rabbit plush made from fleece

Using fleece fabric that looks and feels soft, let’s make a palm-sized stuffed bunny.
The key is how you construct the body: cut the fabric into the shape you want, embroider the facial expression, sew the pieces together, then stuff them with cotton and shape as you go.
The way you stuff it will change the overall roundness and softness, so it’s a good idea to focus on this to create your own unique bunny.
After that, attach parts like the hands, feet, and ears, and finish it so it looks like a bunny, and you’re done.
It can also be fun to change the fabric color and the shapes of the parts to add originality.
Chiikawa mini storage

Get soothed by cute characters! Here are some ideas for Chiikawa mini storage.
“Chiikawa” is short for “something small and cute,” and many fans find comfort in the everyday lives of the characters featured in the anime and manga.
This time, let’s make mini storage items with a Chiikawa motif.
You’ll need cardboard, character pocket tissues, double-sided tape, a craft knife, shatterproof glass film, and some tape.
They’re practical and will make organizing feel exciting!
Fuzzy knit pouch

Recommended even for first-time crafters! Here are some ideas for a fluffy yarn pouch.
As the weather gets chilly, items made with fuzzy textures start to look even cuter, don’t they? This time, why not try making an easy, fluffy pouch that’s perfect for beginners at handcrafts? All you need are a non-slip mat, chunky yarn, scissors, and a magnetic button.
You can find all the materials at a 100-yen shop, so it’s great that you can pick them up easily whenever you feel like giving it a try!
Framed-edge placemat

Let’s make a simple, easy-to-use placemat with a frame-like sense of volume around the edges.
The steps are straightforward: fold the fabric edges and sew along the folds with a sewing machine.
Even just this will make it more functional than a plain piece of fabric.
If the center area—where nothing is added—feels thin and flimsy, consider using a thicker fabric or layering several pieces to add volume before sewing.
It’s also a good idea to press crisp folds before stitching and keep in mind the goal of making the whole piece lie flat.