Let's decorate the bamboo! Stylish handmade Tanabata ornaments

On Tanabata Day, July 7, many homes and facilities decorate bamboo branches and rooms with various ornaments.
Did you know that each traditional Tanabata decoration carries its own meaning? For example, streamers represent a wish to improve sewing skills, while wastebaskets express the hope to value belongings and stay organized.
In this article, we introduce stylish, handmade ideas for Tanabata decorations.
We’ve gathered not only traditional ornaments but also items perfect for brightening up Tanabata.
Please use these as inspiration and give them a try!
Let's decorate bamboo! Stylish handmade Tanabata ornaments (1–10)
kimono

Let’s try folding an origami kimono that’s perfect for Tanabata decorations.
This season, colorful yukata are a must-have and can also create a cool, refreshing look.
Fold a regular-sized piece of origami paper into a triangle, open it, then fold it into a triangle the other way.
Using that crease as a guide, fold into a triangle again, then use the new crease to fold a triangle from the opposite side.
Next, fold another triangle toward the crease you just made.
This series of folds feels almost mathematical, doesn’t it? Finally, form the sleeves and spread out the hem, and you’re done.
Using washi paper would also make for a kimono with beautiful patterns.
watermelon net pattern
https://www.tiktok.com/@chooobo2/video/7500919272701562130When it comes to summery foods, watermelon is definitely one of them, and it really makes you feel cool even in the heat.
This idea is about creating watermelon-themed decorations to bring a refreshing touch to Tanabata.
For the red flesh, cut slits into red origami paper to make a lattice pattern, then attach a rind piece made from green origami paper.
If it’s left flat, the lattice can be hard to see, so folding vertical creases to give it a three-dimensional shape is also recommended.
Don’t forget to draw the patterns clearly to make it look unmistakably like a watermelon.
Hanging ornaments of Orihime and Hikoboshi
https://www.tiktok.com/@chooobo2/video/7505767490199489799Speaking of Tanabata, the story of Orihime and Hikoboshi reuniting is unforgettable, and it’s a big part of what makes the event feel so romantic.
Let’s make Orihime and Hikoboshi—the symbols of Tanabata—and decorate beautifully.
The faces are easy to make with origami, while the outfits use coffee filters; with water-based markers and water, you can create soft, gentle colors.
Once you’ve made the colors, just cut them into outfit shapes, combine them with the facial parts, and you’re done.
For an even more romantic look, try pairing them with moon and star motifs.
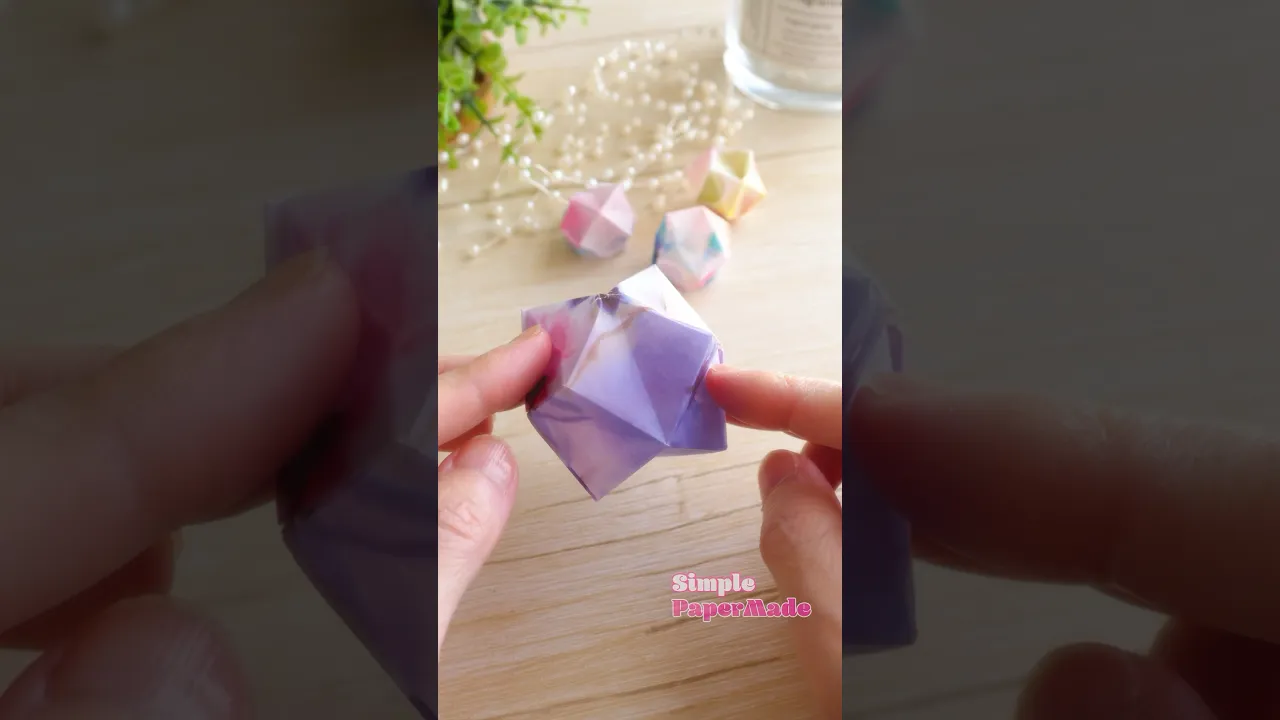
Kusudama of a 24-faced polyhedron

Let me introduce a 24-faced kusudama that you can make from a single sheet of origami paper.
Once you have one sheet ready, fold it carefully to create firm creases vertically, horizontally, and diagonally.
If the creases are weak, the model may shift out of alignment as you shape it, so be careful.
At the end, blow into the hole to inflate it like a balloon.
When inflating it into a 24-faced shape, I also recommend inserting a toothpick inside and gently adjusting the form as you go.
Give this jewel-like 24-faced kusudama a try!
cute lantern(s)

Speaking of Tanabata, it’s practically a festival of stars—stars play a very important role.
Here, I’ll show you how to make shining stars using construction paper.
Try making colorful shining stars in various colors.
To begin, prepare strips of colored construction paper cut 1.5 cm wide.
Make the longest strip the darkest color and gradually use lighter colors to create a beautiful gradient.
Make all three into loops and secure the ends.
After securing them, crease each loop into four sections, then glue them together in order from the smallest to the largest.
Once one is done, make 10 identical units and glue them together to complete the star.
spiral windsock

Let me introduce a beautiful spiral windsock that looks lovely when it twirls.
Get your materials ready: origami paper, scissors, glue, a ruler, a pencil, and thread.
Prepare two sheets of origami paper: on one sheet, draw horizontal lines; on the other, use a ruler to measure and mark points.
Make slits with the scissors, then glue it together with the other sheet of origami.
On the remaining sheet, also cut slits, shape it into a tube, and glue the top and bottom edges together.
Finally, insert the thread through a slit at the edge and thread it through toward the next inner slit.
Once it’s finished, hang it up and enjoy the decoration!
Ogi Tsuzuri

Let’s make a very simple yet very cute fan garland.
First, cut a regular-sized sheet of origami paper in half.
Fold the piece in half three times.
Unfold it, then make an alternating accordion fold along the crease lines.
Once that’s done, fold it in half and glue it together.
That completes one unit.
Make more of these units in various colors, then glue them together in alternating directions.
Adjust the length as you like.
Finally, attach a string for hanging, and you’re done.