[Childcare] Make and play! Origami ideas

Origami plays a big role in daycares and kindergartens.
With just a single sheet, you can make all kinds of things—origami helps nurture children’s imagination, thinking skills, concentration, and fine motor skills.
It’s something you’ll definitely want to incorporate a lot into playtime.
So this time, we’re introducing ideas for origami you can make and play with.
Of course, we’ve included the classic airplane that everyone has folded at least once, as well as lots of unique ideas—like balloons and cameras—that spark kids’ curiosity.
After you finish your creations, set aside plenty of time to play so everyone can have a blast together.
We hope you find this helpful.
- [Childcare] Let's make toys you can play with using origami!
- [Nursery/Kindergarten] Crafts you can play with after making them
- Simple origami for kids: cute, playable origami ideas
- It moves! You can play with it! Fun origami. How to make origami toys.
- Origami for 2-Year-Olds: Fun and Educational! Origami Ideas for Toddlers
- Simple origami that can be folded from a single sheet
- [Childcare] [Origami for 4-year-olds] Introducing origami for 4-year-old children!
- [Origami] She’ll love it if you fold these! Simple ideas for girls
- [For 5-year-olds] Let’s make origami! A collection of fun folding ideas
- Kids will love it! Easy origami ideas—great as gifts too!
- Cool origami that boys will love and want to fold
- [Childcare] Today’s Fun Origami Play
- [Origami] Try it with your 2-year-old! Easy spring origami ideas
[Childcare] Make-and-play! Origami Ideas (1–10)
Moving is fun! Spring toy

Spring toys with mysterious motions are so captivating that you can keep playing with even store-bought ones forever, right? Let’s make that kind of spring toy with origami.
You’ll need one regular square sheet of origami and another sheet cut in half.
Cut each into long, narrow strips so you have a total of 12 pieces.
Glue two strips together at a right angle, flip them over, and fold them back and forth in an alternating pattern.
When the folding sections start getting short, extend them by gluing on more strips to continue.
The key is to make crisp creases as you fold.
Once you’ve used all 12 strips, you’re done! Try wobbling it or pressing it like a switch to play.
Realistic male and female rhinoceros beetles

Do you know the difference between male and female rhinoceros beetles? The biggest difference is that males have impressive horns, while females don’t.
It can be fun to explore these differences while making male and female beetles.
Let’s try making the male’s horn and the female’s face using rectangular pieces of origami paper.
It’s also nice to craft together with your child while talking about how males and females differ.
Besides the horn and face, you can twist origami to make legs and focus on the finer details, allowing you to create a rhinoceros beetle that looks just like the real thing.
Monkey’s Mountain Climb

It’s a whimsical toy where a little monkey climbs a mountain and appears from the summit.
First, make crease lines in both vertical and diagonal X shapes, then fold along those lines to form a square.
Fold the unopened section into a small triangle and cut it off as is.
The cut piece is the monkey.
Next, slightly fold up the edges of the opening part on both sides (front and back) to finish the monkey.
Place the monkey origami between the lower piece that represents the mountain’s foothills, and by moving the foothill section with small, quick motions, the monkey will climb the mountain and reach the top!
[Childcare] Make-and-Play! Origami Ideas (11–20)
A toy you can wiggle and play with

Let’s make an origami piece that moves in a mysterious way as it changes shape! Prepare 36 sheets of 7.5 cm square origami paper.
We’ll make many small parts and combine them to complete the piece.
Fold the paper in half so it becomes horizontally long, then fold the two corners toward the center on the opposite side.
Turn it over, fold it so the top and bottom are reversed, open the pocket and flatten it, and one part is complete.
Spins round and round! A flying toy

It’s an easy-to-make toy that you’ll want to play with over and over.
First, fold the origami paper into a triangle, then roll it up tightly into a long, thin shape starting from the center.
That’s all there is to making it! To play, simply snap open the final folded tip and let go—the piece will shoot off with great speed.
The direction you unfold it affects how well it spins, so experiment and see what works best.
Once it has opened up, you can fold it back the same way and play again and again!
How to fold blinking eyes
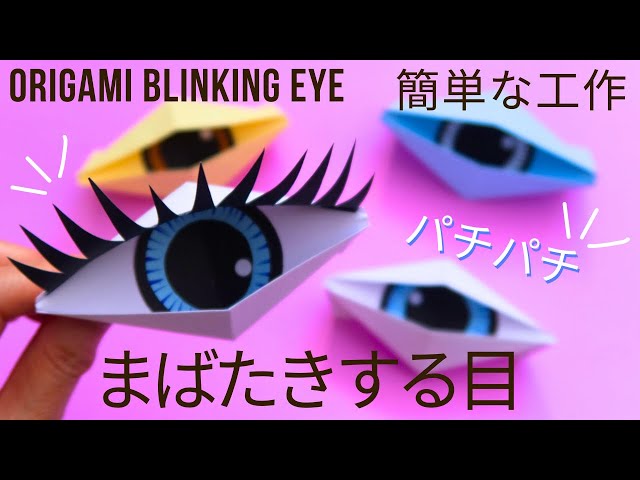
How about some blinking eyes that look a bit eerie in the dark? They’re perfect for Halloween toys, too! First, fold a piece of origami paper in half into a triangle to make a crease, then fold both ends inward toward this crease three times.
Next, fold it in half from the other direction to make another crease, and fold both ends toward the center along that crease.
Shape the whole piece into an eye by folding the straight edges diagonally.
Attach a handle, and the eye is complete! Finish it by adding a separately made drawing of an eye in the center and gluing on eyelashes around it.
Spinning paper toy

You’ll definitely get hooked watching it spin around and around! First, cut a 4 cm × 15 cm sheet of origami paper lengthwise into three long strips.
Fold each strip in half at the center.
Start by crossing two strips at a right angle, then thread the remaining strip through the loop created where the first two intersect at a right angle.
Pull all the ends tight to secure them, adjust the shape, and it’s done! Just drop it, and it will spin as it falls.
Try dropping it from different heights and have fun!