Kids will love it! Easy origami ideas—great as gifts too!


How about creating a special moment with a moving origami gift that makes children’s eyes light up? Shake it and—pop! We’ll introduce origami ideas that look like ordinary paper crafts but are packed with playful surprises, like a cracker that makes a popping sound when you shake it, a top that spins smoothly, and cherry blossoms that bloom when sprinkled with water.
These moving origami creations are easy to make yet guaranteed to delight kids, perfect for birthdays and celebrations or even for a small everyday surprise.
Craft a heartfelt gift and enjoy a fun time together!
Origami toys that move and can be played with (1–10)
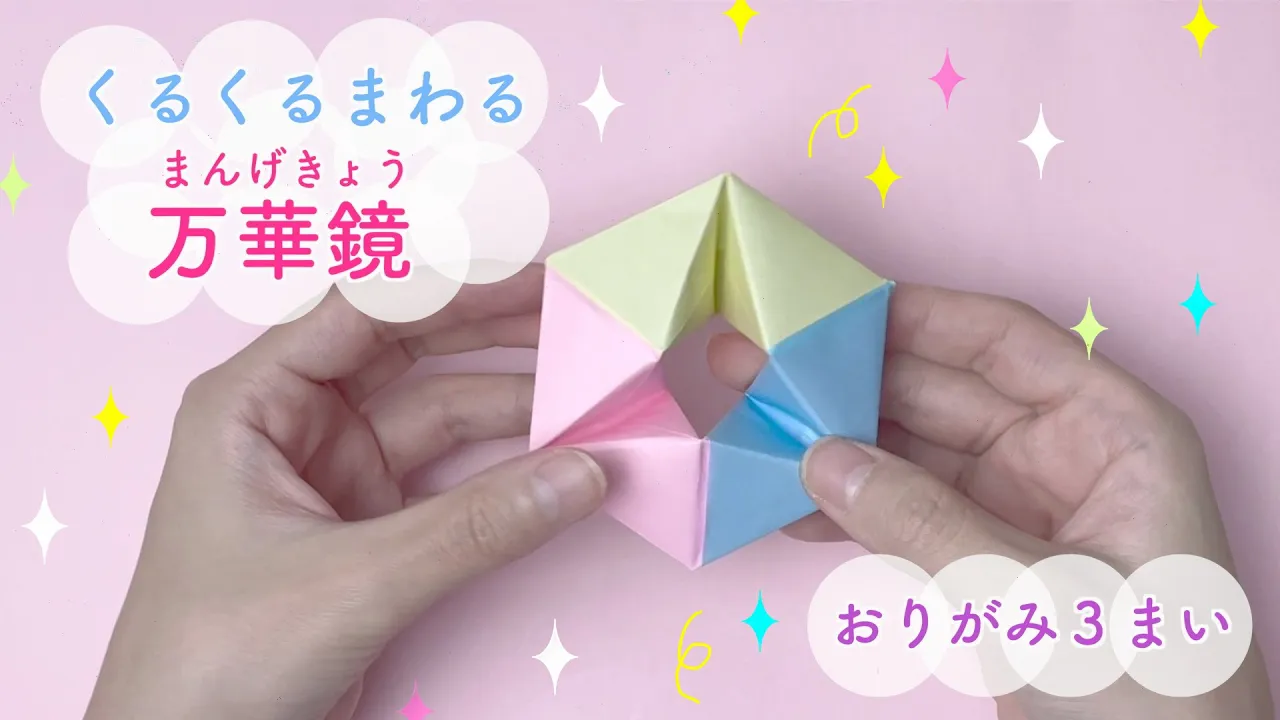
Spinning Kaleidoscope

A kaleidoscope made from origami that kids love! You can create kaleidoscopes in various shapes by increasing the number of parts, but this one is the simplest.
It uses just three parts.
There’s an initial step to make crease lines, but once you get past that, all you do is attach the parts and fold along the creases—super easy.
Despite the number of creases, there aren’t many steps, and the folding method is simple.
Even children can do it, so adults should definitely give it a try, too.
You’ll use three sheets of origami paper, so pick your favorite colors.
hand spinner

Let’s make one with origami! We’ll introduce a hand spinner.
A hand spinner is a small toy that you spin with your palm or fingers.
It became a global craze around 2017, so many of you may already know it.
This time, let’s make a hand spinner out of origami.
All you need is origami paper and glue.
If you blow on it—whoosh—you can enjoy watching it spin around.
When giving it to a child with small hands, it’s a good idea to adjust the size of the origami paper.
Rolled-up pill bug

If you look around a park, you can usually find at least one pill bug, and for many children it’s one of the most familiar insects.
Here’s an idea for making a pill bug out of origami.
What’s more, this pill bug jumps with a pop when you press and release it, and it curls up into a ball! Kids who love pill bugs will of course enjoy it, and even those who are a bit squeamish might be happy to play with an origami pill bug.
It’s not too difficult to make.
The key to making it look neat is to crease firmly.
Since you’ll be making quite a lot of fine creases, take your time and do each one carefully.
A top that spins very well

The spinning top has long been a popular children’s toy.
It’s also a favorite for kids’ craft projects, with lots of ideas using different materials and shapes.
This time, let’s make a top out of origami! We’ll create three parts and assemble them at the end, so please prepare three sheets of origami paper in your favorite colors.
There are many steps, but the folds themselves aren’t very difficult, and it’s at a level that children can manage.
Adults should be able to make it quickly.
It spins really well, so kids are sure to love it!
whirly toy
Let’s make a whirling toy that even kids can play with and get totally absorbed in.
Fold a sheet of origami paper into a square, open it, then fold it into a triangle.
Fold the corners up toward the center of the triangle, then fold it sideways—this part becomes the key base that spins around.
Finally, open it up, adjust the creases, and you’re done.
Try dropping it from a height and play with it! It might be fun to make it with origami in different colors, too.
When dropping it from a high place, make sure an adult supervises and always check for safety.
origami cracker

When it comes to origami toys that are super simple yet keep kids totally absorbed, the “cracker” (paper popper) comes to mind.
I’m sure many parents played with it at least once, too.
While many people may have made it with newspaper, this is the origami version.
It’s very easy to make! Fold the origami paper in half into a square twice, then squash-fold it into a triangle on both sides—and you’re done! Anyone can make it easily, so if your child likes it, it’s fun to make together.
Even kids who first look puzzled and say, “What’s this?” will perk up the moment it makes a sound!
spring toy

Spring toys are super popular with kids, aren’t they? You can make a spring out of origami and even adjust the length of the spring section.
Combine one full sheet of origami with another sheet cut in half, and use tape glue to stick each pair into a single strip.
Fold the lower strip up first, then fold the other strip over it.
Keep repeating the same folding method, making creases as you go.
Finally, cut five small squares, crease them, and glue them together, then attach this piece to both ends of the spring to finish! Try playing with it on steps or slopes.