Kids will love it! Easy origami ideas—great as gifts too!


How about creating a special moment with a moving origami gift that makes children’s eyes light up? Shake it and—pop! We’ll introduce origami ideas that look like ordinary paper crafts but are packed with playful surprises, like a cracker that makes a popping sound when you shake it, a top that spins smoothly, and cherry blossoms that bloom when sprinkled with water.
These moving origami creations are easy to make yet guaranteed to delight kids, perfect for birthdays and celebrations or even for a small everyday surprise.
Craft a heartfelt gift and enjoy a fun time together!
- [Origami] She’ll love it if you fold these! Simple ideas for girls
- Cool origami that boys will love and want to fold
- Simple origami that can be folded from a single sheet
- Cute Origami Ideas for Girls
- Origami ideas boys will want to make!
- Let's make it with origami! Ideas for simple 3D creations
- Popular characters that are easy to make with origami. A collection of creations you can enjoy with children.
- [For Kids] Let's Fold! Today's Origami Idea Collection
- It moves! You can play with it! Fun origami. How to make origami toys.
- Made of paper! A fun collection of DIY toy ideas you can play with
- Kids’ Origami: Cute and Easy Ideas to Make for a Birthday
- [Kids] Let’s Make Origami! A Collection of Easy Goldfish Folding Methods
- At the End of Preschool Practicum: Simple and Cute Handmade Gifts
Origami for Accessories and Gifts (31–40)
Ribbon box with a lidNEW!
This is a lidded ribbon box that makes you want to get creative with the color and pattern of the origami you use.
For the lid, first make X-shaped creases both vertically and diagonally, then collapse it into a square.
Add a small triangular crease to the corner that won’t open, unfold the whole piece, and use the small square formed in the center to create the ribbon and then the entire lid.
For the box, after making creases such as the diagonal X and vertical lines, shape it into a box by folding along the creases.
Try different combinations of colors for the lid and the box as you make it!
Ribbon message cardNEW!

This piece can be used as a message card to accompany a gift.
It’s a very stylish origami creation that looks like a gift box with a ribbon.
You can make everything—from the gift box to the ribbon—using a single sheet of origami paper! Create many creases both vertically and horizontally, fold the edges into long, narrow strips, and have them become the ribbon in the final step.
Shape it into a rectangular gift box, and finish by tucking the lower ribbon section into the upper part of the ribbon.
Write your message on the area that opens up where you tucked it in, and give it as a present!
Easy! How to Fold a Cute Box

Even beginners at origami can make this! Here’s an easy way to fold a box.
First, flip the paper over, fold it into a triangle twice, and open it.
Fold each corner toward the center.
Open it up, then fold all four corners to the center along the crease lines.
After folding to the middle, lift one layer and fold it upward.
Keep folding along the lines, lift one layer, and fold it up.
Fold the triangular flaps to the back, then open it out so it forms a box shape.
Adjust the shape and you’re done! You can use it in many situations, so try making it to match the season.
A book-shaped accessory case

Even masking tape fits inside! It’s a cute book-shaped box.
First, turn the origami paper over with a corner facing you.
Fold it into a triangle twice, then open it and fold the corners to meet the center.
After folding all four sides up so their edges align with the central crease, open it and apply glue in the middle.
Fold the corners inward along the lines to form the shape of a box.
Next, let’s make the cover.
Turn the origami paper over with an edge facing you.
Fold it in half, open it, and fold the edges to meet the center crease.
Mark a point 6 cm from the edge, make a slit there, and open it.
Fold along the lines, then glue the box you made first to the center, and you’re done!
A cat-shaped box

If you want to add a creative touch to a small container, how about making it cat-shaped? First, fold all the corners of the origami paper toward the center, then flip the paper over.
Fold two opposite corners toward the center, then fold once more to make a rolled fold.
Fold the remaining two corners inward to form a box shape, and you’re done.
When folding, leave one outer flap unfolded to create cat ears, finishing it as a cat-shaped box.
Instead of making the box square, aim for a round shape to make it look even more cat-like.
crown
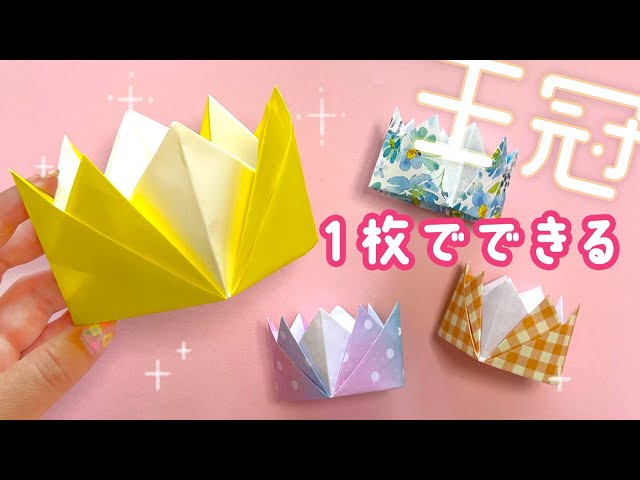
Why not try making a kid-sized crown using 25 cm origami paper? This crown looks like it’s made by connecting several parts, but you can actually make it with just one sheet! First, fold the paper into a square twice, then unfold it once to return to a single fold.
Fold the top and bottom edges to the center crease.
Open up the pocketed sections and squash them flat so they look like two houses side by side.
Fold the left and right sides to the back to make the paper a square again.
Fold the bottom on both sides up to meet the top corners, then fold the top corners down to meet the center line.
Next, open the folded-down sections and squash them flat, and use the creases to form the crown’s jagged points.
It’s easy enough for kids to make, so try it with some cute origami paper!
Easy and cute! How to fold a ribbon

Let’s make a very simple ribbon using a single sheet of origami paper! Fold your chosen color of origami in half horizontally, then fold the sides in toward the crease.
Unfold, and fold the top and bottom toward the center crease.
Rotate it and fold in half, then fold the sides toward the crease.
Fold it in half vertically and horizontally, open the center, spread it into a triangle and squash it; repeat on the other side.
You’re almost there! With this very simple folding method, you’ll have an adorable ribbon.
It’s easy enough for small children and older adults, so give it a try.
Origami for accessories and gifts (41–50)
Stylish star box

Fold the origami paper in half, then fold the right edge to align with the top and bottom edges to make a crease.
Fold the left corner to the center point of the crease, then fold it back along the crease.
Next, align the right bottom edge with the folded-back crease and fold, then fold the paper in half so the shapes overlap neatly.
Using scissors, cut off the excess along the lowest diagonal line to make a pentagon.
Open the paper and fold all the pentagon’s corners inward, then fold the newly formed corners in the same way.
Turn the paper over, make creases by folding along the straight lines that connect each corner, and use these creases to raise the sides and form a star shape.
Easy! Heart Bookmark

A heart-shaped bookmark that’s perfect as a small gift! Place a sheet of origami cut in half (1/2) horizontally, fold it in half top to bottom to make a crease.
Open it, then fold the top and bottom edges to the center crease and crease again.
Fold the right edge in to match the distance between the creases, and flip the paper over.
Fold the top-right and bottom-right corners in to the center line to make triangles, then flip the paper over and fold along the base of the triangles.
Flip the paper over again and reposition it so the folded section is at the top.
Open the pocketed sections and squash-fold so the paper becomes a rectangle, then fold the four top corners into small triangles—and you’re done.
How to fold a cute flower-shaped little box

Here’s a cute idea for a box that blossoms open in a flash.
First, fold an origami paper into a triangle twice, open up the pocketed part and squash it to make a square.
Place it with the corner that will be the center of the piece pointing down, then fold both bottom edges in to meet the center line.
Do the same on both sides.
Using these creases, open the pocketed sections again and squash them, then fold both side corners of every face in to meet the center line.
Fold the top corner down at the color boundary, then gently open it up to form a box.
Make two of these boxes and stack them to complete the flower box.