Fun origami spinning tops! A collection of easy folding ideas that kids and adults alike will love

Have you ever made a spinning top out of origami?Watching it whirl around is so much fun that you can’t help but get absorbed in it.But if the folding steps are complicated, it’s easy to give up halfway.So in this article, we’ll introduce easy ways to fold an origami spinning top.There are plenty of simple methods you can try, from colorful versions made by combining several sheets of origami to quick ones folded from a single sheet!Once you’re done, you can actually spin it and play, making it perfect for craft time with kids.Be sure to give it a try!
Fun origami spinning tops! A collection of easy folding ideas that kids and adults alike will love (1–10)
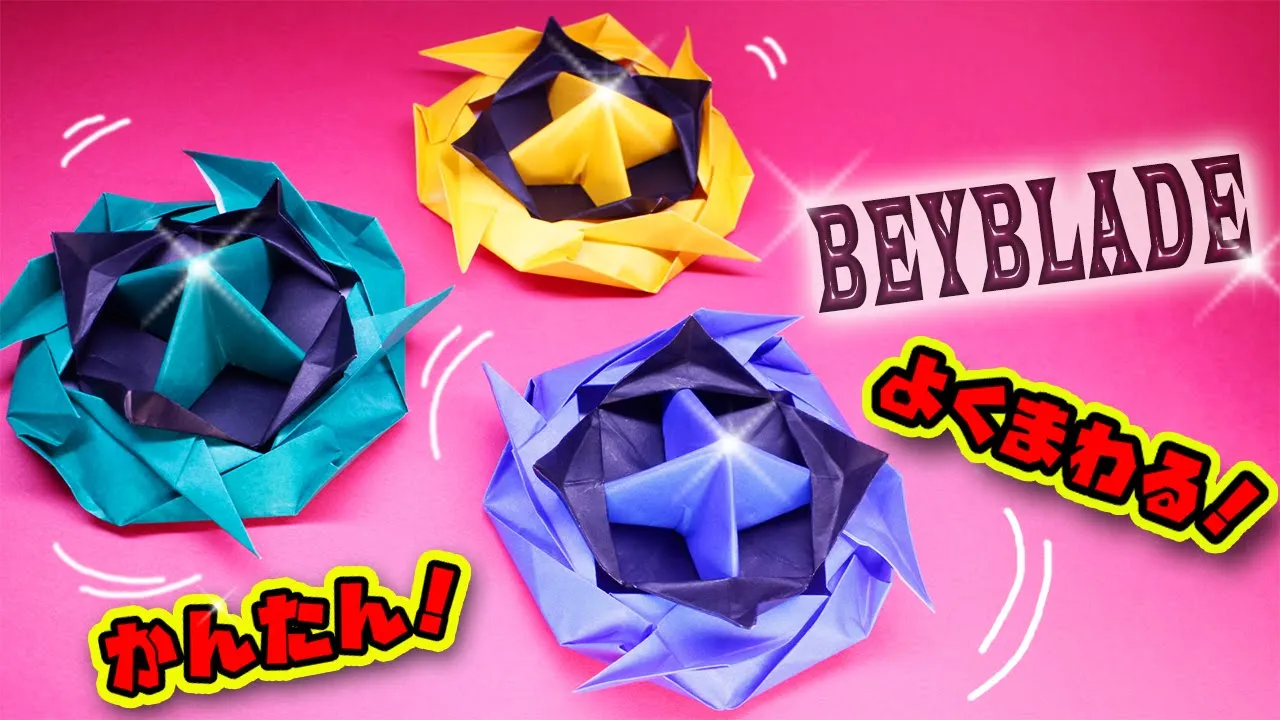
Cool! Origami Beyblade

The swirl-like design looks cool! Let’s make a Beyblade out of origami.
Using three sheets of origami paper, we’ll make the outer and inner decorations of the body, plus the handle.
You can make the inner part and the handle with a cushion fold (zabuton-ori).
For the outer part, first fold all four edges inward, then open up the overlapped corners and collapse them into triangles.
From there, fold the corners toward the center, and fold the triangular sections gathered at the center back outward.
Next, fold the outer edges so they become rounded, then open the triangular sections, fold them in half, and sharpen the tips.
Combine the three parts and you’re done!
Spins well! A top like a Beyblade
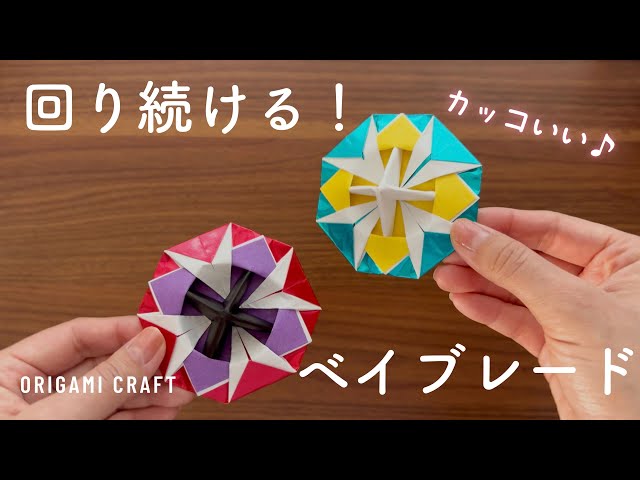
A Beyblade that you can easily spin just by pulling a ripcord is appealing not only for how it works but also for its cool design.
When you finish making this origami Beyblade, it will also have a cool pattern.
You’ll make three parts: the outer body, the inner body, and the handle.
The design section is created by folding the outer body.
First, fold the left and right edges of the origami to meet at the center, then fold the top and bottom edges the same way.
Next, open the top and bottom pockets into boat shapes, and then open the left and right sides of the boats into squares.
From there, keep flipping the paper over while making creases to change it into a diamond shape and form the pattern.
The inner part and the handle can be made with the “zabuton” (cushion) fold, so if you like, try making it and have fun playing with it.
How to fold a playable spinning top

Here’s a simple spinning top idea made with two sheets of origami paper.
If you can do the “zabuton fold,” where you fold all four corners toward the center, you can make it.
Use the first sheet for the body of the top and the second sheet for the handle.
For the body, do one zabuton fold, then flip the paper over and fold the same way.
Flip the paper over once more and do another zabuton fold.
Then fold the four corners that have gathered on the back outward into triangles, and the body is done.
For the handle, do the zabuton fold three times in a row without flipping, then valley-fold along the diagonal and press it flat.
Insert the handle into the inner, folded-back section of the body to complete the top.
A spinning top with a helmet-like shape

An origami spinning top you can make and play with! Please prepare three sheets of your favorite origami paper.
The inside of the top and the handle can be made simply by repeating the “zabuton” fold.
The outer part adds helmet-like decorations along the edges, so the steps are a bit more detailed, but if you can fold a crane by yourself, you should be able to complete it without any problem.
In the end, you’ll assemble the parts you made to finish a single top.
Using different colors of origami paper for each part lets you enjoy the color effects when it spins.
Be sure to have fun with top battles, too!
One sheet of origami! How to fold a spinning top you can display and play with

This is a spinning top you can make using steps similar to the classic crane.
Please prepare a toothpick-like twig for the handle and axle.
Prepare one sheet of origami, fold it into a triangle twice, then squash the pocketed part into a square.
Next, crease and change the shape into a diamond.
Up to this point, it’s the same as the crane, right? Turn a layer of the paper to change the face, then fold up the bottom corners on both sides to make the origami into a triangle.
Now that you should have four triangles on the sides, make a mountain fold along each triangle’s center line and collapse it sideways, flattening it so each triangle becomes half its size.
When it looks like a pinwheel, flip the origami over and fold the collapsed sections inward to create a spiral pattern.
Insert the toothpick-like twig into the center, and it’s complete.
How to fold a spinning top that twirls!

Here’s an idea for a colorful, well-spinning top made with three sheets of origami paper.
You’ll make the outer body, the inner body, and the handle.
The outer part follows the same steps as the “deceiver boat” up to a point.
After making one boat shape on both the top and bottom, open up those corners and squash them to change the shape from a square to a diamond.
Fold the four corners that lie between the diamond’s points outward, then fold the diamond’s points inward.
For the inner part, do the “cushion fold” three times, flipping the paper over after each fold.
For the handle, do the cushion fold three times without flipping, then make a mountain fold along the diagonal.
Finally, press all four edges tightly inward, and it’s done.
Combine the parts to complete a single spinning top.
How to fold the panels of a traditional work

This is how to fold a spinning top you can make just by punching a hole in the center of a traditional “menko” piece and inserting a toothpick.
First, place the origami paper with the white side facing up and fold it in half.
Fold the left and right edges so they meet the top and bottom edges.
Crease it into a square by aligning the corners with each other.
Make a second identical piece.
Place the second piece on top of the first, crossing them, and tuck the corners into the gaps to complete the menko.
Make a small hole in the center of the menko with an awl or gimlet, and finally insert a toothpick to finish!