Kids will love it! Easy origami ideas—great as gifts too!


How about creating a special moment with a moving origami gift that makes children’s eyes light up? Shake it and—pop! We’ll introduce origami ideas that look like ordinary paper crafts but are packed with playful surprises, like a cracker that makes a popping sound when you shake it, a top that spins smoothly, and cherry blossoms that bloom when sprinkled with water.
These moving origami creations are easy to make yet guaranteed to delight kids, perfect for birthdays and celebrations or even for a small everyday surprise.
Craft a heartfelt gift and enjoy a fun time together!
- [Origami] She’ll love it if you fold these! Simple ideas for girls
- Cool origami that boys will love and want to fold
- Simple origami that can be folded from a single sheet
- Cute Origami Ideas for Girls
- Origami ideas boys will want to make!
- Let's make it with origami! Ideas for simple 3D creations
- Popular characters that are easy to make with origami. A collection of creations you can enjoy with children.
- [For Kids] Let's Fold! Today's Origami Idea Collection
- It moves! You can play with it! Fun origami. How to make origami toys.
- Made of paper! A fun collection of DIY toy ideas you can play with
- Kids’ Origami: Cute and Easy Ideas to Make for a Birthday
- [Kids] Let’s Make Origami! A Collection of Easy Goldfish Folding Methods
- At the End of Preschool Practicum: Simple and Cute Handmade Gifts
Origami Toys That Move and Can Be Played With (11–20)
How to fold a flower-like spinning topNEW!

Here’s how to fold a flower-like spinning top from a single sheet.
Double-sided origami paper is recommended.
First, fold into a triangle twice and a square twice, then open it up.
Follow the lines to make a “zabuton” base.
With the open side as the axis, fold up the edges on both sides.
Open the folded sections and squash-fold them.
After folding the bottom downward, fold the top edge downwards.
Keep folding so the lower and upper parts overlap, and finally twist the axis part with a flower-like image in mind to finish! It’s easy for kids to make, too.
How to fold a unicorn finger puppetNEW!

The unicorn finger puppets made with origami paper, a pen, scissors, and glue combine the processes of folding, cutting, pasting, and drawing.
Since they’re finished in a shape that fits on your finger, their biggest appeal is that you can play with them right away after completion.
The horn is made by snipping with scissors and folding, and the facial expression is drawn with a pen.
The impression changes depending on how you draw the eyes and mouth, allowing each creator’s individuality to shine through.
Another feature is that you can move them as you play, and making several can lead to interactive play.
It’s an origami idea that lets you enjoy both the making process and the playtime.
Easy-to-play! How to fold a spinning topNEW!

Here’s an easy and cool way to fold a spinning top.
Please prepare three sheets of origami paper.
First, fold the paper in half into a square twice.
Open it and fold it into a triangle twice.
Open it, fold it like a boat, then squash it into a square.
Using the center as the axis, fold up the edges of each of the four squares.
Open the folded sections and squash-fold them.
Use the remaining two sheets to fold the center and the top’s axle.
Align the center and the axle, and you’re done! If you make them in various sizes, they also make great decorations, so I recommend it.
Super easy! How to fold a spinning topNEW!

Here’s an easy way to fold a spinning top that even small children can make.
First, fold it into a triangle twice and open it back up.
Once open, fold all four corners toward the center.
Fold each of the four edges slightly inward.
Using the creases you made, fold the center corners outward.
Fold the triangular parts inward.
Finally, make firm creases so that the square lines become the top’s axis.
If it spins well, you’re done! The folding method is simple, so if it doesn’t spin well, try sharpening the creases or making small adjustments.
Pop-out Sword
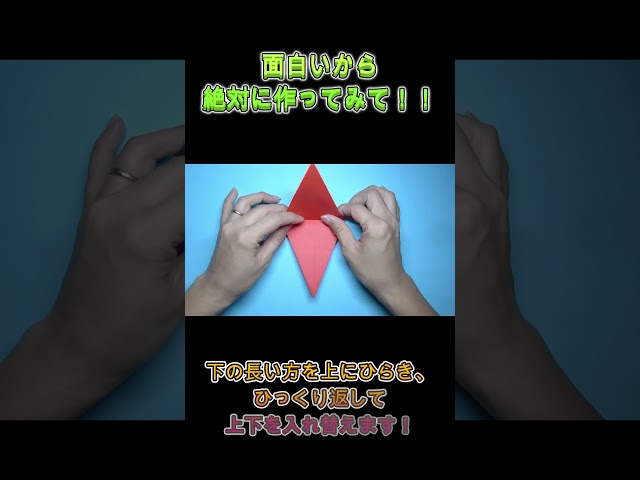
A pop-out sword is really captivating, isn’t it? When making this sword, I recommend using double-sided origami paper.
Up to a certain point, the folding process is similar to the crane, but be careful with the step where you open the longer lower part upward, flip it over, and swap top and bottom—this is easy to get wrong.
Follow the crease lines for a mountain fold, and then proceed carefully with the flip-and-fold section, as it forms the crucial base of the sword.
Once you make the sword’s guard, it’s complete! If you use slightly larger origami paper, you’ll end up with a big, cool-looking sword.
Spins well! A top like a BeybladeNEW!
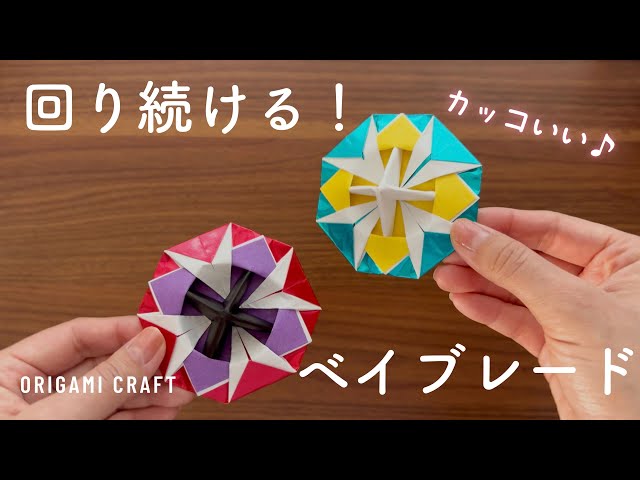
A Beyblade that you can easily spin just by pulling a ripcord is appealing not only for how it works but also for its cool design.
When you finish making this origami Beyblade, it will also have a cool pattern.
You’ll make three parts: the outer body, the inner body, and the handle.
The design section is created by folding the outer body.
First, fold the left and right edges of the origami to meet at the center, then fold the top and bottom edges the same way.
Next, open the top and bottom pockets into boat shapes, and then open the left and right sides of the boats into squares.
From there, keep flipping the paper over while making creases to change it into a diamond shape and form the pattern.
The inner part and the handle can be made with the “zabuton” (cushion) fold, so if you like, try making it and have fun playing with it.
How to fold a playable spinning topNEW!

Here’s a simple spinning top idea made with two sheets of origami paper.
If you can do the “zabuton fold,” where you fold all four corners toward the center, you can make it.
Use the first sheet for the body of the top and the second sheet for the handle.
For the body, do one zabuton fold, then flip the paper over and fold the same way.
Flip the paper over once more and do another zabuton fold.
Then fold the four corners that have gathered on the back outward into triangles, and the body is done.
For the handle, do the zabuton fold three times in a row without flipping, then valley-fold along the diagonal and press it flat.
Insert the handle into the inner, folded-back section of the body to complete the top.
Let’s blow and play! How to fold a blow-top (spinning top you spin by blowing)NEW!

This is a fun blow-top origami that spins when you blow on it.
First, prepare two square sheets of origami paper, and place one with the colored side facing down.
Fold it in half into a triangle, then fold it into a triangle once more.
Open it up, then fold it in half into a square and continue with the “zabuton” (cushion) fold.
Using the closed side as the axis, fold up the left and right edges on both sides.
Fold down the triangles on the two faces.
Make two of these and fit them together.
Try blowing on it with a “fuu—.” Blow strongly or gently and enjoy the differences in how it spins!
How to fold a jack-in-the-box

We’ll use two boxes to make a drawer and put a spring with a pasted-on rabbit inside to create a jack-in-the-box.
For the spring, we’ll use accordion-folded origami.
To make the box, first fold the top and bottom corners of the origami to the center, then overlap the top and bottom and fold it into thirds to create crease lines.
Next, fold in the left and right sides to form the box shape.
The drawer part is basically made the same way, but if you use origami of the same size, it won’t fit, so first fold about 1 cm along two edges to reduce the size, then fold it.
Since we also want to add a handle, when folding in the right corner, fold it so that a flap sits on the top of the side as a handle.
This is a house-shaped version, so let’s also make a roof using a half sheet of origami.
How to fold a Pac-Pac AnpanmanNEW!

Here’s an idea to adapt the classic origami “fortune teller” into Anpanman.
First, do the blintz fold twice and complete the fortune teller.
Then paste a slightly smaller piece of red origami paper inside the fortune teller, fold it into a triangle twice to create an X-shaped crease.
Apply glue to the top and bottom two of the four triangles formed by the creases, fold it in half along the vertical center line, and press firmly to secure.
This creates Anpanman’s mouth.
Finally, round off the edges of the finger holes on the back, attach the facial parts, and you’re done!