Kids will love it! Easy origami ideas—great as gifts too!


How about creating a special moment with a moving origami gift that makes children’s eyes light up? Shake it and—pop! We’ll introduce origami ideas that look like ordinary paper crafts but are packed with playful surprises, like a cracker that makes a popping sound when you shake it, a top that spins smoothly, and cherry blossoms that bloom when sprinkled with water.
These moving origami creations are easy to make yet guaranteed to delight kids, perfect for birthdays and celebrations or even for a small everyday surprise.
Craft a heartfelt gift and enjoy a fun time together!
- [Origami] She’ll love it if you fold these! Simple ideas for girls
- Cool origami that boys will love and want to fold
- Simple origami that can be folded from a single sheet
- Cute Origami Ideas for Girls
- Origami ideas boys will want to make!
- Let's make it with origami! Ideas for simple 3D creations
- Popular characters that are easy to make with origami. A collection of creations you can enjoy with children.
- [For Kids] Let's Fold! Today's Origami Idea Collection
- It moves! You can play with it! Fun origami. How to make origami toys.
- Made of paper! A fun collection of DIY toy ideas you can play with
- Kids’ Origami: Cute and Easy Ideas to Make for a Birthday
- [Kids] Let’s Make Origami! A Collection of Easy Goldfish Folding Methods
- At the End of Preschool Practicum: Simple and Cute Handmade Gifts
Origami Toys That Move and Can Be Played With (31–40)
Rocket

This is an origami rocket that really takes off.
The idea is literally to fold it into the shape of a rocket, with the key point being that the inside is hollow.
Once it’s finished, prepare a bendable straw.
Bend it into an L-shape so the mouthpiece points upward, then place the rocket over the tip.
After that, blow hard and the rocket should launch with a burst of speed.
Since you’re at it, you might draw rocket-style illustrations on it or make it using origami paper with space-themed patterns.
A bat flapping its wings
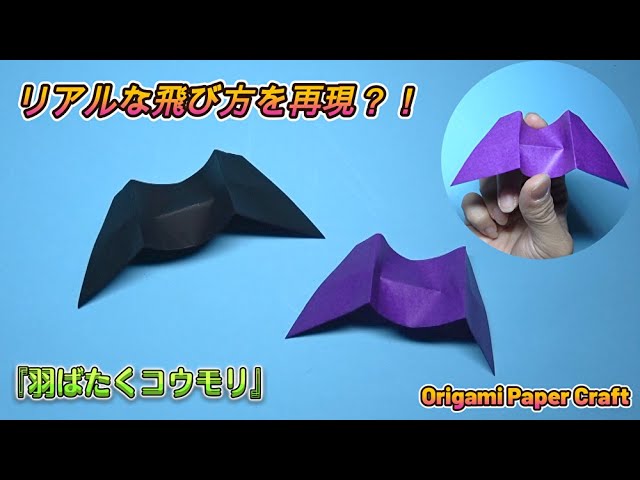
Bats are nocturnal animals that hide in places like caves during the day and are active at night.
This origami bat flaps its wings when you press it with your finger.
After cutting the origami paper in half, use just one of the halves to fold.
Lightly creasing certain parts with a pinch of your fingers is the key to creating the wing-flapping motion.
Insert your index finger to shape the wings, make firm creases on both sides, and once you’ve formed the movable wing section, it’s complete! When you make it move, don’t use too much force—gently flap the wings.
Cute heart letter

You’ll need two sheets of origami paper because the letter and the heart are made separately.
First, place the paper face up with one edge toward you.
Fold it in half into a square twice to make creases, then fold the front edge up to the center line twice.
Next, fold both corners up into triangles.
Fold the left and right edges inward to align with the triangles.
Fold the top corner down to meet the center—your letter is done.
For the heart, fold the origami paper into a square twice to make creases.
Fold the front edge up to the center, then fold both left and right edges to the center.
Fold both pre-folded edges up to the center.
Fold the front edge up to the top edge, then keep folding so the heart appears on the back—done! Slip the heart into the letter.
Pac-Pac Fish

It’s a snap-up fish you can make and play with.
This idea folds a fish with a wide-open mouth.
Just by changing the colors and the shape of the eyes you add later, you can create fish with lots of personality.
The biggest feature of this idea is the movable mouth.
Lightly press the fish’s wide-open mouth to make it open and close.
It looks like it’s talking or eating.
It only takes about 4 minutes, so it’s fun to make a bunch and line them up.
How to fold a playable Anpanman spinning topNEW!

Let’s make a Beyblade you can easily battle with using origami! In this idea, you’ll use four sheets of origami paper to create the outer body, inner body, handle, and hand decorations, then combine them into a single Beyblade.
The inner body and handle are basically made with the zabuton fold.
The outer body follows the same steps as the trick boat up to a point.
After making two boats, squash both sides into squares, then transform them into diamond shapes.
Draw the Anpanman illustration on this part.
Finally, make four hand decorations using origami paper cut into quarters, insert them into the illustrated section, and you’re done! The folding steps themselves aren’t difficult, so it’s perfect for parent-child origami time.
paper airplane

Origami that you can make and play with is popular among children.
How about making a paper airplane out of origami and giving it as a gift? There are many ways to fold a paper airplane, but this time we’ll share an idea for one that flies smoothly.
All you need is a rectangular sheet of paper and a stapler.
The steps are simple, so it’s great that you can make it quickly with things you already have at home! After giving it as a present, you can have fun flying the paper airplanes together or folding them together.
Definitely give it a try!
finger trap
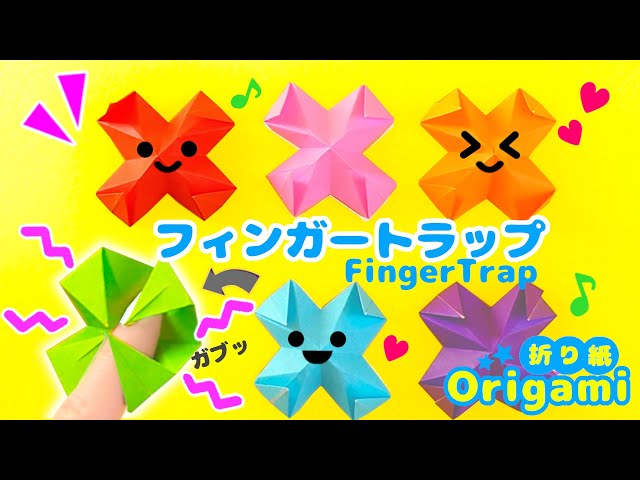
Let’s make a finger trap that snaps and “eats” your finger when you press the center with your finger! Fold the origami paper into a triangle twice, then squash the pocket to form a square.
With the opening facing down, fold the lower left and right edges to align with the center line.
Do the same on the other side.
Open all the folds and return the paper to its original shape, then make a slit in the middle of each edge.
Using the slits and the crease lines, form a shape like a throwing star (shuriken), then flip the paper over and fold the four pointed parts inward.
Finally, use the crease lines so that the center section pops up into a mountain fold, and you’re done! Drawing a face on it makes it look more creature-like, which is highly recommended!
umbrella
@kodomokosaku I tried making an umbrella using origami. You can open and close it 😳 I’ve posted a slightly slower version on YouTube.Origami folding instructions#diygirlOrigami play#AtHomePlay
♬ Next Generation Girls Pop Rock Anime Song(189386) – DIGM
How about trying a pop-up origami idea that opens and closes and moves just like the real thing—an umbrella? Make lots of creases as you would when folding a crane, so it keeps its three-dimensional shape when opened.
Prepare two of these folded pieces; add cuts or other tweaks to one of them, then stack them and glue them together once they’re done.
Finally, thread a pipe cleaner through the center to serve as the handle, and you’re finished! There are plenty of fine steps, but the sense of accomplishment after you make it is all the greater.
Spiraling fall

Let’s make fluttering falling origami.
You’ll need one sheet of origami paper and a pair of scissors.
Here’s how: Fold the paper in half, then cut it in half with the scissors.
Take one of the halves and fold it in half horizontally.
Fold it in half once more, then unfold it, and cut along the vertical crease halfway down.
Fold only the fluttery side upward, then fold that same section once to the side.
Next, fold the whole piece vertically once; along the new vertical crease, make another cut halfway down, just like before.
Flip it over, and fold both top corners of the uncut section into triangles.
Finally, fold the fluttery parts so they switch to opposite sides—and you’re done! Give it a try and have fun!
Also works as a finger puppet! Shima-enaga

The long-tailed tit, known as the “snow fairy,” lives in Hokkaido.
Its plush-like round shape and beady eyes are truly adorable.
This is an origami piece inspired by that bird.
Amazingly, it can also be used as a finger puppet—an idea kids will love.
First, fold the origami paper into a triangle, then fold the left and right corners inward so they overlap at the center.
Flip the paper top to bottom, then fold the left and right corners back to form the wings.
Fold down the top corner, which becomes the head, to round it out, and tuck the bottom triangle inward to finish.
Use a pen to draw the wing patterns and face as the final touch.