Kids will love it! Easy origami ideas—great as gifts too!


How about creating a special moment with a moving origami gift that makes children’s eyes light up? Shake it and—pop! We’ll introduce origami ideas that look like ordinary paper crafts but are packed with playful surprises, like a cracker that makes a popping sound when you shake it, a top that spins smoothly, and cherry blossoms that bloom when sprinkled with water.
These moving origami creations are easy to make yet guaranteed to delight kids, perfect for birthdays and celebrations or even for a small everyday surprise.
Craft a heartfelt gift and enjoy a fun time together!
- [Origami] She’ll love it if you fold these! Simple ideas for girls
- Simple origami that can be folded from a single sheet
- Cute Origami Ideas for Girls
- Origami ideas boys will want to make!
- Let's make it with origami! Ideas for simple 3D creations
- Popular characters that are easy to make with origami. A collection of creations you can enjoy with children.
- [For Kids] Let's Fold! Today's Origami Idea Collection
- It moves! You can play with it! Fun origami. How to make origami toys.
- Cool origami that boys will love and want to fold
- Made of paper! A fun collection of DIY toy ideas you can play with
- Kids’ Origami: Cute and Easy Ideas to Make for a Birthday
- [Kids] Let’s Make Origami! A Collection of Easy Goldfish Folding Methods
- At the End of Preschool Practicum: Simple and Cute Handmade Gifts
Origami of Popular Characters, Creatures, and Foods (21–30)
How to fold Shokupanman

Dokin-chan’s crush! This is an origami model of Shokupanman.
Fold the origami paper in half into a square twice to make creases, then open it.
Fold the top and bottom edges to the center crease to make additional creases.
Fold the upper left and right corners toward the center to create diagonal creases, then refold the corners along those diagonal lines.
Next, fold the bottom edge up to the lowest crease.
Then fold the left and right edges to the central vertical crease.
Open up the slanted sections and squash-fold them to form Shokupanman’s shape.
Finally, fold the left and right corners into small triangles to finish.
How to fold Dadandan No. 2

Dadan-dan has No.
1 and No.
2, and this is No.
2, the one with four antennas on its head.
First, fold the left and right edges of the origami together in half, make a crease, and open it.
Next, while aligning the lower-left corner with this crease, fold so that the right corner becomes sharp.
Then fold the lower-right corner up to meet the folded left corner, and also fold the right edge to align with the first crease you made.
In the end, fold all the corners and edges inward to form a hexagon, and create the antennas by making cuts with scissors.
The antenna folding itself is simple, but the positions of the cuts are fixed, so be careful not to make a mistake as you proceed.
How to fold Dokin-chan

Let’s make a cute Dokin-chan with orange origami! Fold the paper into a triangle to make a crease, then rotate it so the crease is vertical.
Fold the top two edges to the crease to make additional creases, open it up, and fold the lower parts of the left and right corners to the creases you just made.
Fold along the diagonal creases and return it to shape, then flip the paper over and fold the bottom corner up.
Fold it up just enough so a little bit of orange shows on the left and right.
Fold the top corner of the folded-up section down to create Dokin-chan’s facial pattern, then flip the paper over and fold the lower left and right corners inward to refine the outline.
Next, make a stepped fold on the top corner, and narrow the left and right edges toward the center line while flattening the stepped section into a triangle to complete the horn! Make two slits on each side, then round off the horn’s tip to finish.
Shortcake in a gift box

If you want to make a wrapping box that will amaze everyone, we recommend this cake-style one.
It’s perfect for birthday celebrations and parties, of course.
You’ll need seven 15 cm × 15 cm sheets of white origami paper—these will become the box body, the lid, and the whipped cream.
For the strawberry, use one red origami sheet measuring 7.5 cm square.
You’ll also need glue, adhesive, scissors, and a craft knife.
Just looking at the materials might make it feel a bit advanced, right? The whipped cream part involves very detailed work, so if a child is giving it a try, please have an adult help with that section.
Origami of Popular Characters, Creatures, and Foods (31–40)
How to fold Rollpanna-chan

A reliable big sister to Melonpanna-chan! This is an origami piece of Rollpanna-chan.
The simple steps make it a great idea for kids to try! Place a light orange sheet of origami paper with the colored side facing up, then fold up the bottom edge about 1 cm.
Next, fold the paper in half into a square twice to make crease lines.
Once the creases are made, unfold back to the state with the bottom edge folded, and fold the left and right edges diagonally toward the center point where the creases intersect.
The remaining triangular section will be Rollpanna-chan’s face.
Finally, fold the three corners to the back with the outline in mind, and you’re done! Draw the face with a pen to finish.
Fold the whole body! How to fold Anpanman

Here’s a helpful idea when you want to make not just the face but the body too! We’ll create it in separate parts: face, nose, torso, cape, arms and legs, plus the decorative belt and face emblem.
The steps for the face and torso are the same up to a point, so it’s a good idea to fold them in parallel.
For the nose, limbs, and decorations, use smaller 7.5 cm origami paper, so please prepare 15 cm sheets cut into quarters.
Once all the parts are done, combine them to finish.
There’s a section on the cape for attaching the head, so after gluing, you won’t have to worry about the head tipping backward from its weight!
A slightly more detailed way to fold cheese
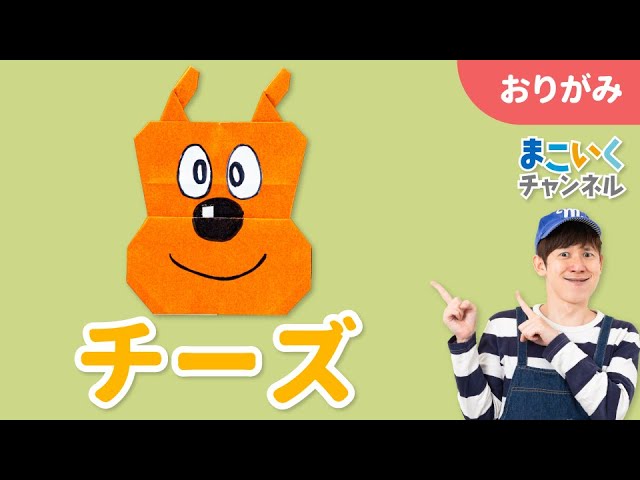
A dog named Meiken Cheese who lives in a bread factory.
You can make this origami idea with a single sheet, but since there’s one place where you need to make a cut, please prepare scissors.
First, fold the left and right edges of the origami to meet at the center to make a rectangle.
From there, create multiple horizontal crease lines and make two valley-mountain step folds to divide the paper into three sections: ears (top), the upper head, and the lower head.
The top section will be the ears, so make a cut at the center and split it into left and right.
While folding the left and right edges of the ears inward, squash the four lower corners into triangles.
Then, overlap the folded edges and tilt them diagonally to complete Meiken Cheese’s distinctive ears.
For the middle section, follow the same steps to form the outline, but fold the edges so they flare outward from the step line.
Finally, fold the lower left and right bottom corners of the bottom section into triangles, and you’re done!