Kids will love it! Easy origami ideas—great as gifts too!


How about creating a special moment with a moving origami gift that makes children’s eyes light up? Shake it and—pop! We’ll introduce origami ideas that look like ordinary paper crafts but are packed with playful surprises, like a cracker that makes a popping sound when you shake it, a top that spins smoothly, and cherry blossoms that bloom when sprinkled with water.
These moving origami creations are easy to make yet guaranteed to delight kids, perfect for birthdays and celebrations or even for a small everyday surprise.
Craft a heartfelt gift and enjoy a fun time together!
- [Origami] She’ll love it if you fold these! Simple ideas for girls
- Simple origami that can be folded from a single sheet
- Cute Origami Ideas for Girls
- Origami ideas boys will want to make!
- Let's make it with origami! Ideas for simple 3D creations
- Popular characters that are easy to make with origami. A collection of creations you can enjoy with children.
- [For Kids] Let's Fold! Today's Origami Idea Collection
- It moves! You can play with it! Fun origami. How to make origami toys.
- Cool origami that boys will love and want to fold
- Made of paper! A fun collection of DIY toy ideas you can play with
- Kids’ Origami: Cute and Easy Ideas to Make for a Birthday
- [Kids] Let’s Make Origami! A Collection of Easy Goldfish Folding Methods
- At the End of Preschool Practicum: Simple and Cute Handmade Gifts
Origami of Popular Characters, Creatures, and Foods (51–60)
Cute Patterns! How to Fold a Unicorn
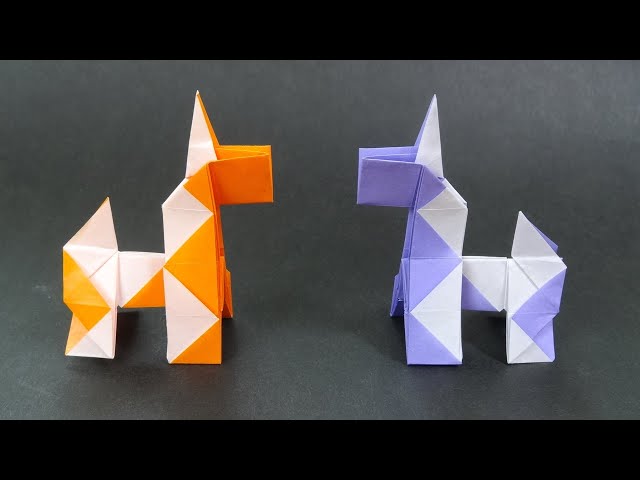
This idea is characterized by how the pattern gradually emerges as you continue folding.
Depending on the folding method, a design reminiscent of a Rubik’s Snake appears, and the overlaps of colors and patterns begin to look orderly.
Until the midway point, it’s hard to imagine the whole picture, but as it approaches completion and the shape comes together, the connections in the pattern become clear, making the sense of accomplishment at the end all the greater.
The patterns that appear on the corners and body serve as accents, adding a playful touch to the unicorn.
Even with the same folding method, the way the pattern appears differs, making it fun to compare multiple pieces; it’s unicorn origami that lets you enjoy both the folding process and the visual changes at the same time.
A 3D-cute Bulbasaur

One of the original starter Pokémon in the series, Bulbasaur, a Grass- and Poison-type.
Prepare two sheets of light green origami paper measuring 7.5 cm and one sheet of dark green origami paper.
Use the light green paper for the face and body, and the dark green paper to make the seed on Bulbasaur’s back.
For the face, start by folding into a triangle, and aim for an overall oval shape when finishing.
Don’t forget to draw the face after folding! For the body, start by making a vertical crease, fold the legs, and finish it to give a bit of three-dimensionality.
For the seed, start by folding into a triangle twice, and shape it into a plump, bulb-like form.
Finally, glue all the parts together to complete it!
How to fold a 3D Mewtwo

Mewtwo, a Pokémon artificially created based on Mew’s genes.
Prepare three sheets of standard-sized purple origami and one smaller sheet of origami.
Start by folding the small sheet into a triangle to make Mewtwo’s face.
Since the final result will be three-dimensional, draw Mewtwo’s face before shaping it to add depth.
Use the standard-sized origami to make Mewtwo’s body.
Make good use of the colored and white sides as you complete Mewtwo’s body.
Finally, assemble all the parts to finish.
When assembling, using a stapler makes it easy.
Cute and easy! Dog box

Here’s an origami idea for making a small dog-shaped box.
After folding the paper in half both ways into a square and a triangle to make creases, do a cushion fold (zabuton).
Using the creases, fold it into a square with the corners on the outside, then open the center of the square and squash it into a rectangle.
Repeat the same steps on the other side.
Turn and adjust the paper so the folded sections are on the inside, then fold the top corner of the new face down into a triangle.
Using the crease, tuck this section inward—this will be the dog’s ear.
Next, fold the left and right edges to meet the center line, and do the same on the back side, then fold the ears downward.
Open it out from the center and shape it, and your box is complete!
Cute 3D box penguin

Here’s an idea for making a 3D penguin from a single sheet of origami paper.
Fold the corners toward the center of a square, and treat those corners as the beak and hands as you continue.
First, crease the paper to create a 3×3 grid, then do a “zabuton fold.” Next, make a stepped fold on the top corner to form the beak, and use the left and right corners to form the hands.
Then mountain-fold along the vertical creases to create the head and body, and sharpen the two bottom corners to make the feet.
You’ll mainly be folding along the crease lines, so take care to make the creasing steps neatly.
Use black origami paper and cleverly make use of the white color on the back side as you work.
Also as a small item holder! Origami box rabbit

What a cute idea to make the rabbit’s body into a box.
Since the creasing steps are important for this idea, let’s proceed carefully.
First, fold the origami paper in half to make a crease, open it, and then fold it into a triangle twice.
Next, from here, make three evenly spaced creases above and below, parallel to the first crease.
Using these creases and the diagonal creases, fold in the two left corners to make the ears.
On the opposite side, add one more crease parallel to the outside of the diagonal crease and make an inside reverse fold in an M shape.
From here, fold in the sides and finish forming the box shape.
Origami of Popular Characters, Creatures, and Foods (61–70)
A box with a cute bunny-shaped face

Here’s an idea for making a box with a rabbit’s ears standing up.
First, fold the origami paper into a square and a triangle twice each to make creases.
Then do a cushion fold, and using the creases, collapse it into a square with the corners on the outside.
Open the central slit of the square and squash it into a rectangle; repeat on the other side.
Flip layers so that the folded parts end up on the inside, then fold the left and right edges of the revealed face to the center line.
These will be the rabbit’s ears.
Fold the back side the same way, then open it out from the center to complete the box.