[Childcare] Wind chime craft ideas

How about making wind chimes—one of the symbols of summer—as a seasonal craft activity?
This article introduces wind chime craft ideas that are useful in early childhood education.
While many wind chimes are made of glass, here we’ve gathered ideas that use kid-friendly materials like plastic bottles, paper cups, and construction paper.
You’ll find lots of variations, such as wind chimes featuring animals kids love, wind chimes with tanzaku strips that can double as Tanabata decorations, and wind chimes with bells that jingle when they sway.
Give your favorite wind chime a try!
- [Childcare] Fun craft ideas and craft activities perfect for summer
- Preschool: Lantern craft ideas to make in summer!
- [Nursery/Daycare] Recommended for Summer Festivals! A Collection of DIY Game Ideas
- [Childcare] A roundup of summer craft ideas to enjoy with 2-year-olds
- [Childcare] August Crafts: Cute Ideas to Make in Summer
- [Childcare] Summer wall display ideas: fun summer craft activities
- [Childcare] Craft ideas perfect for June
- [Childcare] A roundup of craft ideas for 1-year-olds, perfect for summer
- [Childcare] Simple Tanabata decoration ideas made with origami
- [For 3-year-olds] A roundup of craft ideas to enjoy in summer! Introducing various motifs and techniques
- Fun summer activities for kids: ideas you’ll want to try in childcare and at home
- Fun to make in childcare! A collection of easy origami ideas recommended for July
- [Childcare] Shaved Ice Craft Ideas by Age and Materials
[Childcare] Wind Chime Craft Ideas (1–10)
paper-cup wind chime

Let’s make wind chimes using paper cups.
Because the materials are familiar, children will be interested and eager to participate.
Patterned paper cups are, of course, cute, but it’s also great to have the kids draw on white construction paper and then stick it onto the cups! Once the body is ready, make a hole in the paper cup and thread twine through to attach a bell and a strip of paper.
Since this involves fine work, the teacher should handle it.
If you choose construction paper for the strip as well, the children can create their own original designs.
Displaying the wind chimes in the classroom will bring a cool, refreshing atmosphere.
goldfish wind chime

How about a refreshing wind chime collaborated with goldfish? The top part of the wind chime can be made using a PET bottle cut to about one-third, or an empty pudding or jelly cup.
Feel free to decorate it by drawing pictures or adding stickers.
You could also draw goldfish here.
Then, instead of a paper strip, attach goldfish made from various materials, along with a small bell, and it’s complete.
For the goldfish in place of the strip, try folding origami, cutting them out of construction paper, or weaving them with masking tape.
jellyfish wind chime
Wind chimes and jellyfish have similar shapes, don’t they? So how about making a jellyfish-shaped wind chime? Use empty pudding or jelly cups as the jellyfish’s head, then decorate them by adding eyes or sticking on stickers.
Attach several strands of glittery origami strips or cellophane tape underneath to create the tentacles.
Finally, add a string and thread a small bell so it makes sound—done! Not only the bell’s chime, but just watching it sway gently will make you feel cool and refreshed.
[Childcare] Wind Chime Craft Ideas (11–20)
Octopus wind chime
Let’s make a cute octopus-shaped wind chime! For an octopus-shaped wind chime, paper cups are recommended.
First, draw the octopus from head to tentacles on the paper cup.
For the suction cups, using finger stamps is recommended—it makes it easy to create lots of them quickly.
Once the drawing is done, cut slits so you have eight legs, then spread them out and curl them outward.
After that, thread a string through and attach a bell and a tanzaku strip to finish.
You can use the same method to make squid or jellyfish, too.
flower wind chime
Let’s make a pretty, flower-like wind chime! If you want an easy method, using tissue paper (ohana-gami) is recommended.
Cut a clear plastic file into a circle like a wind chime and stick small, crumpled pieces of tissue paper onto it.
If you put double-sided tape on the clear file side, even infants can handle the steps up to crumpling and sticking! Once you’ve attached enough tissue paper, thread a string through, add a strip (tanzaku) and a small bell, and it’s done! Using multiple colors of tissue paper instead of just one will give it a more festive, vibrant look.
Paint your own design on a ceramic wind chime!
Prepare a plain ceramic wind chime with no design on it, and try making your own original wind chime.
When you paint on the ceramic, be sure to use paints or pens made for ceramics.
You can draw various patterns, your favorite characters, or cover it solidly with color until no white shows—feel free to draw however you like! Once you’ve finished the design, thread a string through it and attach a tanzaku (paper strip) and a small weight that makes the sound, and you’re done.
Decorate the tanzaku freely as well, and create a one-of-a-kind wind chime just for you.
Crab wind chime
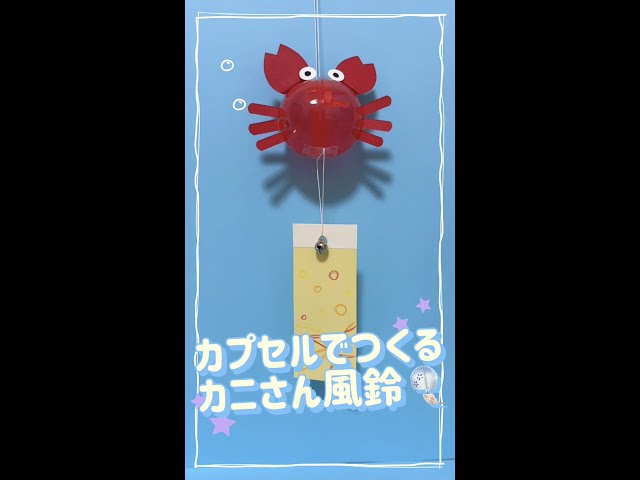
Let’s try making a summer-themed wind chime shaped like a crab that lives in the sea or rivers.
The recommended material is a capsule from a gacha machine.
Once you have a red capsule or another color that suits a crab, attach eyes and limb parts made from construction paper.
After that, thread a strip of paper and attach a bell, and it’s complete! It might be best for the teacher to prepare the strip and crab parts in advance, and have the children do the steps of sticking on the parts and drawing on the strip.
Enjoy summer with a wind chime that’s a little different from the usual.